electrolux e:line rangehoods rangehood installation / installation sequence 5

Rangehood installation


electrolux e:line rangehoods installation / using the rangehood 6

Installation

Using the rangehood – ERCM9010AS

ERCM9010AS

ERCE9020AS

(rear to wall)

ceiling mounted bracket

155mm

46mm

(recommended area behind flue cover for power point location)

344mm

303mm

37mm

155mm

ceiling

Distance from hood base to top of hob

hob type

minimum*

maximum

gas

650mm

800mm

electric

600mm

800mm

*If the instructions of the hob specify a greater distance than the minimum above, then that shall be the minimum height for installation

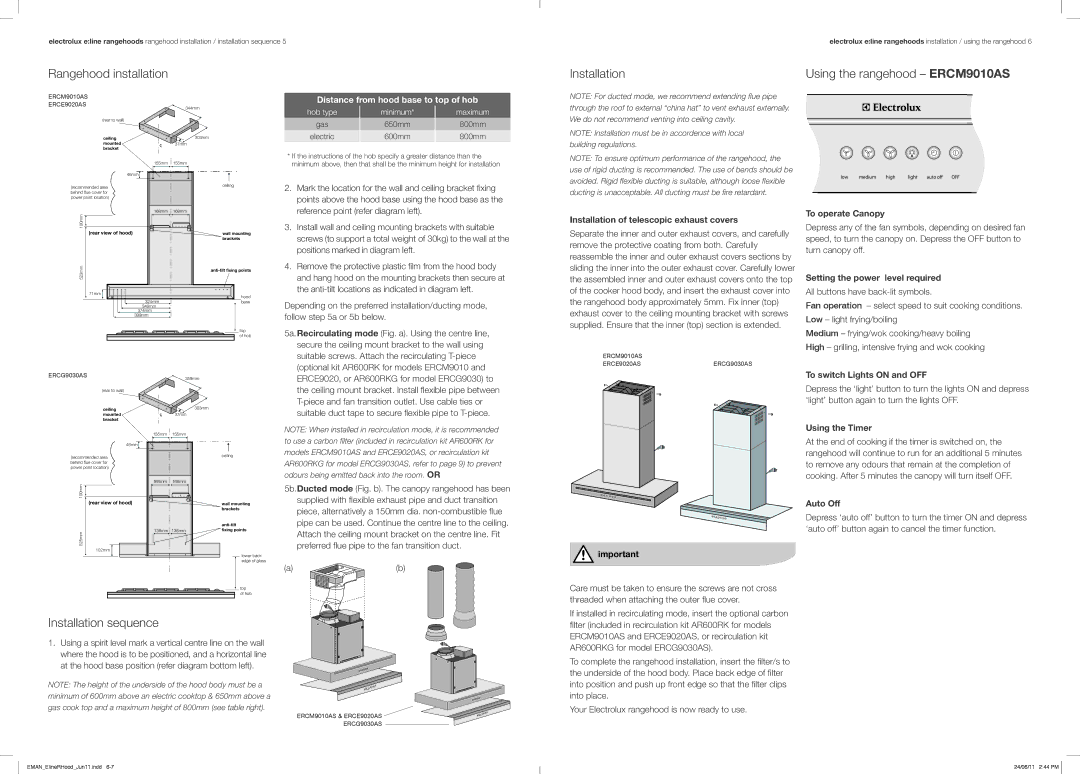
2. Mark the location for the wall and ceiling bracket fixing

points above the hood base using the hood base as the

NOTE: For ducted mode, we recommend extending flue pipe through the roof to external “china hat” to vent exhaust externally. We do not recommend venting into ceiling cavity.

NOTE: Installation must be in accordence with local building regulations.

NOTE: To ensure optimum performance of the rangehood, the use of rigid ducting is recommended. The use of bends should be avoided. Rigid flexible ducting is suitable, although loose flexible ducting is unacceptable. All ducting must be fire retardant.


low

medium

high

light

auto off

OFF


168mm

100mm

(rear view of hood)

523mm

71mm

324mm

349mm 374mm

399mm

168mm

wall mounting brackets

anti-tilt fixing points

hood base

top

of hob


reference point (refer diagram left).

3.

Install wall and ceiling mounting brackets with suitable


screws (to support a total weight of 30kg) to the wall at the


positions marked in diagram left.

4.

Remove the protective plastic film from the hood body


and hang hood on the mounting brackets then secure at


the anti-tilt locations as indicated in diagram left.

Depending on the preferred installation/ducting mode, follow step 5a or 5b below.

5a.Recirculating mode (Fig. a). Using the centre line, secure the ceiling mount bracket to the wall using suitable screws. Attach the recirculating T-piece (optional kit AR600RK for models ERCM9010 and

Installation of telescopic exhaust covers

Separate the inner and outer exhaust covers, and carefully remove the protective coating from both. Carefully reassemble the inner and outer exhaust covers sections by sliding the inner into the outer exhaust cover. Carefully lower the assembled inner and outer exhaust covers onto the top of the cooker hood body, and insert the exhaust cover into the rangehood body approximately 5mm. Fix inner (top) exhaust cover to the ceiling mounting bracket with screws supplied. Ensure that the inner (top) section is extended.

ERCM9010AS

ERCE9020ASERCG9030AS

To operate Canopy

Depress any of the fan symbols, depending on desired fan speed, to turn the canopy on. Depress the OFF button to turn canopy off.

Setting the power level required

All buttons have back-lit symbols.

Fan operation – select speed to suit cooking conditions. Low – light frying/boiling

Medium – frying/wok cooking/heavy boiling High – grilling, intensive frying and wok cooking

ERCG9030AS

359mm


(rear to wall)

ceiling

303mm


mounted

37mm

bracket


ERCE9020, or AR600RKG for model ERCG9030) to the ceiling mount bracket. Install flexible pipe between T-piece and fan transition outlet. Use cable ties or suitable duct tape to secure flexible pipe to T-piece.

To switch Lights ON and OFF

Depress the ‘light’ button to turn the lights ON and depress ‘light’ button again to turn the lights OFF.

46mm

(recommended area behind flue cover for power point location)

100mm (rear view of hood)

525mm 102mm

155mm 155mm

168mm 168mm

138mm 138mm

ceiling

wall mounting brackets

anti-tilt fixing points

lower back edge of glass

top

of hob

NOTE: When installed in recirculation mode, it is recommended to use a carbon filter (included in recirculation kit AR600RK for models ERCM9010AS and ERCE9020AS, or recirculation kit AR600RKG for model ERCG9030AS, refer to page 9) to prevent odours being emitted back into the room. OR

5b.Ducted mode (Fig. b). The canopy rangehood has been

supplied with flexible exhaust pipe and duct transition piece, alternatively a 150mm dia. non-combustible flue pipe can be used. Continue the centre line to the ceiling. Attach the ceiling mount bracket on the centre line. Fit preferred flue pipe to the fan transition duct.

(a)

(b)

important

Care must be taken to ensure the screws are not cross threaded when attaching the outer flue cover.

Using the Timer

At the end of cooking if the timer is switched on, the rangehood will continue to run for an additional 5 minutes to remove any odours that remain at the completion of cooking. After 5 minutes the canopy will turn itself OFF.

Auto Off

Depress ‘auto off’ button to turn the timer ON and depress ‘auto off’ button again to cancel the timer function.

Installation sequence

1. Using a spirit level mark a vertical centre line on the wall where the hood is to be positioned, and a horizontal line at the hood base position (refer diagram bottom left).

NOTE: The height of the underside of the hood body must be a minimum of 600mm above an electric cooktop & 650mm above a

gas cook top and a maximum height of 800mm (see table right).

ERCM9010AS & ERCE9020AS

ERCG9030AS

If installed in recirculating mode, insert the optional carbon filter (included in recirculation kit AR600RK for models ERCM9010AS and ERCE9020AS, or recirculation kit AR600RKG for model ERCG9030AS).

To complete the rangehood installation, insert the filter/s to the underside of the hood body. Place back edge of filter into position and push up front edge so that the filter clips into place.

Your Electrolux rangehood is now ready to use.

EMAN_ElineRHood_Jun11.indd 6-7

24/06/11 2:44 PM

Page 4
Image 4
Electrolux ERCE9020AS Rangehood installation, Installation Using the rangehood ERCM9010AS, Installation sequence

ERCE9020AS, ERCG9030AS, ERCM9010AS specifications

The Electrolux ERCM9010AS, ERCG9030AS, and ERCE9020AS are cutting-edge home appliances that embody innovation and efficiency in kitchen design. These models blend functionality with aesthetic appeal, making them an excellent choice for modern households.

The Electrolux ERCM9010AS is a standout built-in microwave that offers an array of features tailored for convenience. Its spacious interior provides ample room for cooking a variety of dishes, while the advanced sensor cooking technology ensures optimal results every time. The microwave automatically adjusts cooking time and power levels based on the food being prepared, eliminating the guesswork associated with traditional cooking methods. Additionally, its sleek stainless steel exterior not only enhances the kitchen’s visual appeal but is also easy to clean.

Meanwhile, the ERCG9030AS gas cooktop is designed for the home chef who values precision and control. With its powerful burners, including a high-BTU burner for rapid boiling, this gas cooktop allows for a quick and efficient cooking experience. The continuous grates provide a seamless surface for moving pots and pans, making it easier to manage multiple dishes simultaneously. Safety features, such as the flame failure device, ensure peace of mind while cooking.

The ERCE9020AS is an electric wall oven that combines generous capacity with intelligent cooking technologies. It features a convection cooking system that circulates hot air for even baking and roasting, resulting in perfectly cooked meals. The oven includes multiple cooking modes, such as steam bake and broil, offering versatility in meal preparation. The intuitive touchscreen controls simplify operation, allowing users to set cooking times and temperatures with ease.

All three models are designed with energy efficiency in mind, contributing to lower utility bills while maintaining high performance. They incorporate innovative technologies that not only enhance cooking efficiency but also align with modern eco-conscious values. The seamless design of each appliance allows for easy integration into any kitchen layout, while the advanced features cater to both novice cooks and culinary enthusiasts.

In summary, the Electrolux ERCM9010AS microwave, ERCG9030AS gas cooktop, and ERCE9020AS electric wall oven exemplify the brand’s commitment to quality and innovation, making them perfect additions to any contemporary kitchen.