LOCATION OF APPLIANCE

This appliance must not be installed in a bed-sitting room of volume less than 20m³ or in a bathroom, shower room or garage. It is essential that the appliance is positioned as stated below. The appliance must be a minimum of 20mm from the rear wall (note that this dimension is provided by the inlet elbow). Shelves, wall cabinets and cooker hoods must not be fitted closer than 500mm to the top of the grill canopy or within 100mm of the sides of the grill. Curtains must not be fitted immediately behind the appliance or within 200mm of the sides of the grill. If fitted next to or between two base units a minimum space of 1mm must be left between the units and the sides of the appliance. The hotplate must be set to a minimum of 7mm above the adjacent units (note that the levelling feet fitted to the appliance will achieve a nominal height to hotplate level of 907mm -5+13mm). Base units not meeting the above conditions must be a minimum of 100mm away from the hotplate. L.P.G. cookers MUST NOT be installed below ground level, i.e. in a basement or fitted aboard any boat, yacht or other vessel.

INSTALLATION

1.PARTS REQUIRED

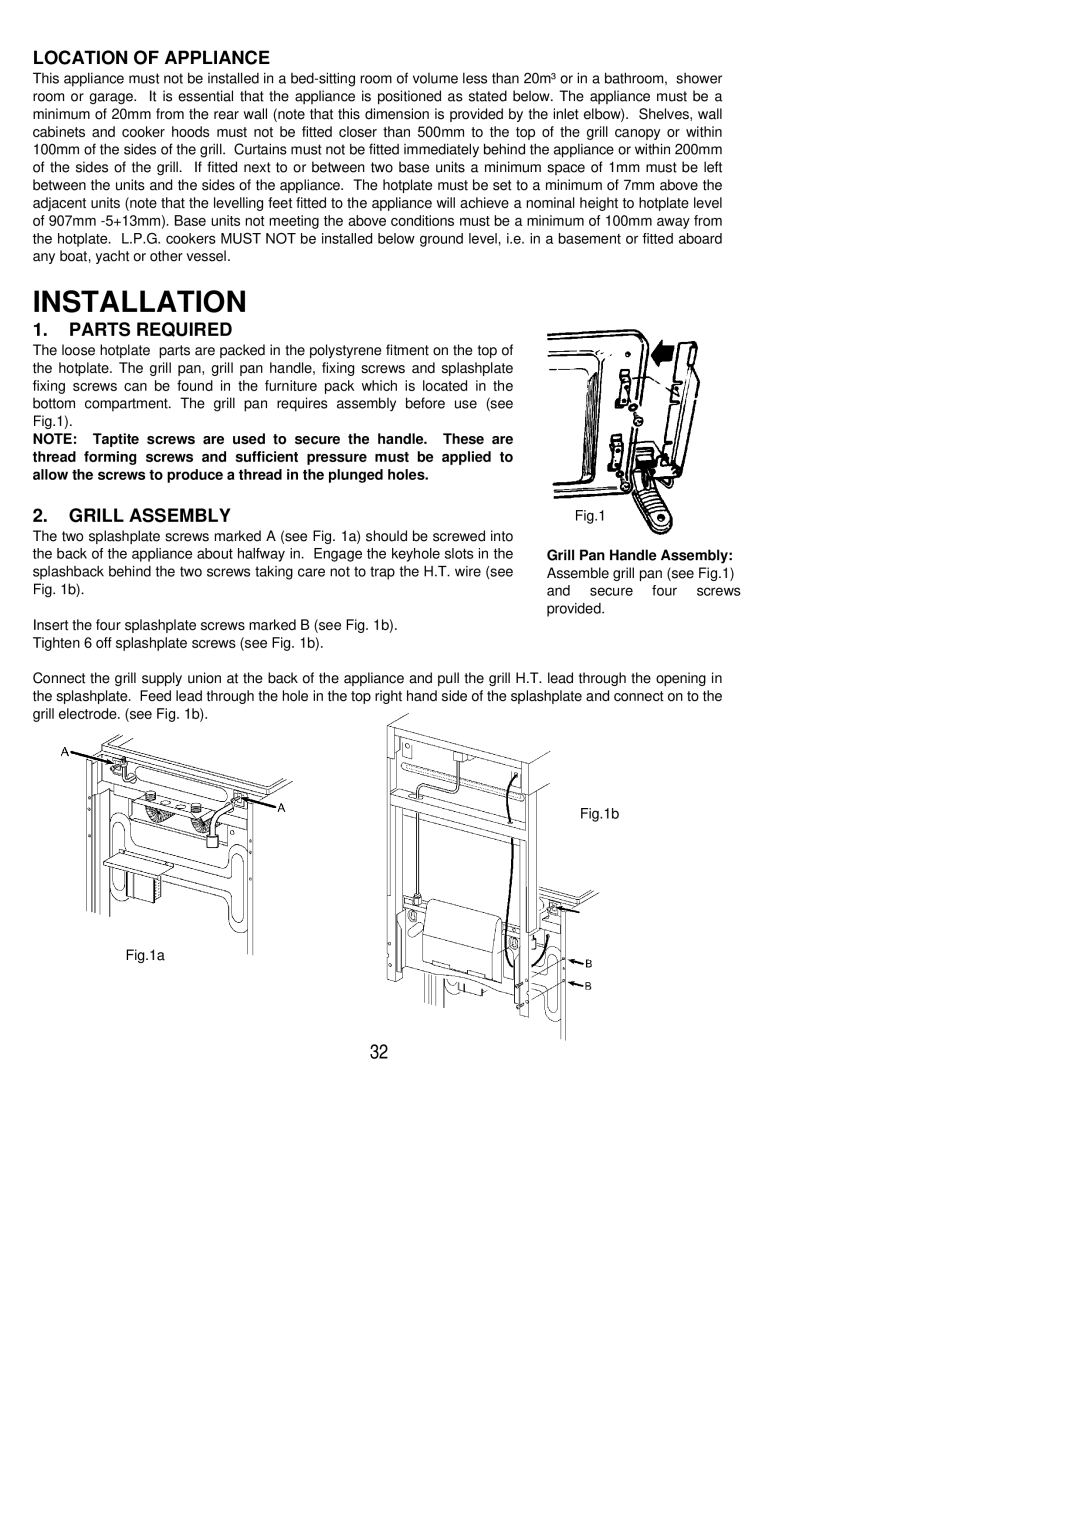
The loose hotplate parts are packed in the polystyrene fitment on the top of the hotplate. The grill pan, grill pan handle, fixing screws and splashplate fixing screws can be found in the furniture pack which is located in the bottom compartment. The grill pan requires assembly before use (see Fig.1).

NOTE: Taptite screws are used to secure the handle. These are thread forming screws and sufficient pressure must be applied to allow the screws to produce a thread in the plunged holes.

2.GRILL ASSEMBLY

The two splashplate screws marked A (see Fig. 1a) should be screwed into the back of the appliance about halfway in. Engage the keyhole slots in the splashback behind the two screws taking care not to trap the H.T. wire (see Fig. 1b).

Insert the four splashplate screws marked B (see Fig. 1b). Tighten 6 off splashplate screws (see Fig. 1b).

Fig.1

Grill Pan Handle Assembly:

Assemble grill pan (see Fig.1) and secure four screws provided.

Connect the grill supply union at the back of the appliance and pull the grill H.T. lead through the opening in the splashplate. Feed lead through the hole in the top right hand side of the splashplate and connect on to the grill electrode. (see Fig. 1b).

Fig.1b

Fig.1a

32

Page 32
Image 32
Electrolux LYRIC 55M1 installation instructions Location of Appliance, Parts Required, Grill Assembly

LYRIC 55M1 specifications

The Electrolux LYRIC 55M1 is a highly sophisticated smart refrigerator that epitomizes modern kitchen technology and convenience. Designed with innovation and user-friendliness in mind, it offers a seamless blend of style, functionality, and energy efficiency.

One of the standout features of the LYRIC 55M1 is its smart connectivity. Equipped with Wi-Fi capabilities, users can monitor and control the refrigerator remotely through a dedicated mobile app. This feature enables alerts for temperature fluctuations, door openings, or when it's time to replace filters, ensuring that your food stays fresh at all times. The app also allows users to create shopping lists and check the contents of the fridge without opening it, making meal planning extremely efficient.

The interior design of the Electrolux LYRIC 55M1 is as impressive as its smart features. It offers a spacious 500 liters of storage capacity, accommodating a variety of food items and drinks. The adjustable shelving allows customization based on individual storage needs, while the spacious crisper drawers maintain optimal humidity levels for fruits and vegetables. LED lighting illuminates the interior, providing excellent visibility and a sleek aesthetic.

In terms of temperature control, the LYRIC 55M1 features a multi-air flow system that ensures even cooling throughout the refrigerator. This technology prevents hot spots and keeps food at the ideal temperature, contributing to longer freshness. The inverter compressor is not only quiet but also energy-efficient, reducing overall power consumption and contributing to lower energy bills.

Additionally, the Electrolux LYRIC 55M1 incorporates advanced filtration systems to purify the air inside the refrigerator. This helps to minimize odors and keeps produce fresher for longer. The built-in water and ice dispenser provides instant access to chilled water and ice, enhancing convenience.

With a sleek exterior design, the LYRIC 55M1 adds a touch of elegance to any kitchen, available in various color options to suit different styles. The energy efficiency rating is commendable, making it an environmentally conscious choice.

In summary, the Electrolux LYRIC 55M1 combines smart technology with user-friendly features, ample storage space, and efficient performance. It is an excellent choice for households seeking a reliable, stylish, and high-tech refrigeration solution that enhances food preservation and overall kitchen experience.