Authorized Emerson Fan Dealer www.NovaLightingStore.com 800-860-1207

How to Put Your Ceiling Fan Together

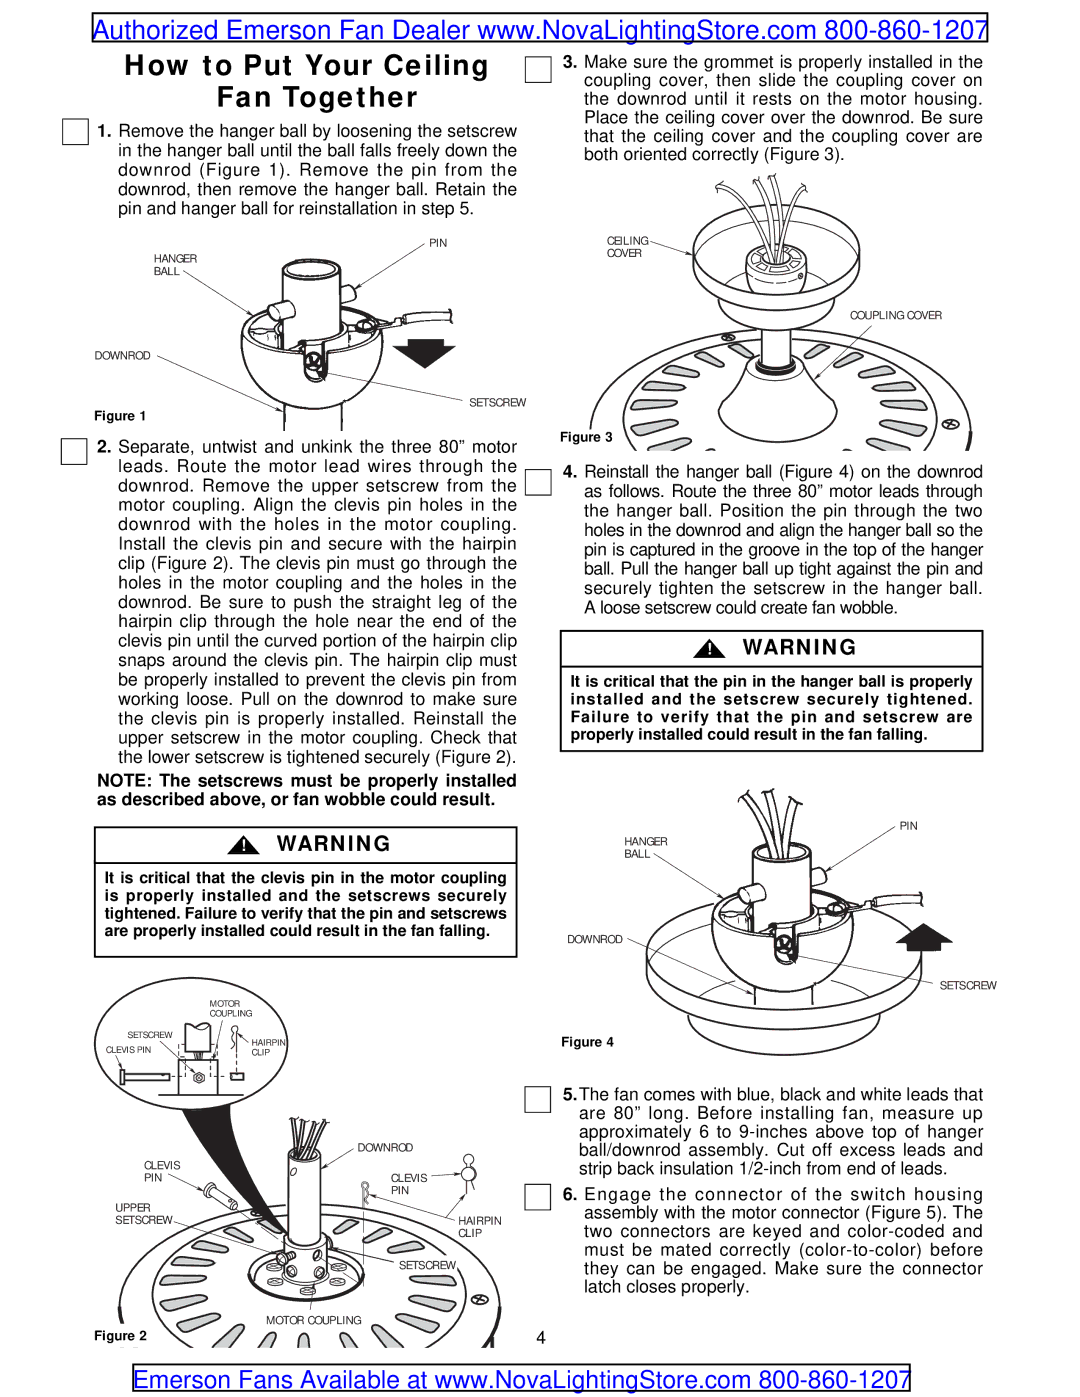
1.Remove the hanger ball by loosening the setscrew in the hanger ball until the ball falls freely down the downrod (Figure 1). Remove the pin from the downrod, then remove the hanger ball. Retain the pin and hanger ball for reinstallation in step 5.

PIN

HANGER

BALL

DOWNROD

SETSCREW

Figure 1

2.Separate, untwist and unkink the three 80” motor leads. Route the motor lead wires through the downrod. Remove the upper setscrew from the motor coupling. Align the clevis pin holes in the downrod with the holes in the motor coupling. Install the clevis pin and secure with the hairpin clip (Figure 2). The clevis pin must go through the holes in the motor coupling and the holes in the downrod. Be sure to push the straight leg of the hairpin clip through the hole near the end of the clevis pin until the curved portion of the hairpin clip snaps around the clevis pin. The hairpin clip must be properly installed to prevent the clevis pin from working loose. Pull on the downrod to make sure the clevis pin is properly installed. Reinstall the upper setscrew in the motor coupling. Check that the lower setscrew is tightened securely (Figure 2).

NOTE: The setscrews must be properly installed as described above, or fan wobble could result.

!WARNING

It is critical that the clevis pin in the motor coupling is properly installed and the setscrews securely tightened. Failure to verify that the pin and setscrews are properly installed could result in the fan falling.

MOTOR

COUPLING

SETSCREW

HAIRPIN

CLEVIS PIN

CLIP

3.Make sure the grommet is properly installed in the coupling cover, then slide the coupling cover on the downrod until it rests on the motor housing. Place the ceiling cover over the downrod. Be sure that the ceiling cover and the coupling cover are both oriented correctly (Figure 3).

CEILING

COVER

COUPLING COVER

Figure 3

4.Reinstall the hanger ball (Figure 4) on the downrod as follows. Route the three 80” motor leads through the hanger ball. Position the pin through the two holes in the downrod and align the hanger ball so the pin is captured in the groove in the top of the hanger ball. Pull the hanger ball up tight against the pin and securely tighten the setscrew in the hanger ball. A loose setscrew could create fan wobble.

!WARNING

It is critical that the pin in the hanger ball is properly installed and the setscrew securely tightened. Failure to verify that the pin and setscrew are properly installed could result in the fan falling.

PIN

HANGER

BALL

DOWNROD

SETSCREW

Figure 4


DOWNROD

CLEVIS


PIN

CLEVIS


PIN

UPPER


SETSCREW

HAIRPIN


CLIP


SETSCREW

MOTOR COUPLING

Figure 2

5.The fan comes with blue, black and white leads that are 80” long. Before installing fan, measure up approximately 6 to 9-inches above top of hanger ball/downrod assembly. Cut off excess leads and strip back insulation 1/2-inch from end of leads.

6.Engage the connector of the switch housing assembly with the motor connector (Figure 5). The two connectors are keyed and color-coded and must be mated correctly (color-to-color) before they can be engaged. Make sure the connector latch closes properly.

4

Emerson Fans Available at www.NovaLightingStore.com 800-860-1207

Page 4
Image 4
Emerson CF759OB00 warranty How to Put Your Ceiling Fan Together

CF759OB00 specifications

The Emerson CF759 series ceiling fans, comprising models CF759PB00, CF759AB00, CF759WW00, CF759TG00, and CF759OB00, represent a pinnacle of versatility and performance in residential ceiling fans. With a focus on functionality and aesthetics, these fans are designed to enhance comfort while contributing to the overall decor of any room.

One of the main features of the Emerson CF759 models is their sleek and aerodynamic blade design, which ensures optimal airflow and energy efficiency. The fans come equipped with powerful motors that provide high performance while minimizing noise, making them perfect for bedrooms, living rooms, and other spaces where peace and quiet are essential.

Another notable characteristic of the CF759 series is their range of finishes. Each model boasts a unique color schemeā€”PB00 features polished brass, AB00 showcases antique bronze, WW00 is styled in a modern white finish, TG00 offers a traditional textured globe, and OB00 presents an elegant oil-rubbed bronze. This variety allows homeowners to select a fan that best complements their interior design.

The CF759 models incorporate advanced technologies, including multiple speed settings and a reversible motor function. This versatility enables users to adjust airflow to their liking, whether they need a gentle breeze in the summer or assistance with air circulation during cooler months. The reversible feature allows the fan blades to spin in either direction, effectively distributing warm air during winter and cool air in summer.

Additionally, the Emerson CF759 fans are designed with ease of installation in mind. They come with all necessary hardware and a straightforward setup process, making installation a breeze for both seasoned DIYers and those who may not be as handy.

Finally, these ceiling fans are compatible with various control options, including wall switches and remote controls, adding to the convenience and user-friendliness of the overall design.

In summary, the Emerson CF759PB00, CF759AB00, CF759WW00, CF759TG00, and CF759OB00 ceiling fans blend style, efficiency, and practicality, making them an ideal choice for anyone looking to enhance their living space. The combination of advanced features and appealing designs ensures that these models will meet diverse consumer needs while providing reliable, year-round comfort.