(H)

(G)

D

E

unfinished edge bord inachevé borde no acabado

Step 5

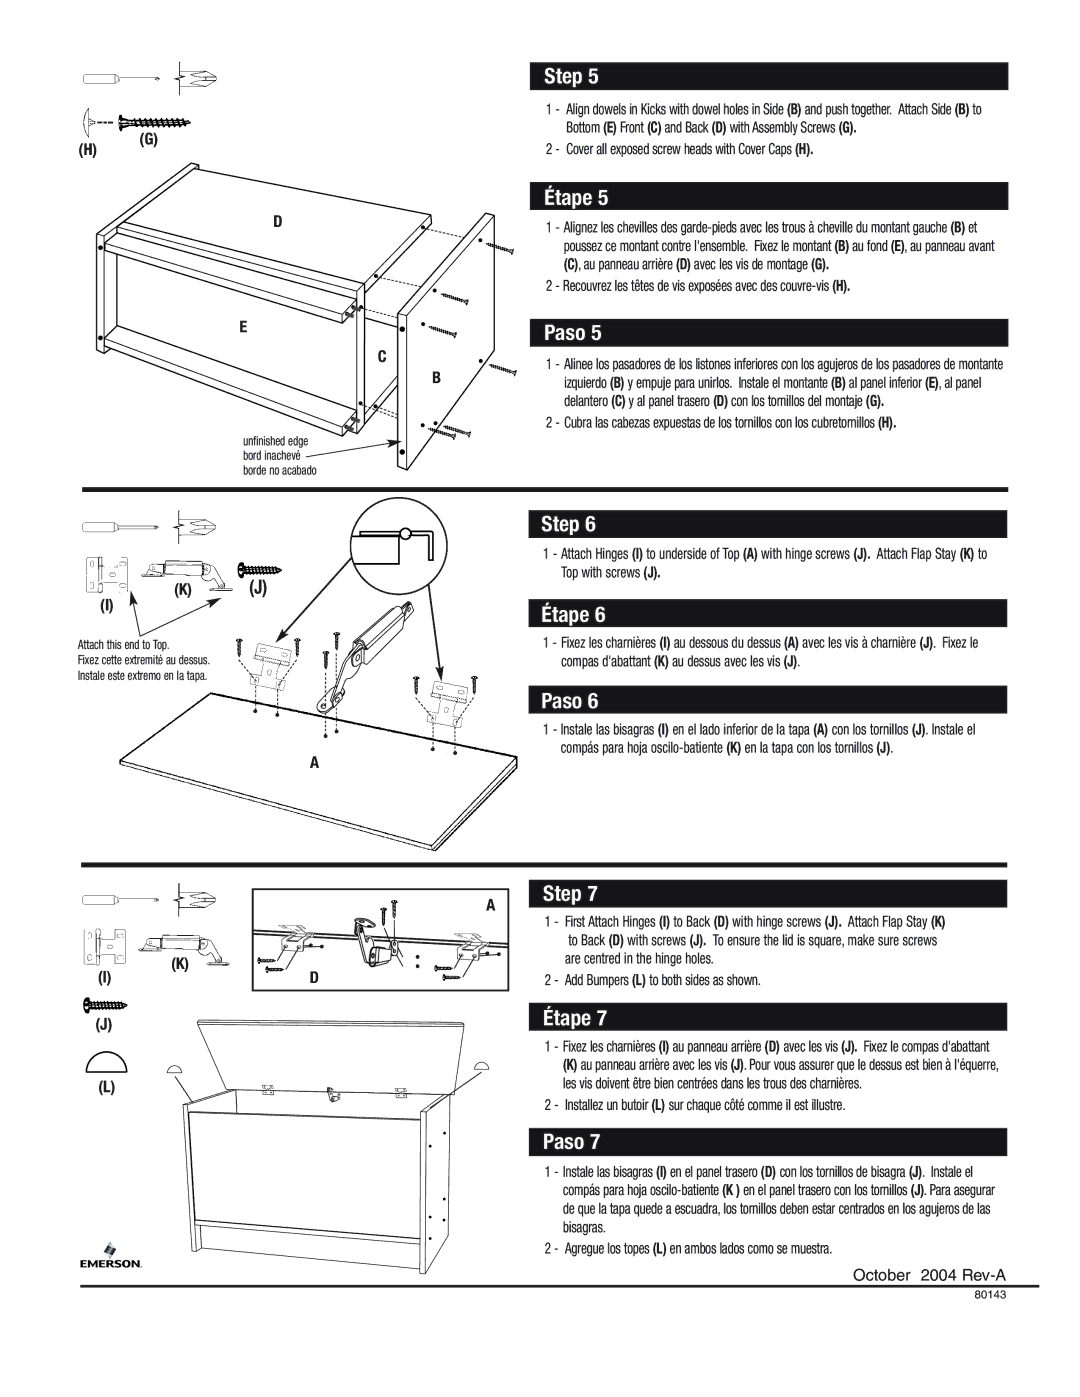
1 - Align dowels in Kicks with dowel holes in Side (B) and push together. Attach Side (B) to Bottom (E) Front (C) and Back (D) with Assembly Screws (G).

2 - Cover all exposed screw heads with Cover Caps (H).

Étape 5


1

- Alignez les chevilles des garde-pieds avec les trous à cheville du montant gauche (B) et


poussez ce montant contre l'ensemble. Fixez le montant (B) au fond (E), au panneau avant


(C), au panneau arrière (D) avec les vis de montage (G).


2

- Recouvrez les têtes de vis exposées avec des couvre-vis (H).


Paso 5

C

1

- Alinee los pasadores de los listones inferiores con los agujeros de los pasadores de montante


B

izquierdo (B) y empuje para unirlos. Instale el montante (B) al panel inferior (E), al panel

delantero (C) y al panel trasero (D) con los tornillos del montaje (G). 2 - Cubra las cabezas expuestas de los tornillos con los cubretornillos (H).

Step 6

(K)

(I)

Attach this end to Top.

Fixez cette extremité au dessus. Instale este extremo en la tapa.

(J)

. .


1

- Attach Hinges (I) to underside of Top (A) with hinge screws (J). Attach Flap Stay (K) to


Top with screws (J).


Étape 6


1 - Fixez les charnières (I) au dessous du dessus (A) avec les vis à charnière (J). Fixez le


compas d'abattant (K) au dessus avec les vis (J).


Paso 6

. .

1

- Instale las bisagras (I) en el lado inferior de la tapa (A) con los tornillos (J). Instale el


. .

compás para hoja oscilo-batiente (K) en la tapa con los tornillos (J).

A

(K)

(I)

(J)

(L)

. .

. .

D

A


Step 7


1 -

First Attach Hinges (I) to Back (D) with hinge screws (J). Attach Flap Stay (K)


. .


to Back (D) with screws (J). To ensure the lid is square, make sure screws


are centred in the hinge holes.


2 -

Add Bumpers (L) to both sides as shown.


Étape 7

1 - Fixez les charnières (I) au panneau arrière (D) avec les vis (J). Fixez le compas d'abattant

(K) au panneau arrière avec les vis (J). Pour vous assurer que le dessus est bien à l'équerre, les vis doivent être bien centrées dans les trous des charnières.

2 - Installez un butoir (L) sur chaque côté comme il est illustre.

Paso 7

1 - Instale las bisagras (I) en el panel trasero (D) con los tornillos de bisagra (J). Instale el compás para hoja oscilo-batiente (K ) en el panel trasero con los tornillos (J). Para asegurar de que la tapa quede a escuadra, los tornillos deben estar centrados en los agujeros de las bisagras.

2 - Agregue los topes (L) en ambos lados como se muestra.

October 2004 Rev-A

80143

Page 4
Image 4
Emerson STCH manual Cover all exposed screw heads with Cover Caps H

STCH specifications

Emerson STCH (Smart Temperature Control Hub) is a state-of-the-art solution designed for monitoring and managing temperature-sensitive processes in various industries. It combines advanced technologies with user-friendly features to ensure optimal control and efficiency in temperature management.

At the core of the Emerson STCH is its robust temperature sensing technology. The hub utilizes high-precision sensors capable of delivering real-time temperature data. This accuracy is essential for industries like pharmaceuticals, food and beverage, and chemical manufacturing, where even slight deviations can lead to significant issues with product quality and compliance.

One of the standout features of the Emerson STCH is its connectivity. The hub supports various communication protocols, including Ethernet, Wi-Fi, and industrial-grade protocols like Modbus and BACnet. This versatility enables seamless integration into existing infrastructure, facilitating data exchange and device management across multiple platforms.

The STCH also incorporates advanced analytics capabilities. By leveraging machine learning algorithms, the system can analyze historical temperature data to identify patterns and predict potential fluctuations. This predictive ability empowers organizations to implement proactive measures, reducing downtime and maintaining the integrity of their processes.

User experience is a key consideration in the design of the Emerson STCH. The system boasts an intuitive interface that allows users to configure settings, access real-time data, and generate reports with ease. Customizable dashboards provide an at-a-glance view of temperature performance, making it easier for operators to make informed decisions.

Security is paramount in today's digital landscape, and Emerson has ensured that the STCH is equipped with robust cybersecurity features. Roles-based access control, encrypted communications, and regular software updates provide a safeguard against potential threats, ensuring that sensitive data remains protected.

Additionally, the Emerson STCH is designed with scalability in mind. Whether it’s a small facility or a vast industrial complex, the system can accommodate varying numbers of sensors and devices, allowing businesses to scale their operations without needing a complete hardware overhaul.

In conclusion, Emerson STCH stands out as an innovative temperature control solution that combines precision sensing technology, connectivity, advanced analytics, user-friendly design, and robust security features. It is poised to enhance operational efficiency and product quality across various industries, making it an essential tool for temperature management in today’s fast-paced environment.