REV C 4.09


Assembly Instructions


for the Mountain Pass


2XTE and 3XTE


Component List:


1 Tent Body 1 Tent Fly 1 Carry Bag

2 Tent Poles 1 Pole Bag 1 Fly Rod

14 Stakes & 4 Guy Ropes w/Bag

1 Gear Loft

NOTE:

Do not drop tent bag or pole bag on its end. Do not bounce tent bag on its end to get the tent out. These actions may cut the shock cord and/or damage the pole ends.

Assembly:

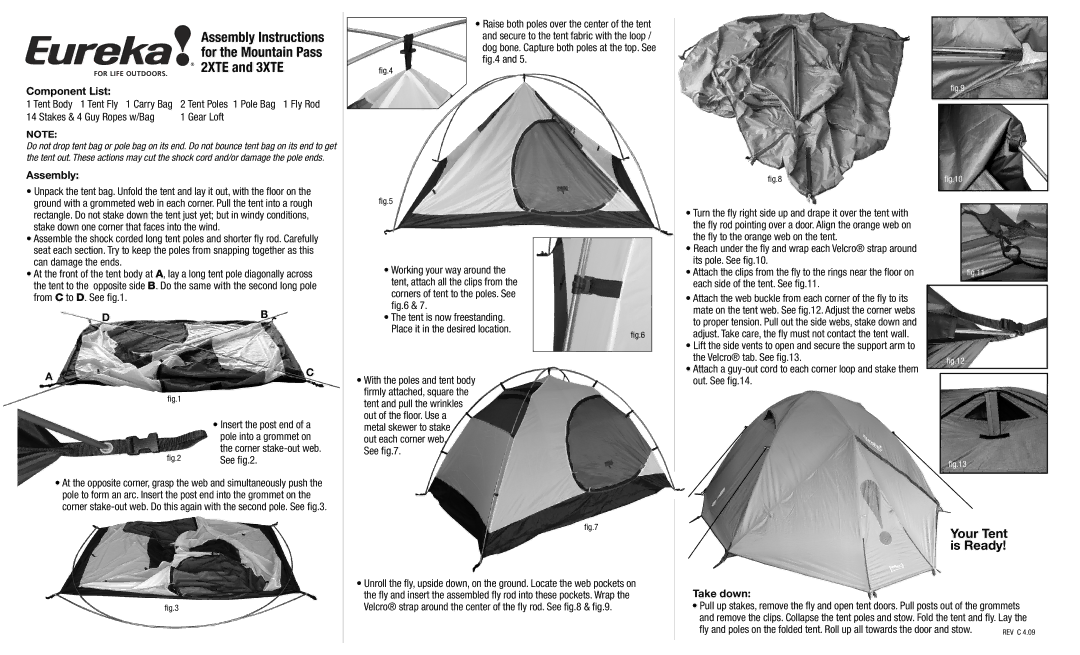
• Unpack the tent bag. Unfold the tent and lay it out, with the floor on the

ground with a grommeted web in each corner. Pull the tent into a rough

rectangle. Do not stake down the tent just yet; but in windy conditions,

stake down one corner that faces into the wind.

• Assemble the shock corded long tent poles and shorter fly rod. Carefully

seat each section. Try to keep the poles from snapping together as this

can damage the ends.

Raise both poles over the center of the tent and secure to the tent fabric with the loop / dog bone. Capture both poles at the top. See

fig.4 and 5.

fig.4

fig.5

fig.9

fig.8

fig.10

• Turn the fly right side up and drape it over the tent with


the fly rod pointing over a door. Align the orange web on


the fly to the orange web on the tent.


• Reach under the fly and wrap each Velcro® strap around


its pole. See fig.10.


• At the front of the tent body at A, lay a long tent pole diagonally across

the tent to the opposite side B. Do the same with the second long pole

from C to D. See fig.1.

DB

A

C


fig.1


• Insert the post end of a


pole into a grommet on

fig.2

the corner stake-out web.

See fig.2.

At the opposite corner, grasp the web and simultaneously push the pole to form an arc. Insert the post end into the grommet on the corner stake-out web. Do this again with the second pole. See fig.3.

Working your way around the tent, attach all the clips from the corners of tent to the poles. See

fig.6 & 7.

The tent is now freestanding. Place it in the desired location.

With the poles and tent body firmly attached, square the tent and pull the wrinkles out of the floor. Use a metal skewer to stake

out each corner web.

See fig.7.

fig.6

fig.7

• Attach the clips from the fly to the rings near the floor on


fig.11

each side of the tent. See fig.11.


• Attach the web buckle from each corner of the fly to its


mate on the tent web. See fig.12. Adjust the corner webs


to proper tension. Pull out the side webs, stake down and


adjust. Take care, the fly must not contact the tent wall.


• Lift the side vents to open and secure the support arm to


the Velcro® tab. See fig.13.


fig.12

• Attach a guy-out cord to each corner loop and stake them


out. See fig.14.


fig.13

Your Tent is Ready!

fig.3

Unroll the fly, upside down, on the ground. Locate the web pockets on the fly and insert the assembled fly rod into these pockets. Wrap the Velcro® strap around the center of the fly rod. See fig.8 & fig.9.

Take down:

Pull up stakes, remove the fly and open tent doors. Pull posts out of the grommets and remove the clips. Collapse the tent poles and stow. Fold the tent and fly. Lay the

fly and poles on the folded tent. Roll up all towards the door and stow.

Page 1
Image 1
Eureka! Tents 3XTE, 2XTE manual Component List, Assembly, Take down

3XTE, 2XTE specifications

Eureka! Tents has long been synonymous with quality and durability in the outdoor gear market, and their latest models, the 2XTE and 3XTE, elevate camping experiences to new heights. Designed with the modern adventurer in mind, these tents combine innovative technologies with user-friendly features to create a camping environment that is both comfortable and efficient.

The Eureka! 2XTE is ideally designed for two-person use, making it perfect for couples or close friends looking to explore the great outdoors together. One of its main features is the unique Tension Ridge system, which maximizes headroom and interior space, allowing campers to move freely inside. The tent is built with high-quality, weather-resistant materials, ensuring that users stay dry even in damp conditions. Additionally, the 2XTE includes a built-in vestibule for gear storage, so valuables remain protected from the elements.

On the other hand, the Eureka! 3XTE is slightly larger, accommodating three people comfortably. It shares many of the impressive features of the 2XTE, including the Tension Ridge design, but offers an additional vestibule for extra storage space. The 3XTE is particularly noted for its rapid setup technology, allowing users to pitch the tent in mere minutes, which is ideal for those eager to hit the trail as soon as possible.

Both models incorporate Eureka!'s proprietary WeatherShield technology, which combines durable fly and floor materials with optimized seam sealing. This technology not only ensures waterproof performance but also enhances breathability, reducing condensation inside the tent. The tents boast an impressive UV-resistant coating that provides additional protection against the sun's relentless rays.

User-friendly details such as color-coded poles and clips make setup a breeze, ensuring even novice campers can erect these tents with ease. Additionally, interior pockets and gear loops provide ample storage for personal items, helping to maintain an organized and clutter-free space.

In terms of weight, both the 2XTE and 3XTE are designed for easy transport, making them suitable for backpacking trips as well as car camping expeditions. With a perfect balance of comfort, space, and practicality, Eureka! Tents' 2XTE and 3XTE models stand out as exceptional choices for any outdoor enthusiast seeking adventure without sacrificing shelter quality.