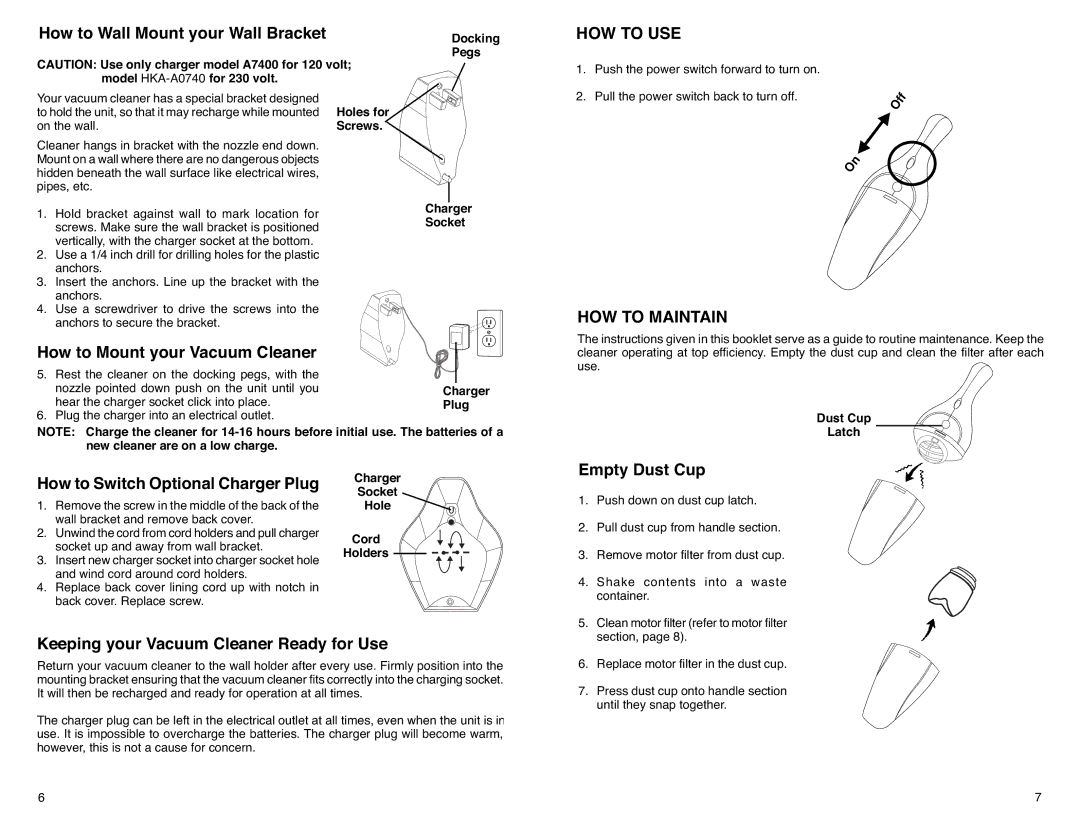
How to Wall Mount your Wall Bracket

CAUTION: Use only charger model A7400 for 120 volt; model HKA-A0740for 230 volt.

Your vacuum cleaner has a special bracket designed

Holes for

to hold the unit, so that it may recharge while mounted

on the wall.

Screws.

Cleaner hangs in bracket with the nozzle end down.


Mount on a wall where there are no dangerous objects


hidden beneath the wall surface like electrical wires,


pipes, etc.


1.Hold bracket against wall to mark location for screws. Make sure the wall bracket is positioned vertically, with the charger socket at the bottom.

2.Use a 1/4 inch drill for drilling holes for the plastic anchors.

3.Insert the anchors. Line up the bracket with the anchors.

4.Use a screwdriver to drive the screws into the anchors to secure the bracket.

How to Mount your Vacuum Cleaner

Docking

Pegs

Charger

Socket

HOW TO USE

1.

Push the power switch forward to turn on.


2.

Pull the power switch back to turn off.

Of

f


On


HOW TO MAINTAIN

The instructions given in this booklet serve as a guide to routine maintenance. Keep the cleaner operating at top efficiency. Empty the dust cup and clean the filter after each use.

5.

Rest the cleaner on the docking pegs, with the


nozzle pointed down push on the unit until you

Charger

6.

hear the charger socket click into place.

Plug

Plug the charger into an electrical outlet.


NOTE: Charge the cleaner for 14-16 hours before initial use. The batteries of a new cleaner are on a low charge.

Dust Cup

Latch

How to Switch Optional Charger Plug

1.Remove the screw in the middle of the back of the wall bracket and remove back cover.

2.Unwind the cord from cord holders and pull charger socket up and away from wall bracket.

3.Insert new charger socket into charger socket hole and wind cord around cord holders.

4.Replace back cover lining cord up with notch in back cover. Replace screw.

Charger

Socket

Hole

Cord Holders

Empty Dust Cup

1.

Push down on dust cup latch.

2.

Pull dust cup from handle section.

3.

Remove motor filter from dust cup.

4.

Shake contents into a waste


container.

5.

Clean motor filter (refer to motor filter

Keeping your Vacuum Cleaner Ready for Use

Return your vacuum cleaner to the wall holder after every use. Firmly position into the mounting bracket ensuring that the vacuum cleaner fits correctly into the charging socket. It will then be recharged and ready for operation at all times.

The charger plug can be left in the electrical outlet at all times, even when the unit is in use. It is impossible to overcharge the batteries. The charger plug will become warm, however, this is not a cause for concern.


section, page 8).

6.

Replace motor filter in the dust cup.

7.

Press dust cup onto handle section


until they snap together.

6

7

Page 4
Image 4
Eureka! Tents 79 SERIES warranty HOW to USE, HOW to Maintain

79 SERIES specifications

Eureka! Tents has long been a trusted name in the camping industry, and their 79 SERIES is a prime example of innovation and functionality woven into outdoor gear. Designed for adventurers seeking reliability and comfort, the 79 SERIES tents boast an array of features that cater to a variety of camping needs.

One of the standout characteristics of the 79 SERIES is its robust construction. Made with high-quality fabrics and materials, these tents are engineered to withstand difficult weather conditions. The rugged, water-resistant fly provides excellent protection against rain, while the floor is often reinforced to resist wear, tears, and moisture, ensuring campers stay dry and comfortable.

Ventilation is another key feature of the 79 SERIES. Each tent is equipped with strategically placed mesh panels that promote airflow while keeping insects at bay. This thoughtful design helps regulate temperature and moisture inside the tent, enhancing comfort during warm summer nights or humid weather.

Setup is made effortless with the 79 SERIES tents, thanks to their color-coded poles and clips, as well as a straightforward pole system. Most models allow for quick assembly, which is particularly beneficial for those who arrive at campsites late or are eager to set up before exploring their surroundings. Additionally, the tents are designed to be lightweight, making them a suitable choice for backpacking trips where every ounce matters.

Eureka! Tents also incorporates advanced technologies into the 79 SERIES. For instance, some models feature the proprietary Eureka! Hub system, which enhances stability and wind resistance, making the tent less susceptible to being toppled by inclement weather. This system, combined with the tent’s sturdy poles, provides a secure environment for those seeking refuge from nature’s elements.

In terms of interior space, the 79 SERIES does not disappoint. With thoughtful designs that maximize usable space, campers can enjoy a roomy experience inside. Many models come with vestibules, providing additional storage space for gear, shoes, and other essentials, while also offering an area to prepare meals or keep dry when entering the tent.

In conclusion, the Eureka! Tents 79 SERIES stands out due to its meticulous attention to detail, quality materials, and user-friendly features. It's an excellent choice for anyone looking for a reliable and comfortable outdoor shelter that can handle the challenges of nature while providing a pleasant camping experience. Whether you're setting out on a weekend getaway or an extended wilderness expedition, the 79 SERIES ensures you have a safe haven to return to at the end of each day.