ASSEMBLY INSTRUCTIONS
 For the N!ergy Screen House
Component List: 1 Screen Body with Plastic Elbows and Guy Ropes, 4Wall Poles, 2 Roof Poles, 1 Carry Bag, 1 Stake Bag and Stakes, 1 Pole Bag
1.Remove from the carry bag and separate all the components. Unroll and unfold the fabric top side up, on a clean dry space and open the doors. If windy, stake down the windward corner. See fig 1. This is a large structure; it is best to assemble it with two people.
fig 1
D
C
B
fig 5
A |
|
|
4. Raise the tent. Lift the |
|
|
top poles to form a dome. |
|
|
Start on one side and |
|
|
insert the wall poles into |
|
|
the elbows. See fig 6. |
|
|
At the bottom of each pole, |
| fig 6 |
insert the pin/ring |
| |
|
| |
|
| |
(attached to the corner |
| |
| ||
web) into the bottom of each pole. See fig 7 |
| |
& 8. Repeat on the other side until the |
| |
shelter is at full height and freestanding. |
| |
Note: With the last pole, it is usually easier if |
| |
6.Stake the shelter down. Stake through the corner web loops, not the corner rings. Stake opposite corners while applying tension to smooth the sidewall wrinkles. See fig 10.
Note: There are snaps on the wall panels just below the zippers. Be sure to secure these snaps before you square and stake the shelter. The snaps will keep the wall panels together when you raise and lower the zipper and will keep tension off of the zipper when you pull the sidewalls to smooth.
7. Tuck the ground skirt under the walls and | fig 10 |
into the shelter. See fig 11. |
|
|
Your Shelter is Ready!
Roof poles
Wall poles
fig 2
2.Assemble the shock corded poles and divide according to size and shape. Take care; make sure that each pole section is fully seated into the next. Do not allow the sections to snap together as this can damage the ends. See fig 2.
you first fit the bottom pin into the pole and | fig 7 |
then fit the elbow. |
|
Take care: You must keep the top |
|
“up” when you insert the walll poles |
|
|
|
| fig 8 |
fig 11
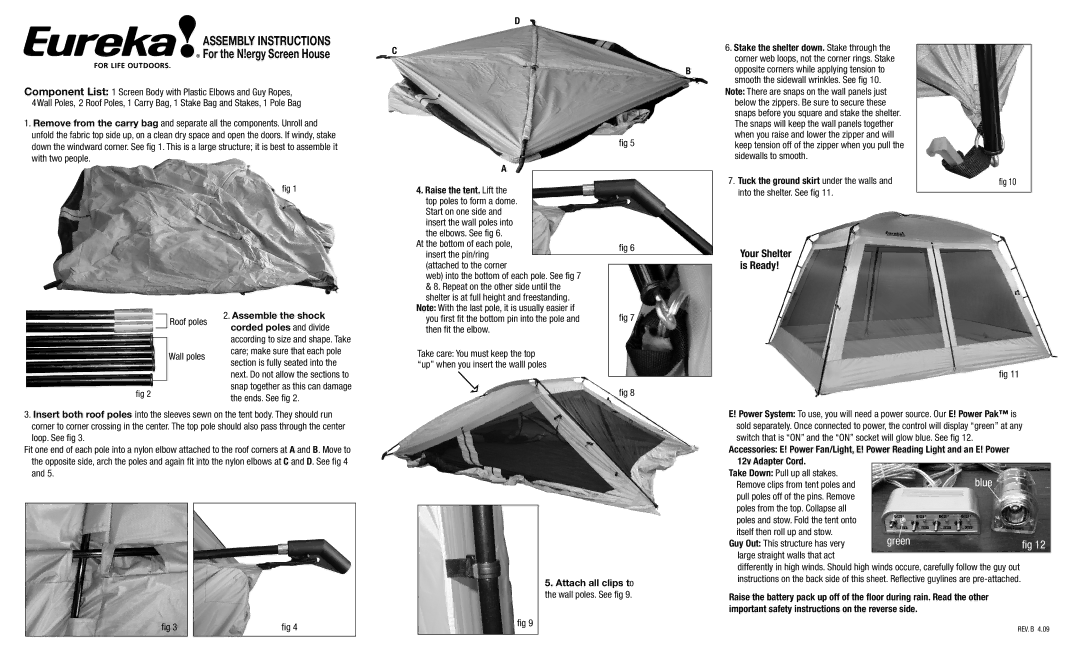
3.Insert both roof poles into the sleeves sewn on the tent body. They should run corner to corner crossing in the center. The top pole should also pass through the center loop. See fig 3.
Fit one end of each pole into a nylon elbow attached to the roof corners at A and B. Move to the opposite side, arch the poles and again fit into the nylon elbows at C and D. See fig 4 and 5.
fig 3 |
| fig 4 |
|
|
|
5. Attach all clips to the wall poles. See fig 9.
fig 9
E! Power System: To use, you will need a power source. Our E! Power Pak™ is sold separately. Once connected to power, the control will display “green” at any switch that is “ON” and the “ON” socket will glow blue. See fig 12.
Accessories: E! Power Fan/Light, E! Power Reading Light and an E! Power
12v Adapter Cord. |
|
| |
Take Down: Pull up all stakes. |
| blue | |
Remove clips from tent poles and |
| ||
pull poles off of the pins. Remove |
|
| |
poles from the top. Collapse all |
|
| |
poles and stow. Fold the tent onto |
|
| |
itself then roll up and stow. | green |
| |
Guy Out: This structure has very | fig 12 | ||
| |||
large straight walls that act |
|
| |
|
| ||
differently in high winds. Should high winds occure, carefully follow the guy out | |||
instructions on the back side of this sheet. Reflective guylines are | |||
Raise the battery pack up off of the floor during rain. Read the other | |||
important safety instructions on the reverse side. |
| ||
|
| REV. B 4.09 | |