Read all the sections of this booklet and follow all the instructions carefully.

OPERATING INSTRUCTIONS

OPERATING INSTRUCTIONS

Assembling the Hand Mixer to

3. While the hand mixer is still in the

raised position, insert either the

Warning: To avoid injury when inserting or removing beaters or

dough hooks, always set the speed selector on 0and unplug the appliance.

1.Before using your Convertible Hand/Stand Mixer for the first time, wash the beaters, dough hooks, bowls and spatula in warm, sudsy water. Rinse and dry thoroughly. Use a damp cloth to wash over the mixer base and the hand mixer. Dry with a soft cloth. NEVER immerse the base stand or the hand mixer in water or any other liquids.

2.Before assembling your Convertible Hand/Stand Mixer, make sure that the power cord is unplugged from the electrical outlet and that both the speed control and the base speed control dial are in the OFFposition.

Attaching the Beaters to the Hand Mixer

1.Ensure that the hand mixer is not plugged in to an electrical outlet and that the speed control switch is on the 0(off) position.

2.Insert the beaters into the sockets on the under side of the hand mixer and twist counter clockwise until the beater is firmly fitted into the socket.

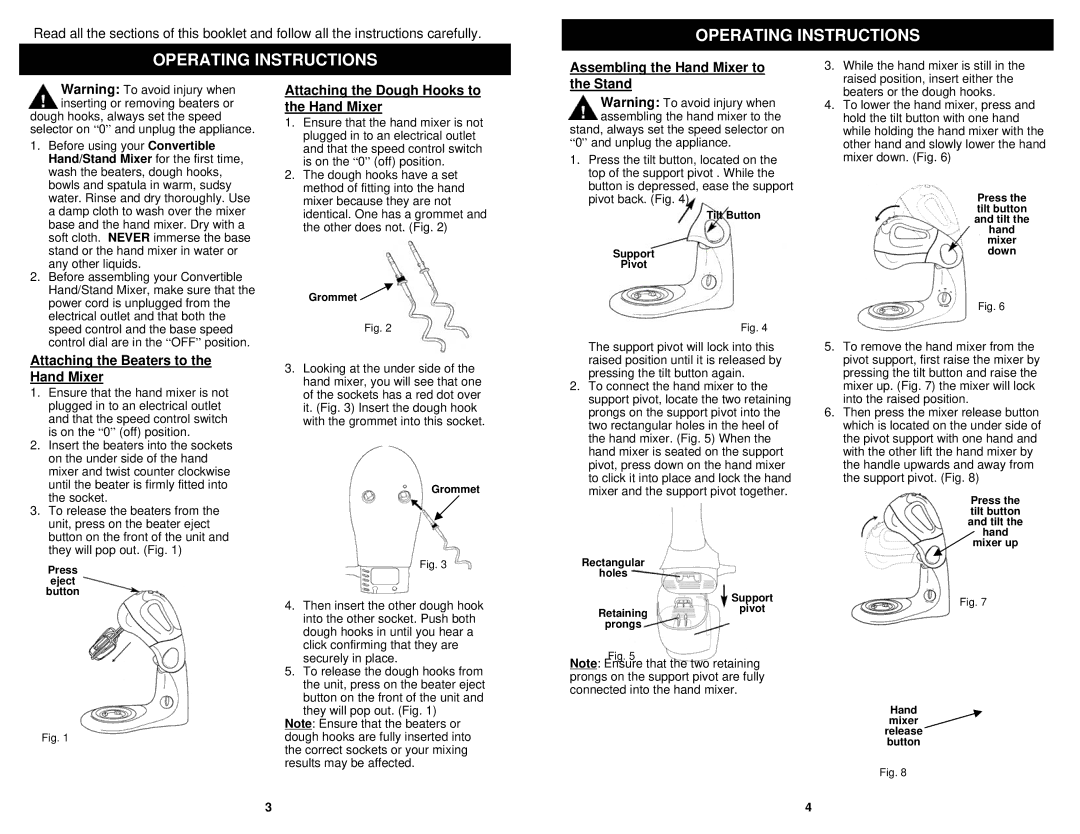
3.To release the beaters from the unit, press on the beater eject button on the front of the unit and they will pop out. (Fig. 1)

Press

eject

button

Fig. 1

Attaching the Dough Hooks to the Hand Mixer

1.Ensure that the hand mixer is not plugged in to an electrical outlet and that the speed control switch is on the 0(off) position.

2.The dough hooks have a set method of fitting into the hand mixer because they are not identical. One has a grommet and the other does not. (Fig. 2)

Grommet

Fig. 2

3.Looking at the under side of the hand mixer, you will see that one of the sockets has a red dot over it. (Fig. 3) Insert the dough hook with the grommet into this socket.

Grommet

Fig. 3

4.Then insert the other dough hook into the other socket. Push both dough hooks in until you hear a click confirming that they are securely in place.

5.To release the dough hooks from the unit, press on the beater eject button on the front of the unit and

they will pop out. (Fig. 1) Note: Ensure that the beaters or dough hooks are fully inserted into the correct sockets or your mixing results may be affected.

the Stand

Warning: To avoid injury when assembling the hand mixer to the stand, always set the speed selector on

0and unplug the appliance.

1.Press the tilt button, located on the top of the support pivot . While the button is depressed, ease the support pivot back. (Fig. 4)

Tilt Button

Support

Pivot

Fig. 4

The support pivot will lock into this raised position until it is released by pressing the tilt button again.

2.To connect the hand mixer to the support pivot, locate the two retaining prongs on the support pivot into the two rectangular holes in the heel of the hand mixer. (Fig. 5) When the hand mixer is seated on the support pivot, press down on the hand mixer to click it into place and lock the hand mixer and the support pivot together.

Rectangular

holes

Support

Retainingpivot prongs

Fig. 5

Note: Ensure that the two retaining prongs on the support pivot are fully connected into the hand mixer.

beaters or the dough hooks.

4. To lower the hand mixer, press and

hold the tilt button with one hand

while holding the hand mixer with the

other hand and slowly lower the hand

mixer down. (Fig. 6)

Press the tilt button and tilt the hand mixer down

Fig. 6

5.To remove the hand mixer from the pivot support, first raise the mixer by pressing the tilt button and raise the mixer up. (Fig. 7) the mixer will lock into the raised position.

6.Then press the mixer release button which is located on the under side of the pivot support with one hand and with the other lift the hand mixer by the handle upwards and away from the support pivot. (Fig. 8)

Press the tilt button and tilt the hand mixer up

Fig. 7

Hand mixer release button

Fig. 8

3

4

Page 3
Image 3
Euro-Pro EP585 Operating Instructions, Assembling the Hand Mixer to, Attaching the Beaters to the Hand Mixer, Stand

EP585 specifications

The Euro-Pro EP585 is a versatile and efficient vacuum cleaner that has gained popularity for its powerful performance and user-friendly design. This model incorporates advanced technologies and features, making it suitable for various cleaning tasks around the home.

One of the standout characteristics of the Euro-Pro EP585 is its suction power. Equipped with a high-efficiency motor, this vacuum delivers strong suction that effectively captures dust, dirt, and debris from both carpets and hard floors. The multi-surface capability ensures that users can transition seamlessly from one type of flooring to another, making it ideal for households with diverse flooring options.

The EP585 features a lightweight and compact design, promoting ease of use and storage. Weighing in at a manageable size, this vacuum cleaner can be easily maneuvered around furniture and tight spaces. This portability is a major advantage for users looking for a cleaner that doesn’t compromise on performance.

Moreover, the Euro-Pro EP585 comes with a range of attachments and tools designed to enhance its functionality. These include a crevice tool for reaching into narrow gaps, an upholstery brush for cleaning furniture, and a dusting brush for delicate surfaces. These accessories expand the vacuum’s capabilities, allowing it to tackle everything from pet hair to cobwebs.

Another significant technology featured in the EP585 is its advanced filtration system. This vacuum is designed with a HEPA filter that traps allergens and fine particles, effectively improving indoor air quality. This feature is particularly beneficial for allergy sufferers, as it minimizes the release of dust and allergens back into the air.

In addition to its performance and filtration capabilities, the Euro-Pro EP585 is designed with user convenience in mind. It includes an easy-to-empty dust cup, reducing the hassle of traditional vacuum bags. This dust cup can be cleaned quickly, allowing for a hassle-free maintenance experience.

Lastly, the Euro-Pro EP585 emphasizes energy efficiency. With its powerful motor and design, it operates effectively while consuming less energy compared to many competitors. This not only helps reduce electricity bills but also makes it an environmentally friendly choice.

In summary, the Euro-Pro EP585 vacuum cleaner stands out for its powerful suction, lightweight design, versatile attachments, advanced filtration, and energy efficiency. These features make it a top choice for homeowners looking for an effective cleaning solution that adapts to their needs. With the Euro-Pro EP585, users can enjoy a cleaner home environment with minimal effort.