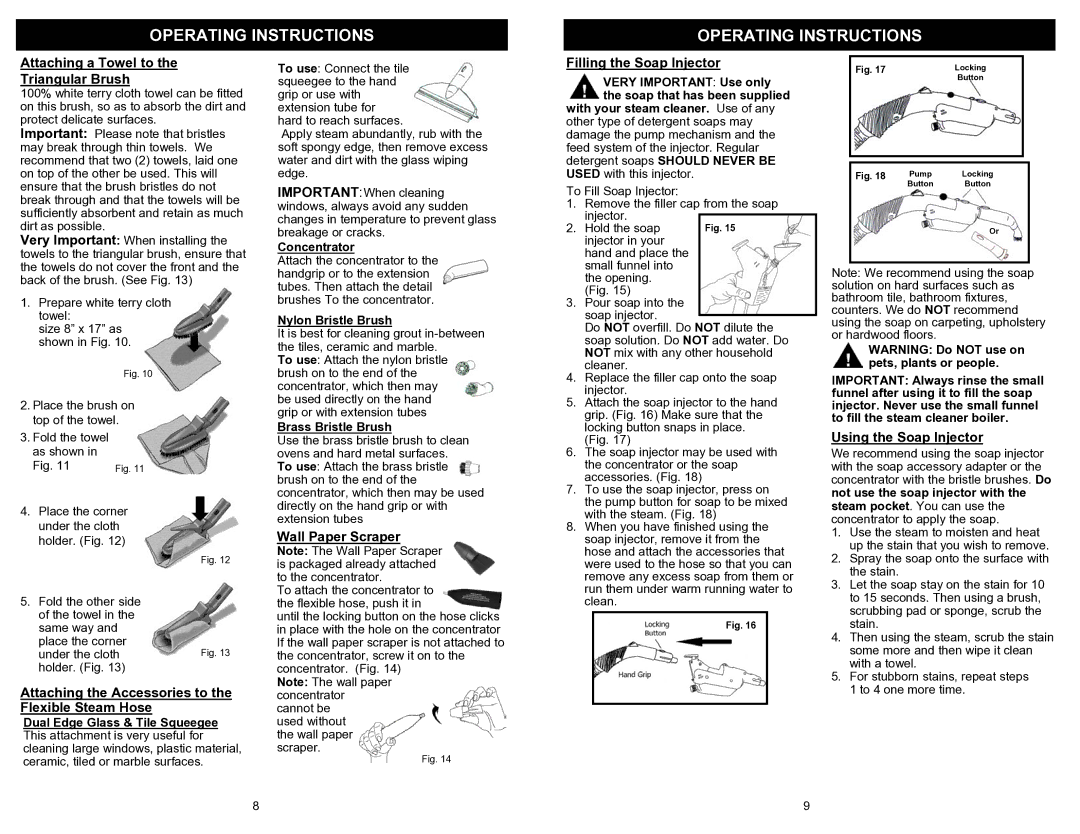
Fig. 15

OPERATING INSTRUCTIONS

OPERATING INSTRUCTIONS

Attaching a Towel to the

Triangular Brush

100% white terry cloth towel can be fitted on this brush, so as to absorb the dirt and protect delicate surfaces.

Important: Please note that bristles may break through thin towels. We recommend that two (2) towels, laid one on top of the other be used. This will ensure that the brush bristles do not break through and that the towels will be sufficiently absorbent and retain as much dirt as possible.

Very Important: When installing the towels to the triangular brush, ensure that the towels do not cover the front and the back of the brush. (See Fig. 13)

1.Prepare white terry cloth towel:

size 8” x 17” as shown in Fig. 10.

Fig. 10

2.Place the brush on top of the towel.

3.Fold the towel as shown in

Fig. 11

Fig. 11

4.Place the corner under the cloth holder. (Fig. 12)

Fig. 12

5.Fold the other side of the towel in the same way and

place the corner

under the clothFig. 13 holder. (Fig. 13)

Attaching the Accessories to the Flexible Steam Hose

Dual Edge Glass & Tile Squeegee This attachment is very useful for cleaning large windows, plastic material, ceramic, tiled or marble surfaces.

To use: Connect the tile squeegee to the hand grip or use with extension tube for hard to reach surfaces.

Apply steam abundantly, rub with the soft spongy edge, then remove excess water and dirt with the glass wiping edge.

IMPORTANT:When cleaning windows, always avoid any sudden changes in temperature to prevent glass breakage or cracks.

Concentrator

Attach the concentrator to the handgrip or to the extension tubes. Then attach the detail brushes To the concentrator.

Nylon Bristle Brush

It is best for cleaning grout in-between the tiles, ceramic and marble.

To use: Attach the nylon bristle brush on to the end of the concentrator, which then may be used directly on the hand grip or with extension tubes

Brass Bristle Brush

Use the brass bristle brush to clean ovens and hard metal surfaces. To use: Attach the brass bristle brush on to the end of the concentrator, which then may be used directly on the hand grip or with extension tubes

Wall Paper Scraper

Note: The Wall Paper Scraper is packaged already attached to the concentrator.

To attach the concentrator to the flexible hose, push it in

until the locking button on the hose clicks in place with the hole on the concentrator If the wall paper scraper is not attached to the concentrator, screw it on to the concentrator. (Fig. 14)

Note: The wall paper concentrator cannot be

used without the wall paper scraper.

Fig. 14

Filling the Soap Injector

VERY IMPORTANT: Use only the soap that has been supplied

with your steam cleaner. Use of any

other type of detergent soaps may damage the pump mechanism and the feed system of the injector. Regular detergent soaps SHOULD NEVER BE USED with this injector.

To Fill Soap Injector:

1.Remove the filler cap from the soap injector.

2. Hold the soap injector in your hand and place the small funnel into the opening.

(Fig. 15)

3.Pour soap into the soap injector.

Do NOT overfill. Do NOT dilute the soap solution. Do NOT add water. Do NOT mix with any other household cleaner.

4.Replace the filler cap onto the soap injector.

5.Attach the soap injector to the hand grip. (Fig. 16) Make sure that the locking button snaps in place.

(Fig. 17)

6.The soap injector may be used with the concentrator or the soap accessories. (Fig. 18)

7.To use the soap injector, press on the pump button for soap to be mixed with the steam. (Fig. 18)

8.When you have finished using the soap injector, remove it from the hose and attach the accessories that were used to the hose so that you can remove any excess soap from them or run them under warm running water to clean.

Fig. 16

Fig. 17

Locking


Button

Fig. 18

Pump

Locking


Button

Button

Or

Note: We recommend using the soap solution on hard surfaces such as bathroom tile, bathroom fixtures, counters. We do NOT recommend using the soap on carpeting, upholstery or hardwood floors.

WARNING: Do NOT use on pets, plants or people.

IMPORTANT: Always rinse the small funnel after using it to fill the soap injector. Never use the small funnel to fill the steam cleaner boiler.

Using the Soap Injector

We recommend using the soap injector with the soap accessory adapter or the concentrator with the bristle brushes. Do not use the soap injector with the steam pocket. You can use the concentrator to apply the soap.

1.Use the steam to moisten and heat up the stain that you wish to remove.

2.Spray the soap onto the surface with the stain.

3.Let the soap stay on the stain for 10 to 15 seconds. Then using a brush, scrubbing pad or sponge, scrub the stain.

4.Then using the steam, scrub the stain some more and then wipe it clean with a towel.

5.For stubborn stains, repeat steps 1 to 4 one more time.

8

9

Page 10
Image 10
Euro-Pro EP923H owner manual Attaching a Towel to Triangular Brush, Attaching the Accessories to the Flexible Steam Hose

EP923H specifications

The Euro-Pro EP923H is a versatile and powerful vacuum solution designed for modern households, combining efficient cleaning capabilities with innovative technologies. This model has garnered attention for its ability to tackle a variety of surfaces, making it a valuable addition to any cleaning arsenal.

One of the standout features of the Euro-Pro EP923H is its multi-surface cleaning capability. It seamlessly transitions between carpet, hardwood floors, and tiled surfaces, thanks to its specialized brush roll and adjustable suction settings. Users can easily switch modes depending on their cleaning needs, ensuring optimal performance on any surface type.

The vacuum is equipped with a HEPA filter that captures up to 99.97% of dust, allergens, and tiny particles, making it an excellent choice for allergy sufferers. This advanced filtration system not only protects indoor air quality but also promotes a healthier living environment. The filter is washable and reusable, providing an eco-friendly option for maintaining performance without the recurring cost of replacement filters.

Another notable feature is the compact and lightweight design of the Euro-Pro EP923H. Weighing in at just a few pounds, it is easy to maneuver and store, making it a practical choice for those with limited storage space. The vacuum also features an ergonomic handle that enhances comfort during extended cleaning sessions.

The EP923H is designed with user convenience in mind. It boasts a generous cord length for extended reach, reducing the need to frequently change outlets. Additionally, the vacuum is equipped with a large dustbin that minimizes the frequency of emptying, allowing users to cover more ground in less time.

Technologically, the Euro-Pro EP923H incorporates smart suction adjustments that automatically regulate power based on surface type and level of dirt detected. This not only optimizes cleaning efficiency but also conserves energy during use.

Moreover, the vacuum is equipped with handy onboard tools, including a crevice tool and dusting brush, allowing users to tackle hard-to-reach areas and delicate surfaces with ease. The easy-to-access controls further enhance user functionality, making the cleaning experience smooth and hassle-free.

In summary, the Euro-Pro EP923H stands out in the crowded vacuum market due to its combination of advanced features, powerful performance, and user-friendly design. Its multi-surface capability, HEPA filtration, and convenient technologies make it an excellent choice for anyone seeking an efficient and effective home cleaning solution.