How To Assemble Your Steam Mop
1.Remove all the parts from the packaging.
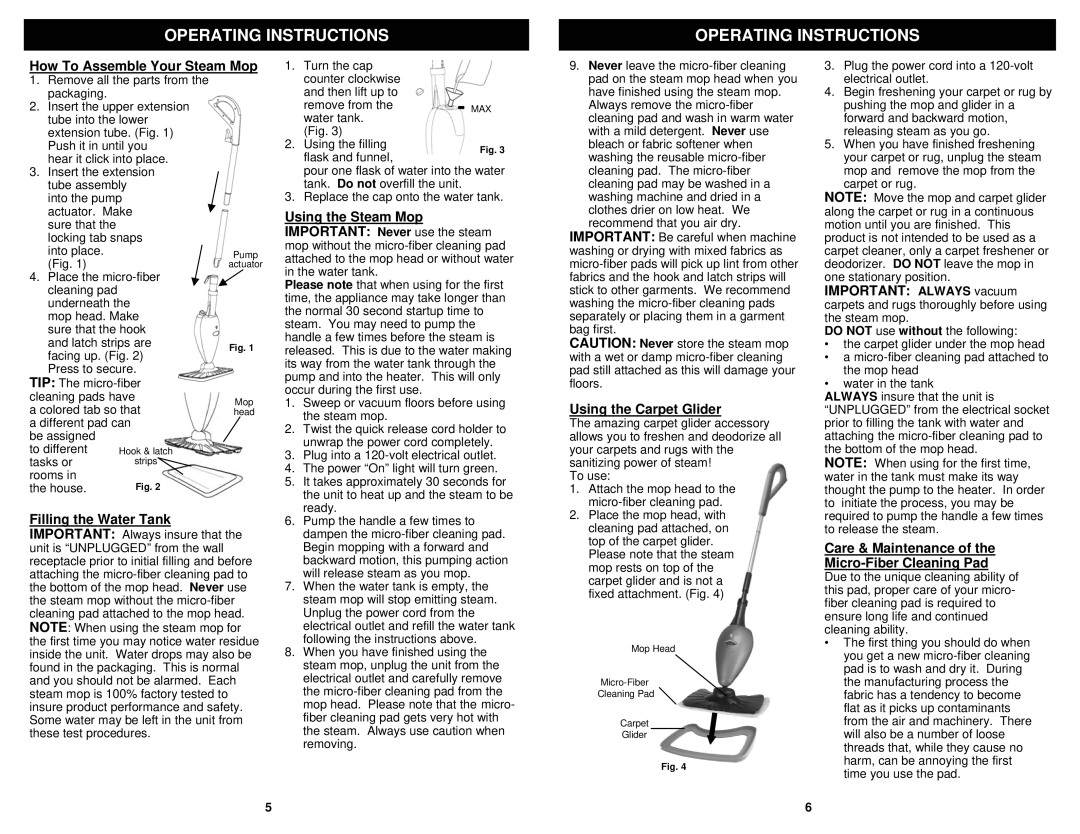
2.Insert the upper extension tube into the lower extension tube. (Fig. 1) Push it in until you
hear it click into place.
3.Insert the extension tube assembly into the pump actuator. Make sure that the locking tab snaps
into place. | Pump |
(Fig. 1) | actuator |
4.Place the micro-fiber cleaning pad underneath the mop head. Make sure that the hook
| and latch strips are | Fig. 1 |
| facing up. (Fig. 2) |
| |
| Press to secure. | |
| TIP: The micro-fiber | |
| cleaning pads have | Mop |
| a colored tab so that | head |
| a different pad can | |
| be assigned | | |
| to different | Hook & latch | |
| tasks or | strips | |
| rooms in | | |
| the house. | Fig. 2 | |
Filling the Water Tank IMPORTANT: Always insure that the unit is “UNPLUGGED” from the wall receptacle prior to initial filling and before attaching the micro-fiber cleaning pad to the bottom of the mop head. Never use the steam mop without the micro-fiber cleaning pad attached to the mop head. NOTE: When using the steam mop for the first time you may notice water residue inside the unit. Water drops may also be found in the packaging. This is normal and you should not be alarmed. Each steam mop is 100% factory tested to insure product performance and safety. Some water may be left in the unit from these test procedures.
1. Turn the cap counter clockwise and then lift up to
remove from theMAX water tank.
(Fig. 3)
2. Using the filling flask and funnel,
pour one flask of water into the water tank. Do not overfill the unit.
3. Replace the cap onto the water tank.
Using the Steam Mop IMPORTANT: Never use the steam mop without the micro-fiber cleaning pad attached to the mop head or without water in the water tank.
Please note that when using for the first time, the appliance may take longer than the normal 30 second startup time to steam. You may need to pump the handle a few times before the steam is released. This is due to the water making its way from the water tank through the pump and into the heater. This will only occur during the first use.
1.Sweep or vacuum floors before using the steam mop.
2.Twist the quick release cord holder to unwrap the power cord completely.
3.Plug into a 120-volt electrical outlet.
4.The power “On” light will turn green.
5.It takes approximately 30 seconds for the unit to heat up and the steam to be ready.
6.Pump the handle a few times to dampen the micro-fiber cleaning pad. Begin mopping with a forward and backward motion, this pumping action will release steam as you mop.
7.When the water tank is empty, the steam mop will stop emitting steam. Unplug the power cord from the electrical outlet and refill the water tank following the instructions above.
8.When you have finished using the steam mop, unplug the unit from the electrical outlet and carefully remove the micro-fiber cleaning pad from the mop head. Please note that the micro- fiber cleaning pad gets very hot with the steam. Always use caution when removing.
9.Never leave the micro-fiber cleaning pad on the steam mop head when you have finished using the steam mop. Always remove the micro-fiber cleaning pad and wash in warm water with a mild detergent. Never use bleach or fabric softener when washing the reusable micro-fiber cleaning pad. The micro-fiber cleaning pad may be washed in a washing machine and dried in a clothes drier on low heat. We recommend that you air dry.
IMPORTANT: Be careful when machine washing or drying with mixed fabrics as micro-fiber pads will pick up lint from other fabrics and the hook and latch strips will stick to other garments. We recommend washing the micro-fiber cleaning pads separately or placing them in a garment bag first.
CAUTION: Never store the steam mop with a wet or damp micro-fiber cleaning pad still attached as this will damage your floors.
Using the Carpet Glider
The amazing carpet glider accessory allows you to freshen and deodorize all your carpets and rugs with the sanitizing power of steam!
To use:
1.Attach the mop head to the micro-fiber cleaning pad.
2.Place the mop head, with cleaning pad attached, on top of the carpet glider.
Please note that the steam mop rests on top of the carpet glider and is not a fixed attachment. (Fig. 4)
Mop Head
Micro-Fiber
Cleaning Pad 
Carpet
Glider
Fig. 4
3.Plug the power cord into a 120-volt electrical outlet.
4.Begin freshening your carpet or rug by pushing the mop and glider in a forward and backward motion, releasing steam as you go.
5.When you have finished freshening your carpet or rug, unplug the steam mop and remove the mop from the carpet or rug.
NOTE: Move the mop and carpet glider along the carpet or rug in a continuous motion until you are finished. This product is not intended to be used as a carpet cleaner, only a carpet freshener or deodorizer. DO NOT leave the mop in one stationary position.
IMPORTANT: ALWAYS vacuum carpets and rugs thoroughly before using the steam mop.
DO NOT use without the following:
•the carpet glider under the mop head
•a micro-fiber cleaning pad attached to the mop head
•water in the tank
ALWAYS insure that the unit is “UNPLUGGED” from the electrical socket prior to filling the tank with water and attaching the micro-fiber cleaning pad to the bottom of the mop head.
NOTE: When using for the first time, water in the tank must make its way thought the pump to the heater. In order to initiate the process, you may be required to pump the handle a few times to release the steam.
Care & Maintenance of the Micro-Fiber Cleaning Pad
Due to the unique cleaning ability of this pad, proper care of your micro- fiber cleaning pad is required to ensure long life and continued cleaning ability.
•The first thing you should do when you get a new micro-fiber cleaning pad is to wash and dry it. During the manufacturing process the fabric has a tendency to become flat as it picks up contaminants from the air and machinery. There will also be a number of loose threads that, while they cause no harm, can be annoying the first time you use the pad.