EVGA nForce 790i SLITM FTW Quick Install Guide | Gaming ● Imaging ● 3D Video ● Entertainment ● Photos ● Graphics |
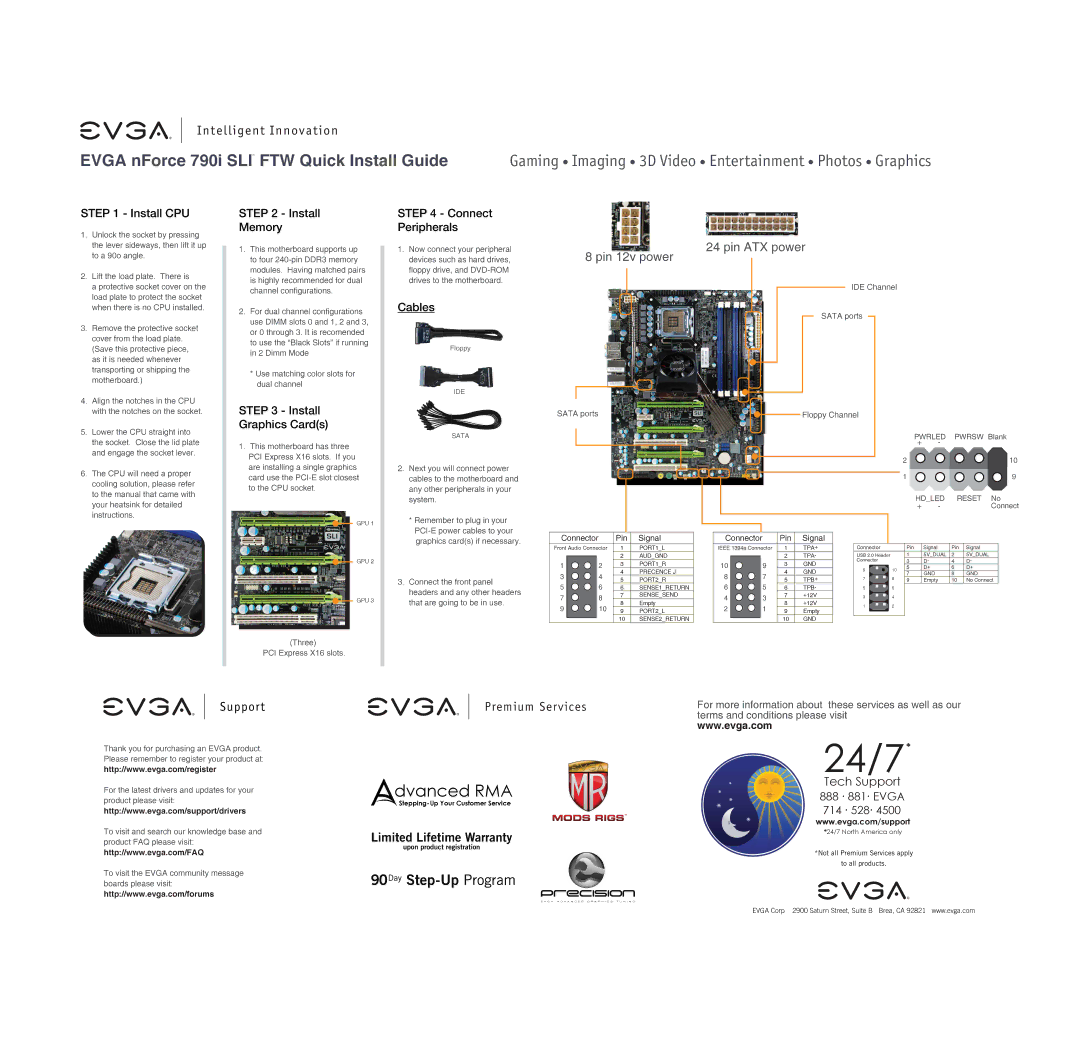
STEP 1 - Install CPU
1. | Unlock the socket by pressing |
| the lever sideways, then lift it up |
| to a 90o angle. |
2. | Lift the load plate. There is |
| a protective socket cover on the |
| load plate to protect the socket |
| when there is no CPU installed. |
3. | Remove the protective socket |
| cover from the load plate. |
| (Save this protective piece, |
| as it is needed whenever |
| transporting or shipping the |
| motherboard.) |
4. | Align the notches in the CPU |
STEP 2 - Install
Memory
1.This motherboard supports up to four
2.For dual channel configurations use DIMM slots 0 and 1, 2 and 3, or 0 through 3. It is recomended to use the “Black Slots” if running in 2 Dimm Mode
*Use matching color slots for dual channel
STEP 4 - Connect Peripherals
1.Now connect your peripheral devices such as hard drives, floppy drive, and
Cables
Floppy
IDE
8 pin 12v power
24 pin ATX power
IDE Channel
SATA ports
| with the notches on the socket. |
5. | Lower the CPU straight into |
| the socket. Close the lid plate |
| and engage the socket lever. |
6. | The CPU will need a proper |
| cooling solution, please refer |
| to the manual that came with |
| your heatsink for detailed |
| instructions. |
STEP 3 - Install
Graphics Card(s)
1.This motherboard has three PCI Express X16 slots. If you are installing a single graphics card use the
GPU 1
SATA
2. Next you will connect power |
cables to the motherboard and |
any other peripherals in your |
system. |
* Remember to plug in your |
SATA ports |
| Floppy Channel |
|
PWRLED PWRSW Blank
+ -
2 |
| 10 |
1 |
| 9 |
HD_LED | RESET No | |
+ | - | Connect |
GPU 2
GPU 3
(Three)
PCI Express X16 slots.
graphics card(s) if necessary. |
3. Connect the front panel |
headers and any other headers |
that are going to be in use. |
Connector |
| Pin | Signal | |||
Front Audio Connector | 1 | PORT1_L | ||||
|
|
|
| 2 | AUD_GND | |
|
|
|
| |||
1 |
|
| 2 | 3 | PORT1_R | |
4 | PRECENCE J | |||||
3 |
|
| 4 | |||
|
| 5 | PORT2_R | |||
5 |
|
| 6 | |||
|
| 6 | SENSE1_RETURN | |||
7 |
|
| 8 | 7 | SENSE_SEND | |
|
| 8 | Empty | |||
9 |
|
| 10 | |||
|
| 9 | PORT2_L | |||
|
|
|
| 10 | SENSE2_RETURN | |
|
|
|
| |||
Connector |
| Pin | Signal | |||
IEEE 1394a Connector | 1 | TPA+ | ||||
|
|
|
| 2 | TPA- | |
|
|
|
| |||
10 |
|
| 9 | 3 | GND | |
4 | GND | |||||
8 |
|
| 7 | |||
|
| 5 | TPB+ | |||
6 |
|
| 5 | |||
|
| 6 | TPB- | |||
4 |
|
| 3 | 7 | +12V | |
|
| 8 | +12V | |||
2 |
|
| 1 | |||
|
| 9 | Empty | |||
|
|
|
| 10 | GND | |
|
|
|
| |||
Connector |
| Pin | Signal | Pin | Signal | |||||
USB 2.0 Header |
| 1 | 5V_DUAL | 2 | 5V_DUAL | |||||
Connector |
| 3 | D- | 4 | D- | |||||
9 |
|
|
|
| 10 | 5 | D+ | 6 | D+ | |
|
|
|
| |||||||
|
|
|
|
|
|
|
| |||
7 | GND | 8 | GND | |||||||
|
|
|
| |||||||
7 |
|
|
|
| 8 | |||||
|
|
|
| 9 | Empty | 10 | No Connect | |||
|
|
|
| |||||||
5 |
|
|
|
| 6 |
|
|
|
| |
|
|
|
|
|
|
|
| |||
|
|
|
|
|
|
|
| |||
3 |
|
|
|
| 4 |
|
|
|
| |
|
|
|
|
|
|
|
| |||
|
|
|
|
|
|
|
| |||
1 |
|
|
|
| 2 |
|
|
|
| |
|
|
|
|
|
|
|
| |||
|
|
|
|
|
|
|
| |||
|
|
|
|
|
|
|
|
|
| |
Support
Thank you for purchasing an EVGA product. Please remember to register your product at: http://www.evga.com/register
For the latest drivers and updates for your product please visit:
http://www.evga.com/support/drivers
To visit and search our knowledge base and product FAQ please visit: http://www.evga.com/FAQ
To visit the EVGA community message boards please visit: http://www.evga.com/forums
Premium Services
dvanced RMA
Limited Lifetime Warranty
upon product registration
90Day Step-Up Program
E V G A A D V A N C E D G R A P H I C S T U N I N G
For more information about these services as well as our terms and conditions please visit
www.evga.com
24/7*
Tech Support
888 . 881. EVGA
714 . 528. 4500
www.evga.com/support
*24/7 North America only
*Not all Premium Services apply
to all products.
EVGA Corp 2900 Saturn Street, Suite B Brea, CA 92821 www.evga.com