Operation

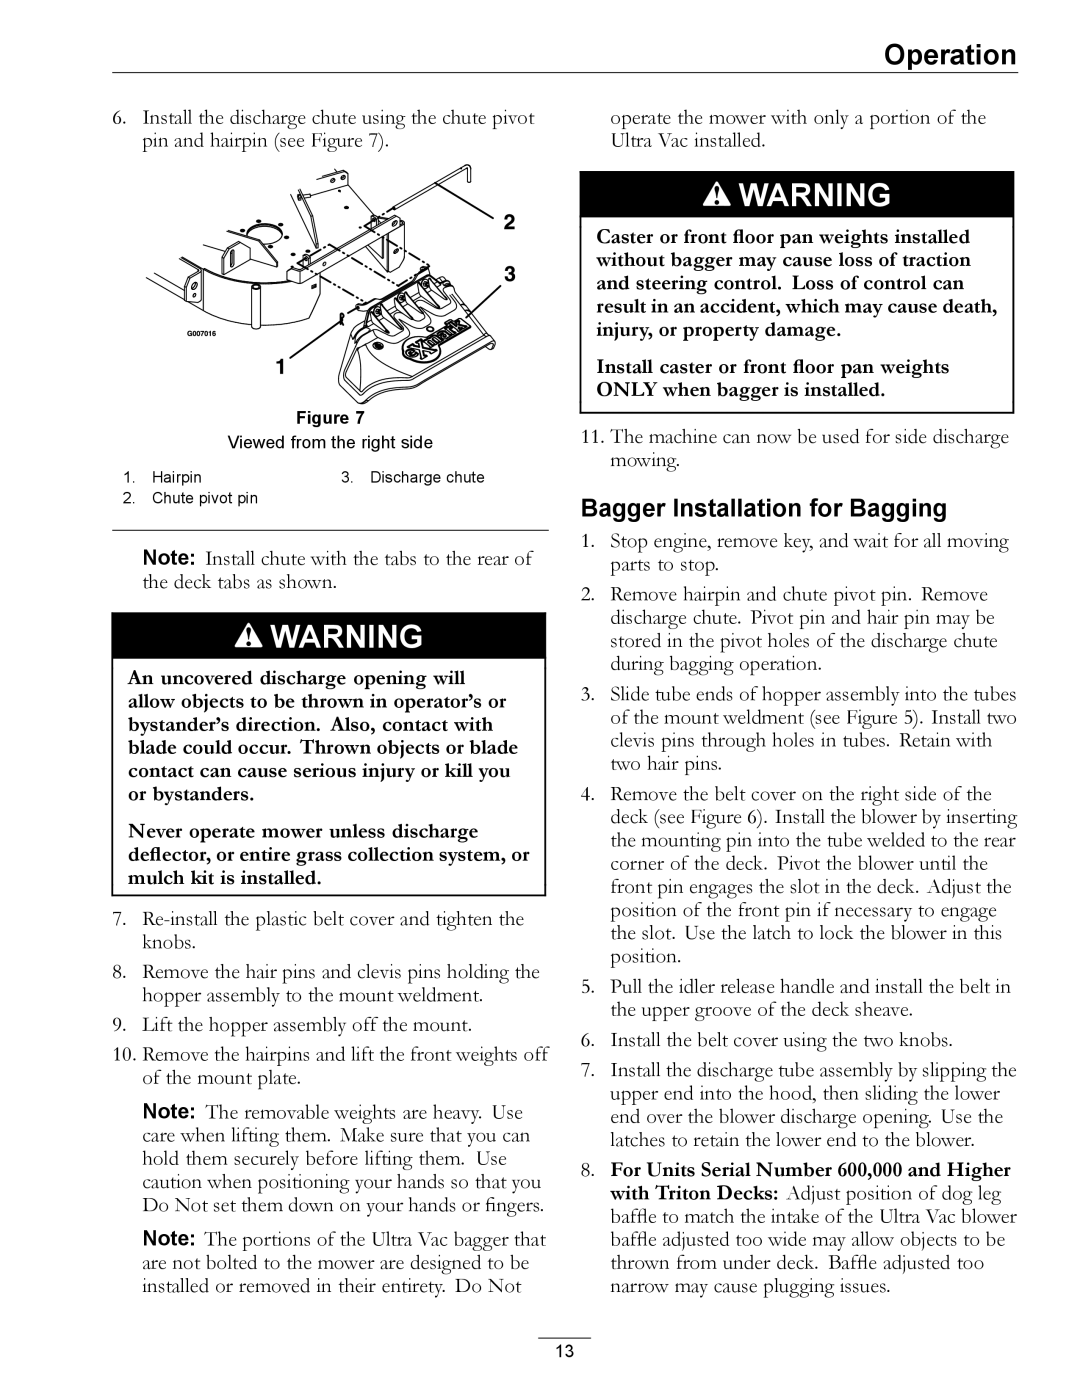
6.Install the discharge chute using the chute pivot pin and hairpin (see Figure 7).

operate the mower with only a portion of the Ultra Vac installed.

Figure 7

Viewed from the right side

1. Hairpin

3. Discharge chute

2.Chute pivot pin

Note: Install chute with the tabs to the rear of the deck tabs as shown.

WARNING

An uncovered discharge opening will allow objects to be thrown in operator’s or bystander’s direction. Also, contact with blade could occur. Thrown objects or blade contact can cause serious injury or kill you or bystanders.

Never operate mower unless discharge deflector, or entire grass collection system, or mulch kit is installed.

7.Re-install the plastic belt cover and tighten the knobs.

8.Remove the hair pins and clevis pins holding the hopper assembly to the mount weldment.

9.Lift the hopper assembly off the mount.

10.Remove the hairpins and lift the front weights off of the mount plate.

Note: The removable weights are heavy. Use care when lifting them. Make sure that you can hold them securely before lifting them. Use caution when positioning your hands so that you Do Not set them down on your hands or fingers.

Note: The portions of the Ultra Vac bagger that are not bolted to the mower are designed to be installed or removed in their entirety. Do Not

WARNING

Caster or front floor pan weights installed without bagger may cause loss of traction and steering control. Loss of control can result in an accident, which may cause death, injury, or property damage.

Install caster or front floor pan weights ONLY when bagger is installed.

11.The machine can now be used for side discharge mowing.

Bagger Installation for Bagging

1.Stop engine, remove key, and wait for all moving parts to stop.

2.Remove hairpin and chute pivot pin. Remove discharge chute. Pivot pin and hair pin may be stored in the pivot holes of the discharge chute during bagging operation.

3.Slide tube ends of hopper assembly into the tubes of the mount weldment (see Figure 5). Install two clevis pins through holes in tubes. Retain with two hair pins.

4.Remove the belt cover on the right side of the deck (see Figure 6). Install the blower by inserting the mounting pin into the tube welded to the rear corner of the deck. Pivot the blower until the front pin engages the slot in the deck. Adjust the position of the front pin if necessary to engage the slot. Use the latch to lock the blower in this position.

5.Pull the idler release handle and install the belt in the upper groove of the deck sheave.

6.Install the belt cover using the two knobs.

7.Install the discharge tube assembly by slipping the upper end into the hood, then sliding the lower end over the blower discharge opening. Use the latches to retain the lower end to the blower.

8.For Units Serial Number 600,000 and Higher with Triton Decks: Adjust position of dog leg baffle to match the intake of the Ultra Vac blower baffle adjusted too wide may allow objects to be thrown from under deck. Baffle adjusted too narrow may cause plugging issues.

13

Page 13
Image 13
Exmark QDS, 4500-420 manual Bagger Installation for Bagging

4500-420, QDS specifications

The Exmark QDS 4500-420 is a versatile and innovative attachment system designed to enhance the functionality of Exmark’s mowing equipment. The Quick Disconnect System (QDS) allows users to easily attach and detach accessories, transforming a standard mower into a multi-functional machine suitable for a variety of landscaping tasks. This significant feature streamlines operations, saving time and boosting productivity for professionals in the lawn care and landscaping industries.

One of the standout characteristics of the QDS 4500-420 is its user-friendly design. The quick-connect feature enables operators to switch between attachments such as baggers, aerators, and spreaders with minimal effort. This adaptability allows for seamless transitions between different jobs, ensuring that users can tackle any landscape challenge efficiently and effectively. The intuitive mechanism offers a secure fit, eliminating wobbles and providing peace of mind during operation.

In terms of technology, the Exmark QDS 4500-420 integrates advanced engineering principles to enhance durability and performance. The robust construction is designed to withstand the rigors of everyday use, showcasing Exmark's commitment to quality craftsmanship. The attachment system is engineered to maintain a consistent performance level, whether it's used for commercial applications or residential projects.

Another notable feature of the QDS 4500-420 is its compatibility with various Exmark models. This compatibility broadens its appeal by ensuring that a wide range of users can benefit from its innovative functionalities. This adaptability is complemented by user support, ensuring that operators can attain maximum efficiency and effectiveness with their Exmark equipment.

The QDS 4500-420 is designed with the professional landscaper in mind, addressing the common challenges they face in the field. By offering a solution that reduces downtime and enhances versatility, Exmark has established itself as a leader in landscaping innovation. This attachment system is not just about convenience; it is about empowering professionals to perform at their best.

In summary, the Exmark QDS 4500-420 is a game-changing attachment system that enhances the utility of Exmark mowers. With its user-friendly quick disconnect feature, durable construction, and broad compatibility, it represents a significant advancement in landscape management technology. This innovative system allows users to maximize their investment in equipment and take on diverse landscaping tasks with confidence and ease.