PMK 300
Installation Instructions
NOnly VersaTools products and most IP Link products can be mounted using the
1. If necessary, remove the feet from the bottom of the device to be installed.
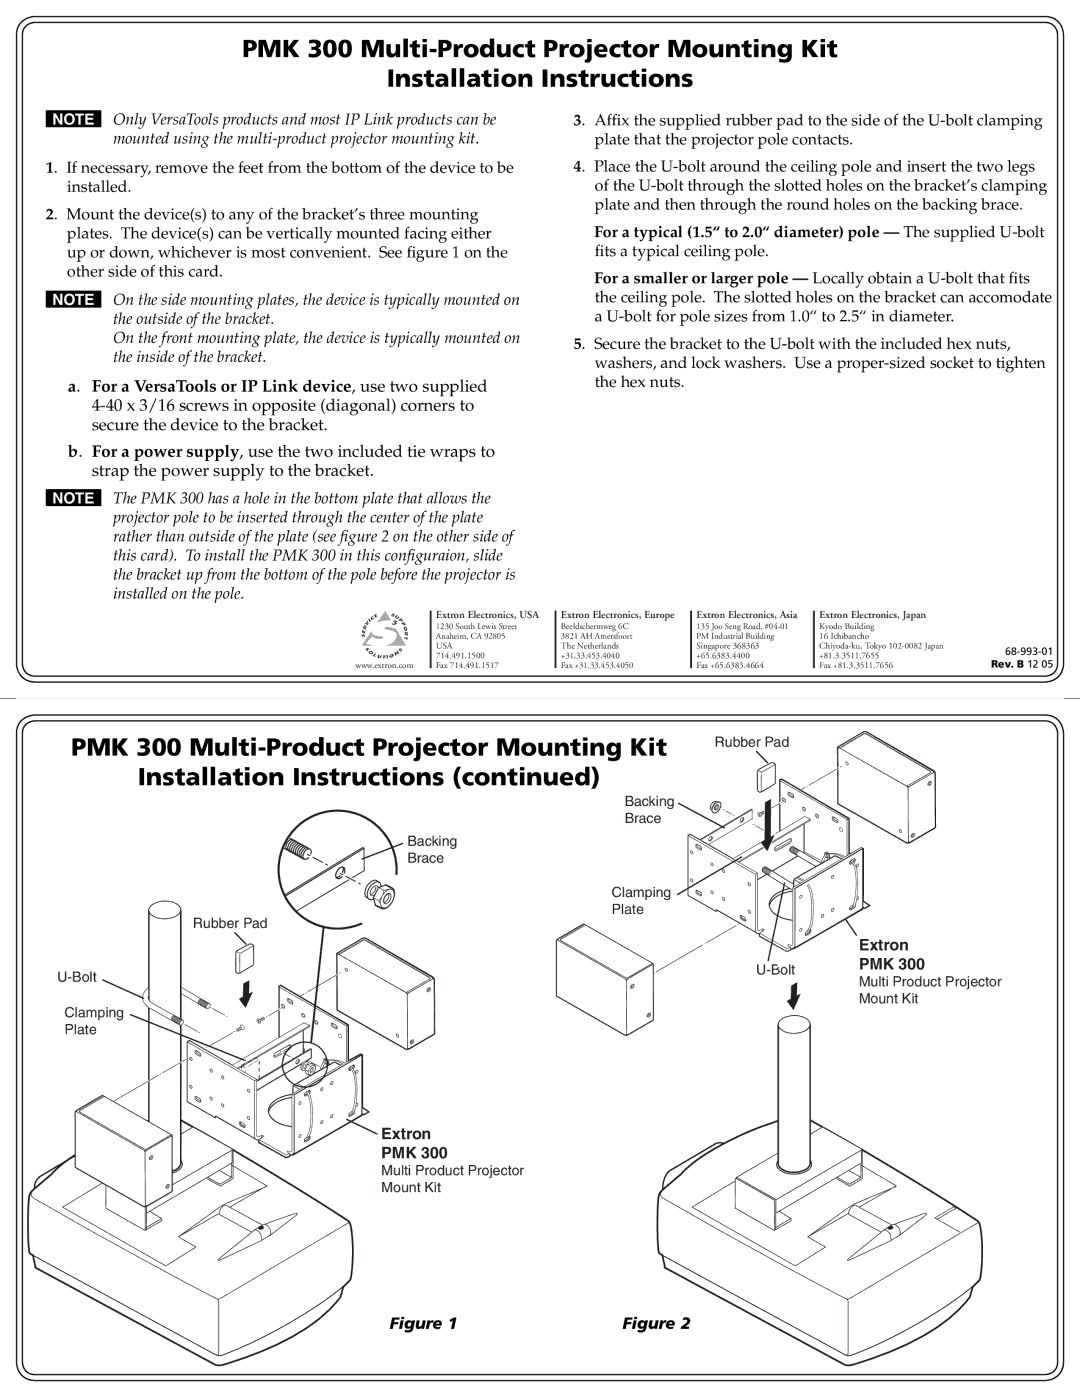
2. Mount the device(s) to any of the bracket’s three mounting plates. The device(s) can be vertically mounted facing either up or down, whichever is most convenient. See figure 1 on the other side of this card.
NOn the side mounting plates, the device is typically mounted on the outside of the bracket.
On the front mounting plate, the device is typically mounted on the inside of the bracket.
a. For a VersaTools or IP Link device, use two supplied
b. For a power supply, use the two included tie wraps to strap the power supply to the bracket.
NThe PMK 300 has a hole in the bottom plate that allows the projector pole to be inserted through the center of the plate rather than outside of the plate (see figure 2 on the other side of this card). To install the PMK 300 in this configuraion, slide the bracket up from the bottom of the pole before the projector is installed on the pole.
3. Affix the supplied rubber pad to the side of the
4. Place the
For a typical (1.5“ to 2.0“ diameter) pole — The supplied
For a smaller or larger pole — Locally obtain a
5. Secure the bracket to the
| Extron Electronics, USA | Extron Electronics, Europe |
| 1230 South Lewis Street | Beeldschermweg 6C |
| Anaheim, CA 92805 | 3821 AH Amersfoort |
| USA | The Netherlands |
www.extron.com | 714.491.1500 | +31.33.453.4040 |
Fax 714.491.1517 | Fax +31.33.453.4050 |
Extron Electronics, Asia | Extron Electronics, Japan |
| |
135 Joo Seng Road, | Kyodo Building |
| |
PM Industrial Building | 16 Ichibancho |
| |
Singapore 368363 | |||
+65.6383.4400 | +81.3.3511.7655 | ||
Rev. B 12 05 | |||
Fax +65.6383.4664 | Fax +81.3.3511.7656 |
PMK 300 | Rubber Pad |
| |
|
| ||
Installation Instructions (continued) |
|
| |
Backing |
|
| |
Brace |
|
| |
Backing |
|
| |
Brace |
|
| |
Clamping |
|
| |
Plate |
|
| |
Rubber Pad |
|
| |
|
| Extron | |
PMK 300 | |||
Multi Product Projector | |||
| |||
|
| ||
Clamping |
| Mount Kit | |
|
| ||
Plate |
|
|
Extron
PMK 300
Multi Product Projector
Mount Kit
Figure 1 | Figure 2 |