6 |
| B l u e s D e Vi l l e A m p l i f i e r |
| ||
|
Your new Blues DeVille amplifier delivers
•60 watts output into 4Ω or 8Ω
•All tube preamp and power amp provide harmonically rich distortion and
•Selectable channels offer
•Performance tested and matched GT6L6B Fender® Groove Tubes™
•
•
•External speaker jack allows optional speaker arrays
Thank you for choosing Fender®
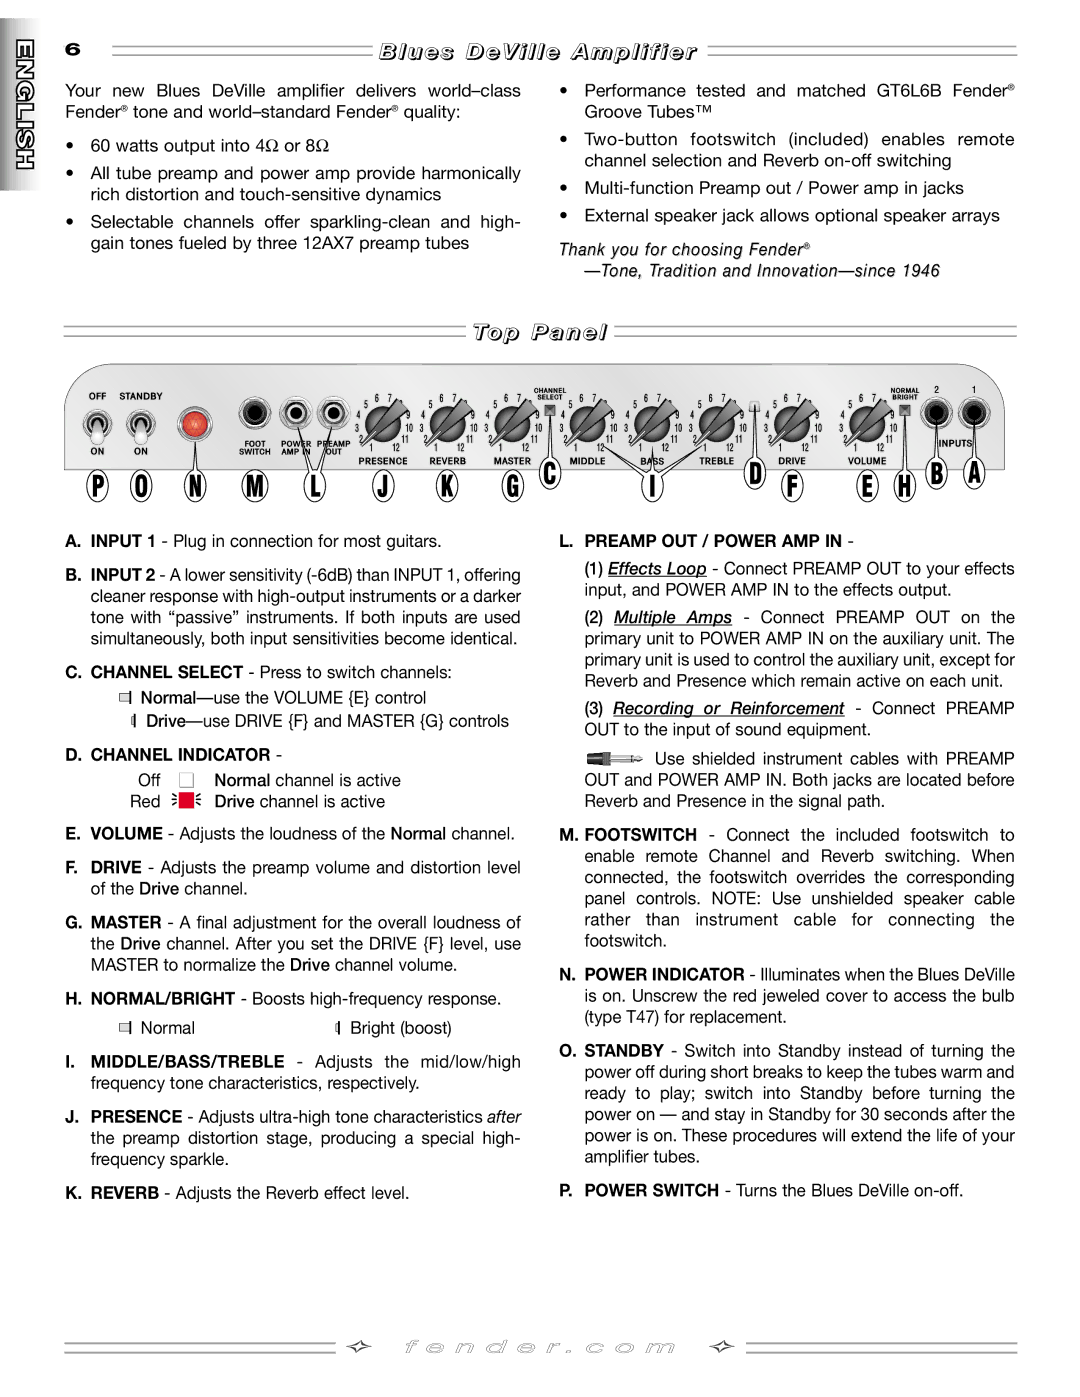
To p P a n e l
A.INPUT 1 - Plug in connection for most guitars.
B.INPUT 2 - A lower sensitivity
C.CHANNEL SELECT - Press to switch channels:
D. CHANNEL INDICATOR -
Off Normal channel is active
Red Drive channel is active
E.VOLUME - Adjusts the loudness of the Normal channel.
F.DRIVE - Adjusts the preamp volume and distortion level of the Drive channel.
G.MASTER - A final adjustment for the overall loudness of the Drive channel. After you set the DRIVE {F} level, use MASTER to normalize the Drive channel volume.
H.NORMAL/BRIGHT - Boosts
Normal |
| Bright (boost) |
|
I.MIDDLE/BASS/TREBLE - Adjusts the mid/low/high frequency tone characteristics, respectively.
J.PRESENCE - Adjusts
K.REVERB - Adjusts the Reverb effect level.
L.PREAMP OUT / POWER AMP IN -
(1)Effects Loop - Connect PREAMP OUT to your effects input, and POWER AMP IN to the effects output.
(2)Multiple Amps - Connect PREAMP OUT on the primary unit to POWER AMP IN on the auxiliary unit. The primary unit is used to control the auxiliary unit, except for Reverb and Presence which remain active on each unit.
(3)Recording or Reinforcement - Connect PREAMP OUT to the input of sound equipment.
![]()
![]()
![]()
![]()
![]() Use shielded instrument cables with PREAMP OUT and POWER AMP IN. Both jacks are located before Reverb and Presence in the signal path.
Use shielded instrument cables with PREAMP OUT and POWER AMP IN. Both jacks are located before Reverb and Presence in the signal path.
M. FOOTSWITCH - Connect the included footswitch to enable remote Channel and Reverb switching. When connected, the footswitch overrides the corresponding panel controls. NOTE: Use unshielded speaker cable rather than instrument cable for connecting the footswitch.
N.POWER INDICATOR - Illuminates when the Blues DeVille is on. Unscrew the red jeweled cover to access the bulb (type T47) for replacement.
O.STANDBY - Switch into Standby instead of turning the power off during short breaks to keep the tubes warm and ready to play; switch into Standby before turning the power on — and stay in Standby for 30 seconds after the power is on. These procedures will extend the life of your amplifier tubes.
P.POWER SWITCH - Turns the Blues DeVille
![]() ✧ f e n d e r . c o m ✧
✧ f e n d e r . c o m ✧