P R E - I N S T A L L A T I O N
Thank you for purchasing a quality stainless canopy rangehood. We have a high standard of quality control and each rangehood is tested and approved before it leaves the factory.
IMPORTANT : Please read prior to installation and operation.
•Always switch the power off prior to installing, servicing or cleaning the appliance.
•Never use the appliance without the filters.
• Please read the notes on general cleaning, especially the filters .
•Exhaust air must not be discharged into a heating flue or wall cavity, unless the cavity is designed for that purpose.
•Areas where the rangehood is installed that also have gas, oil or coal fired heaters, must be well ventilated to prevent a partial vacuum in the room. This includes gas hobs. (A partial vacuum in the room could result in too high a concentration of gas in the air).
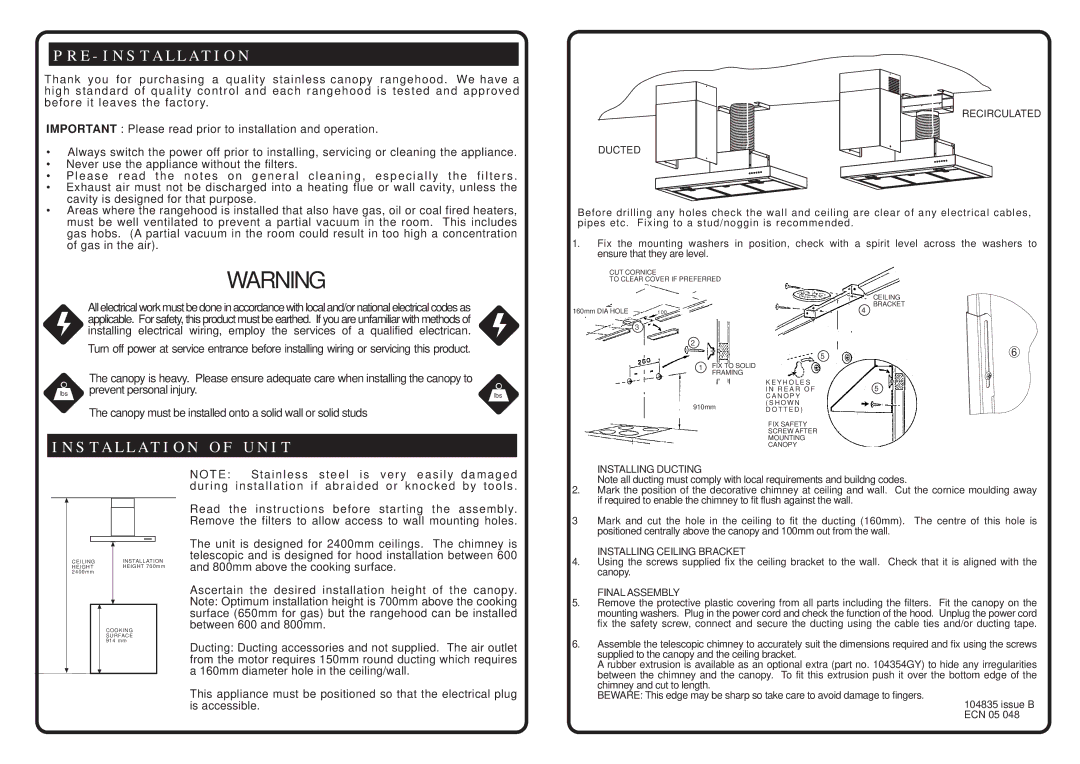
RECIRCULATED
DUCTED
Before drilling any holes check the wall and ceiling are clear of any electrical cables, pipes etc. Fixing to a stud/noggin is recommended.
1.Fix the mounting washers in position, check with a spirit level across the washers to ensure that they are level.
WARNING
All electrical work must be done in accordance with local and/or national electrical codes as applicable. For safety, this product must be earthed. If you are unfamiliar with methods of installing electrical wiring, employ the services of a qualified electrican.
Turn off power at service entrance before installing wiring or servicing this product.
| The canopy is heavy. Please ensure adequate care when installing the canopy to |
|
lbs | prevent personal injury. | lbs |
The canopy must be installed onto a solid wall or solid studs
I N S T A L L A T I O N O F U N I T
CUT CORNICE
TO CLEAR COVER IF PREFERRED
160mm DIA HOLE | 100 |
3
2
1 | FIX TO SOLID |
| FRAMING |
910mm
5
K E Y H O L E S I N R E A R O F C A N O P Y
( S H O W N
D O T T E D )
FIX SAFETY SCREW AFTER MOUNTING CANOPY
CEILING
BRACKET
4
6
5
CEILING INSTALLATION
HEIGHTHEIGHT 700mm 2400mm
COOKING SURFACE 914 mm
NOTE: Stainless steel is very easily damaged during installation if abraided or knocked by tools.
Read the instructions before starting the assembly. Remove the filters to allow access to wall mounting holes.
The unit is designed for 2400mm ceilings. The chimney is telescopic and is designed for hood installation between 600 and 800mm above the cooking surface.
Ascertain the desired installation height of the canopy. Note: Optimum installation height is 700mm above the cooking surface (650mm for gas) but the rangehood can be installed between 600 and 800mm.
Ducting: Ducting accessories and not supplied. The air outlet from the motor requires 150mm round ducting which requires a 160mm diameter hole in the ceiling/wall.
This appliance must be positioned so that the electrical plug is accessible.
INSTALLING DUCTING
Note all ducting must comply with local requirements and buildng codes.
2.Mark the position of the decorative chimney at ceiling and wall. Cut the cornice moulding away if required to enable the chimney to fit flush against the wall.
3Mark and cut the hole in the ceiling to fit the ducting (160mm). The centre of this hole is positioned centrally above the canopy and 100mm out from the wall.
INSTALLING CEILING BRACKET
4.Using the screws supplied fix the ceiling bracket to the wall. Check that it is aligned with the canopy.
FINAL ASSEMBLY
5.Remove the protective plastic covering from all parts including the filters. Fit the canopy on the mounting washers. Plug in the power cord and check the function of the hood. Unplug the power cord fix the safety screw, connect and secure the ducting using the cable ties and/or ducting tape.
6.Assemble the telescopic chimney to accurately suit the dimensions required and fix using the screws supplied to the canopy and the ceiling bracket.
A rubber extrusion is available as an optional extra (part no. 104354GY) to hide any irregularities between the chimney and the canopy. To fit this extrusion push it over the bottom edge of the chimney and cut to length.
BEWARE: This edge may be sharp so take care to avoid damage to fingers.
104835 issue B ECN 05 048