Assembly
Remaining | Holes | |
Tube Ends | ||
Handles | ||
|
|
|
|
|
|
|
|
|
|
| Fis |
|
|
|
|
|
|
|
|
|
| |
| TTERA LFN BDLOU NITELL FOAU STEN |
|
| NOTICE | cePri | |||||
7 | LL |
|
| |||||||
|
| RO | EXE | 611 | MEO | CFO AMALFSIHT |
|
| ||
|
|
|
|
| H |
|
|
|
| |
|
| BUHWIT | DESIRC.711DAN | NRUFROFILA YTILIB | CLIRTA |
| W | |||
|
| R | AC |
| AIN | R | E |
| A | |
| GICGNINEPORA | HSER |
| ERBU MERIEQU ASTEME |
| |||||
.SE | EAM | E | S |
|
|
|
|
| RNING: | |
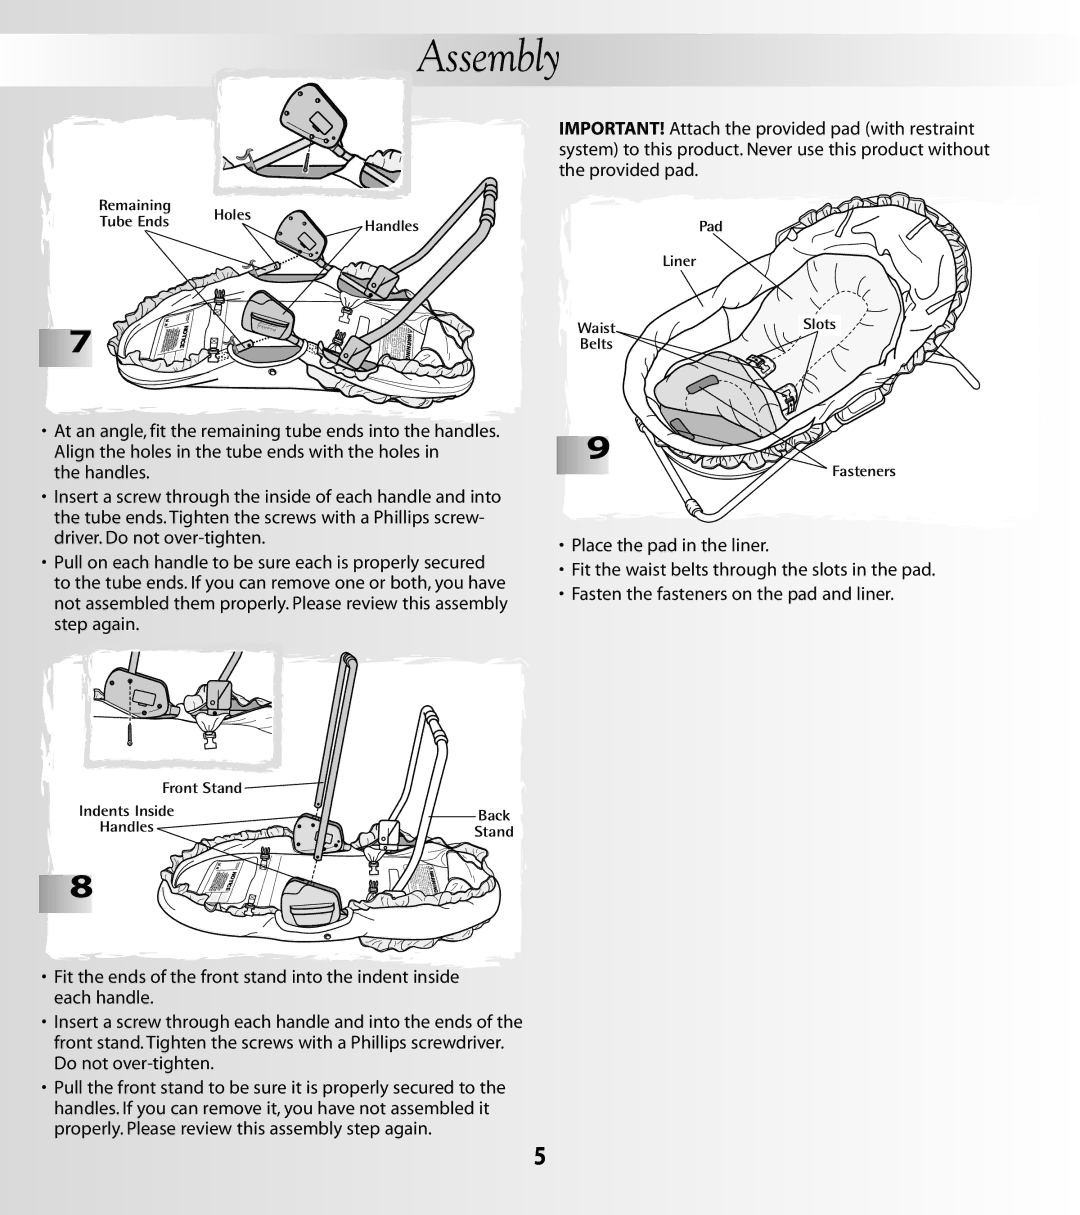
•At an angle, fit the remaining tube ends into the handles. Align the holes in the tube ends with the holes in
the handles.
•Insert a screw through the inside of each handle and into the tube ends. Tighten the screws with a Phillips screw- driver. Do not
•Pull on each handle to be sure each is properly secured to the tube ends. If you can remove one or both, you have not assembled them properly. Please review this assembly
step again.
IMPORTANT! Attach the provided pad (with restraint system) to this product. Never use this product without the provided pad.
| Pad |
| Liner |
Waist | Slots |
Belts |
|
![]()
![]()
![]()
![]()
![]()
![]()
![]()
![]()
![]()
![]()
![]()
![]()
![]()
![]()
![]()
![]()
![]()
![]()
![]()
![]()
![]()
![]() 9
9![]()
![]()
![]()
![]()
![]()
![]()
Fasteners
•Place the pad in the liner.
•Fit the waist belts through the slots in the pad.
•Fasten the fasteners on the pad and liner.
Front Stand ![]()
Indents Inside
Handles
eshiF
8 | TICE | NO |
|
Back
Stand
WAR
N
I
N
G
:
•Fit the ends of the front stand into the indent inside each handle.
•Insert a screw through each handle and into the ends of the front stand. Tighten the screws with a Phillips screwdriver. Do not
•Pull the front stand to be sure it is properly secured to the handles. If you can remove it, you have not assembled it properly. Please review this assembly step again.
5
