GS Turbo Quick Start.qxd:QS.Pro3.qxd 5/9/07 1:54 PM Page 2
Getting Started
Registering your appliance is quick and easy at www.foodsaver.com.
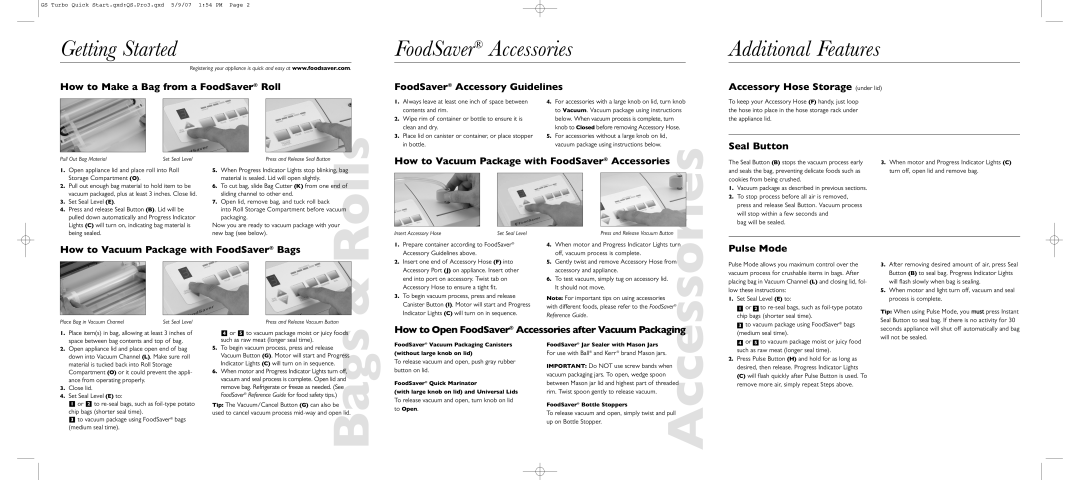
How to Make a Bag from a FoodSaver® Roll
FoodSaver® Accessories
FoodSaver® Accessory Guidelines
Additional Features
Accessory Hose Storage (under lid)
1. | Always leave at least one inch of space between |
| contents and rim. |
2. | Wipe rim of container or bottle to ensure it is |
| clean and dry. |
3. | Place lid on canister or container, or place stopper |
4. | For accessories with a large knob on lid, turn knob |
| to Vacuum. Vacuum package using instructions |
| below. When vacuum process is complete, turn |
| knob to Closed before removing Accessory Hose. |
5. | For accessories without a large knob on lid, |
To keep your Accessory Hose (F) handy, just loop the hose into place in the hose storage rack under the appliance lid.
in bottle. |
vacuum package using instructions below. |
Seal Button
Pull Out Bag Material | Set Seal Level |
1.Open appliance lid and place roll into Roll Storage Compartment (O).
2.Pull out enough bag material to hold item to be vacuum packaged, plus at least 3 inches. Close lid.
3.Set Seal Level (E).
4.Press and release Seal Button (B). Lid will be pulled down automatically and Progress Indicator Lights (C) will turn on, indicating bag material is being sealed.
|
|
|
|
|
| How to Vacuum Package with FoodSaver® Accessories | |||||
|
|
|
|
|
|
|
|
|
|
|
|
|
|
|
|
|
|
|
|
|
|
|
|
|
|
|
|
|
| Insert Accessory Hose | Set Seal Level |
|
| Press and Release Vacuum Button | |
|
|
|
|
|
| 1. Prepare container according to FoodSaver® | 4. When motor and Progress Indicator Lights turn | ||||
|
|
|
|
|
|
|
|
|
|
|
|
|
|
|
|
|
|
|
|
|
|
|
|
|
|
|
|
|
|
|
|
|
|
|
|
|
|
|
|
|
|
|
|
|
|
|
|
The Seal Button (B) stops the vacuum process early and seals the bag, preventing delicate foods such as cookies from being crushed.
1.Vacuum package as described in previous sections.
2.To stop process before all air is removed, press and release Seal Button. Vacuum process will stop within a few seconds and
bag will be sealed.
3.When motor and Progress Indicator Lights (C) turn off, open lid and remove bag.
| Press and Release Seal Button |
5. | When Progress Indicator Lights stop blinking, bag |
| material is sealed. Lid will open slightly. |
6. | To cut bag, slide Bag Cutter (K) from one end of |
| sliding channel to other end. |
7. | Open lid, remove bag, and tuck roll back |
| into Roll Storage Compartment before vacuum |
| Rolls& |
packaging.
Now you are ready to vacuum package with your new bag (see below).
Accessory Guidelines above. |
| off, vacuum process is complete. |
|
2. Insert one end of Accessory Hose (F) into | 5. | Gently twist and remove Accessory Hose from | |
Accessory Port (J) on appliance. Insert other |
| accessory and appliance. |
|
end into port on accessory. Twist tab on | 6. | To test vacuum, simply tug on accessory lid. | |
Accessory Hose to ensure a tight fit. |
| It should not move. |
|
3. To begin vacuum process, press and release | Note: For important tips on using accessories |
| |
Canister Button (I). Motor will start and Progress |
| ||
with different foods, please refer to the FoodSaver® | |||
Indicator Lights (C) will turn on in sequence. | Reference Guide. | Accessories | |
| |||
|
|
| |
Pulse Mode
Pulse Mode allows you maximum control over the vacuum process for crushable items in bags. After placing bag in Vacuum Channel (L) and closing lid, fol- low these instructions:
1. Set Seal Level (E) to: |
1 or 2 to |
chip bags (shorter seal time). |
3.After removing desired amount of air, press Seal Button (B) to seal bag. Progress Indicator Lights will flash slowly when bag is sealing.
5.When motor and light turn off, vacuum and seal process is complete.
Tip: When using Pulse Mode, you must press Instant
Place Bag in Vacuum Channel | Set Seal Level | Press and Release Vacuum Button |
3 to vacuum package using FoodSaver® bags |
Seal Button to seal bag. If there is no activity for 30
1. | Place item(s) in bag, allowing at least 3 inches of |
| space between bag contents and top of bag. |
2. | Open appliance lid and place open end of bag |
| down into Vacuum Channel (L). Make sure roll |
| material is tucked back into Roll Storage |
| Compartment (O) or it could prevent the appli- |
| ance from operating properly. |
3. | Close lid. |
4. | Set Seal Level (E) to: |
such as raw meat (longer seal time).
5. To begin vacuum process, press and release Vacuum Button (G). Motor will start and Progress Indicator Lights (C) will turn on in sequence.
6. When motor and Progress Indicator Lights turn off, vacuum and seal process is complete. Open lid and remove bag. Refrigerate or freeze as needed. (See FoodSaver® Reference Guide for food safety tips.)
4 or 5 to vacuum package moist or juicy Bagsfoods
How to Open FoodSaver® Accessories after Vacuum Packaging | ||
FoodSaver® Vacuum Packaging Canisters | FoodSaver® Jar Sealer with Mason Jars | |
(without large knob on lid) | For use with Ball® and Kerr ® brand Mason jars. | |
To release vacuum and open, push gray rubber | IMPORTANT: Do NOT use screw bands when | |
button on lid. | ||
vacuum packaging jars. To open, wedge spoon | ||
| ||
FoodSaver® Quick Marinator | between Mason jar lid and highest part of threaded | |
(with large knob on lid) and Universal Lids | rim. Twist spoon gently to release vacuum. | |
To release vacuum and open, turn knob on lid |
| |
(medium seal time). |
4 or 5 to vacuum package moist or juicy food |
such as raw meat (longer seal time). |
2. Press Pulse Button (H) and hold for as long as |
desired, then release. Progress Indicator Lights |
(C) will flash quickly after Pulse Button is used. To |
remove more air, simply repeat Steps above. |
seconds appliance will shut off automatically and bag will not be sealed.
1 | or 2 to |
chip bags (shorter seal time). | |
3 | to vacuum package using FoodSaver® bags |
(medium seal time). | |
Tip: The Vacuum/Cancel Button (G) can also be used to cancel vacuum process
to Open.
FoodSaver® Bottle Stoppers
To release vacuum and open, simply twist and pull up on Bottle Stopper.