Quick Start Guide
Features
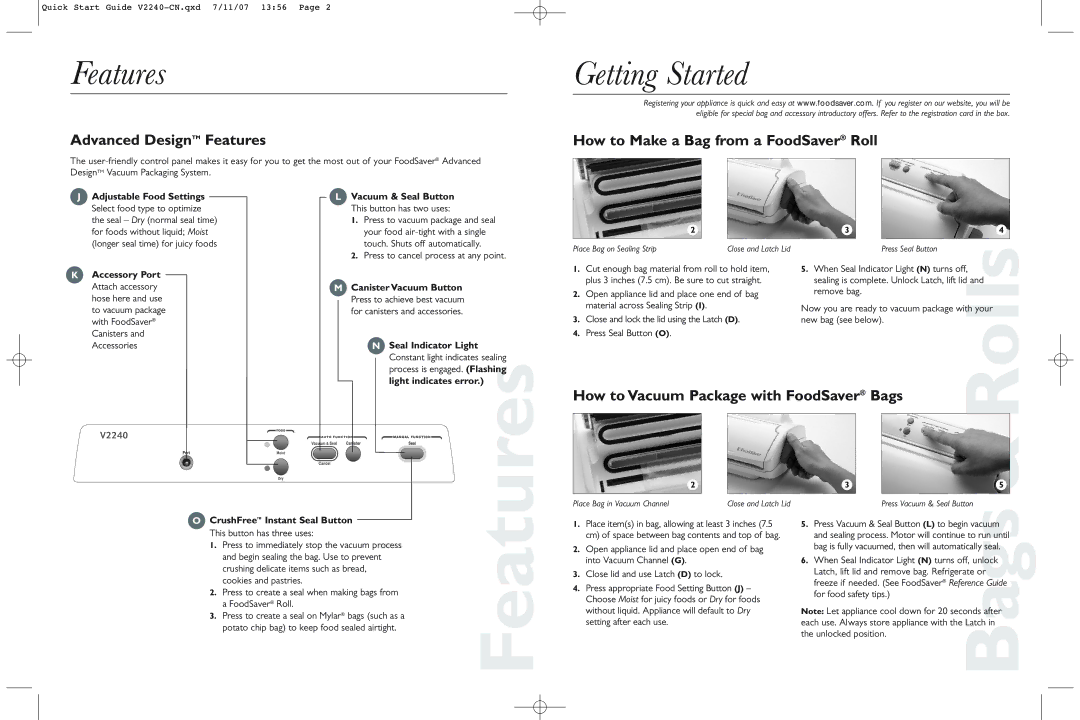
Advanced DesignTM Features
The
Getting Started
Registering your appliance is quick and easy at www.foodsaver.com. If you register on our website, you will be eligible for special bag and accessory introductory offers. Refer to the registration card in the box.
How to Make a Bag from a FoodSaver® Roll
JAdjustable Food Settings Select food type to optimize the seal – Dry (normal seal time) for foods without liquid; Moist (longer seal time) for juicy foods
KAccessory Port
LVacuum & Seal Button This button has two uses:
1.Press to vacuum package and seal your food
2.Press to cancel process at any point.
| 2 |
|
| 3 |
|
| 4 |
|
|
|
|
|
|
|
|
Place Bag on Sealing Strip |
|
| Close and Latch Lid |
|
| Press Seal Button |
|
1. Cut enough bag material from roll to hold item, | 5. When Seal Indicator Light (N) turns off, |
| |||||
plus 3 inches (7.5 cm). Be sure to cut straight. | sealing is complete. Unlock Latch, lift lid and |
| |||||
Attach accessory hose here and use to vacuum package with FoodSaver® Canisters and Accessories
MCanister Vacuum Button Press to achieve best vacuum for canisters and accessories.
N Seal Indicator Light
Constant light indicates sealing process is engaged. (Flashing light indicates error.)
O CrushFree™ Instant Seal Button | Features | ||
This button has three uses: | |||
| |||
1. | Press to immediately stop the vacuum process |
| |
| and begin sealing the bag. Use to prevent |
| |
| crushing delicate items such as bread, |
| |
| cookies and pastries. |
| |
2. | Press to create a seal when making bags from |
| |
| a FoodSaver® Roll. |
| |
3. | Press to create a seal on Mylar® bags (such as a |
| |
| potato chip bag) to keep food sealed airtight. |
| |
2. | Open appliance lid and place one end of bag | remove bag. |
| material across Sealing Strip (I). | Now you are ready to vacuum package with your |
| Close and lock the lid using the Latch (D). | |
3. | new bag (see below). | |
4. | Press Seal Button (O). |
|
How to Vacuum Package with FoodSaver® Bags | Rolls |
| |||||||
|
|
|
|
|
|
|
| ||
| 2 |
|
| 3 |
|
|
| 5 |
|
|
|
|
|
|
|
| & |
| |
Place Bag in Vacuum Channel | Close and Latch Lid |
|
| Press Vacuum & Seal Button |
|
| |||
1. | Place item(s) in bag, allowing at least 3 inches (7.5 | 5. Press Vacuum & Seal Button (L) to begin vacuum | |||||||
| cm) of space between bag contents and top of bag. | and sealing process. Motor will continue to run until | |||||||
2. | Open appliance lid and place open end of bag | bag is fully vacuumed, then will automatically seal. | |||||||
| into Vacuum Channel (G). |
| 6. When Seal Indicator Light (N) turns off, unlock |
|
| ||||
3. | Close lid and use Latch (D) to lock. |
| Latch, lift lid and remove bag. Refrigerate or |
|
| ||||
4. | Press appropriate Food Setting Button (J) – | freeze if needed. (See FoodSaver® Reference Guide | |||||||
for food safety tips.) |
|
|
| ||||||
| Choose Moist for juicy foods or Dry for foods |
|
|
| |||||
|
|
|
|
|
|
| |||
| without liquid. Appliance will default to Dry | Note: Let appliance cool down for 20 seconds after | |||||||
| setting after each use. |
| each use. Always store appliance with the Latch in |
|
| ||||
|
|
|
| the unlocked position. | Bags | ||||
|
|
|
|
|
|
| |||
