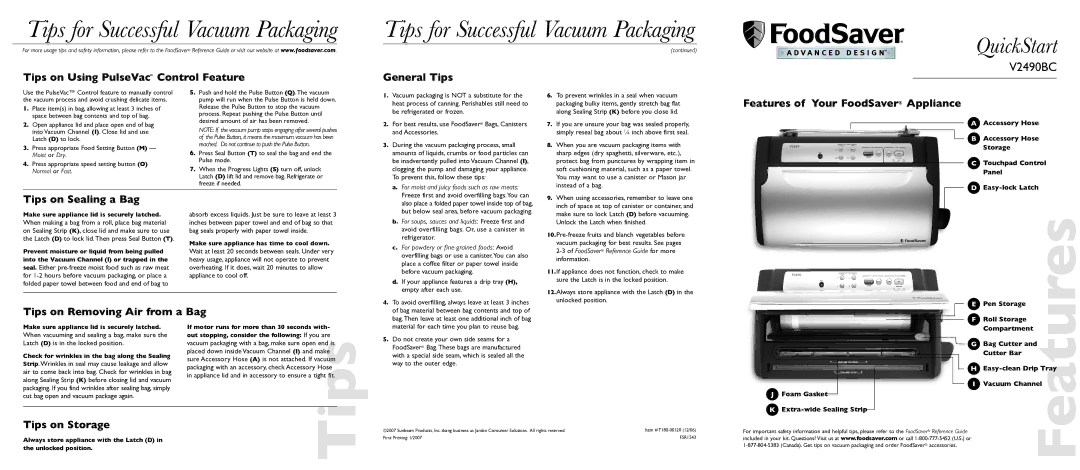
Tips for Successful Vacuum Packaging
For more usage tips and safety information, please refer to the FoodSaver® Reference Guide or visit our website at www.foodsaver.com.
Tips on Using PulseVac™ Control Feature
Tips for Successful Vacuum Packaging
(continued)
General Tips
QuickStart
V2490BCUse the PulseVac™ Control feature to manually control the vacuum process and avoid crushing delicate items.
1.Place item(s) in bag, allowing at least 3 inches of space between bag contents and top of bag.
2.Open appliance lid and place open end of bag into Vacuum Channel (I). Close lid and use Latch (D) to lock.
3.Press appropriate Food Setting Button (M) —
Moist or Dry.
4.Press appropriate speed setting button (O)
Normal or Fast.
5.Push and hold the Pulse Button (Q).The vacuum pump will run when the Pulse Button is held down. Release the Pulse Button to stop the vacuum process. Repeat pushing the Pulse Button until desired amount of air has been removed.
NOTE: If the vacuum pump stops engaging after several pushes of the Pulse Button, it means the maximum vacuum has been reached. Do not continue to push the Pulse Button.
6.Press Seal Button (T) to seal the bag and end the Pulse mode.
7.When the Progress Lights (S) turn off, unlock Latch (D) lift lid and remove bag. Refrigerate or freeze if needed.
1. | Vacuum packaging is NOT a substitute for the |
| heat process of canning. Perishables still need to |
| be refrigerated or frozen. |
2. | For best results, use FoodSaver® Bags, Canisters |
| and Accessories. |
3. | During the vacuum packaging process, small |
| amounts of liquids, crumbs or food particles can |
| be inadvertently pulled into Vacuum Channel (I), |
| clogging the pump and damaging your appliance. |
| To prevent this, follow these tips: |
| a. For moist and juicy foods such as raw meats: |
6. | To prevent wrinkles in a seal when vacuum |
| packaging bulky items, gently stretch bag flat |
| along Sealing Strip (K) before you close lid. |
7. | If you are unsure your bag was sealed properly, |
| simply reseal bag about 1⁄4 inch above first seal. |
8. | When you are vacuum packaging items with |
| sharp edges (dry spaghetti, silverware, etc.), |
| protect bag from punctures by wrapping item in |
| soft cushioning material, such as a paper towel. |
| You may want to use a canister or Mason jar |
| instead of a bag. |
Features of Your FoodSaver® Appliance
A Accessory Hose
B Accessory Hose
Storage
C Touchpad Control
Panel
D
Tips on Sealing a Bag
Make sure appliance lid is securely latched.
When making a bag from a roll, place bag material on Sealing Strip (K), close lid and make sure to use the Latch (D) to lock lid.Then press Seal Button (T).
absorb excess liquids. Just be sure to leave at least 3 inches between paper towel and end of bag so that bag seals properly with paper towel inside.
Make sure appliance has time to cool down.
Freeze first and avoid overfilling bags.You can |
also place a folded paper towel inside top of bag, |
but below seal area, before vacuum packaging. |
b. For soups, sauces and liquids: Freeze first and |
avoid overfilling bags. Or, use a canister in |
refrigerator. |
Avoid |
9. When using accessories, remember to leave one |
inch of space at top of canister or container, and |
make sure to lock Latch (D) before vacuuming. |
Unlock the Latch when finished. |
Prevent moisture or liquid from being pulled | Wait at least 20 seconds between seals. Under very |
into the Vacuum Channel (I) or trapped in the | heavy usage, appliance will not operate to prevent |
seal. Either | overheating. If it does, wait 20 minutes to allow |
for | appliance to cool off. |
folded paper towel between food and end of bag to |
|
Tips on Removing Air from a Bag
Make sure appliance lid is securely latched. | If motor runs for more than 30 seconds with- | |
When vacuuming and sealing a bag, make sure the | out stopping, consider the following: If you are | |
Latch (D) is in the locked position. | vacuum packaging with a bag, make sure open end is | |
Check for wrinkles in the bag along the Sealing | placed down inside Vacuum Channel (I) and make | |
sure Accessory Hose (A) is not attached. If vacuum | ||
Strip.Wrinkles in seal may cause leakage and allow | ||
packaging with an accessory, check Accessory Hose | ||
air to come back into bag. Check for wrinkles in bag | ||
in appliance lid and in accessory to ensure a tight fit. | ||
along Sealing Strip (K) before closing lid and vacuum | ||
Tips | ||
packaging. If you find wrinkles after sealing bag, simply | ||
cut bag open and vacuum package again. | ||
Tips on Storage | ||
|
c. | For powdery or |
| overfilling bags or use a canister.You can also |
| place a coffee filter or paper towel inside |
| before vacuum packaging. |
d. If your appliance features a drip tray (H), | |
| empty after each use. |
4. To avoid overfilling, always leave at least 3 inches | |
of bag material between bag contents and top of | |
bag.Then leave at least one additional inch of bag | |
material for each time you plan to reuse bag. | |
5. Do not create your own side seams for a | |
FoodSaver® Bag.These bags are manufactured | |
with a special side seam, which is sealed all the | |
way to the outer edge. |
11.If appliance does not function, check to make sure the Latch is in the locked position.
12.Always store appliance with the Latch (D) in the unlocked position.
E | Pen Storage | |
F | Roll Storage | |
| Compartment | |
G | Bag Cutter and | |
| Cutter Bar |
|
H | ||
I | Vacuum Channel | |
J Foam Gasket |
| Features |
K |
| |
|
|
Always store appliance with the Latch (D) in |
the unlocked position. |
©2007 Sunbeam Products, Inc. doing business as Jarden Consumer Solutions. All rights reserved. | Item # |
First Printing: 1/2007 | FSR1543 |
For important safety information and helpful tips, please refer to the FoodSaver® Reference Guide |
included in your kit. Questions? Visit us at www.foodsaver.com or call |