Getting Started
Registering your appliance is quick and easy at www.foodsaver.com.
FoodSaver Accessories
Accessories include FoodSaver Vacuum Packaging Canisters, Universal Lids, Jar Sealers and Bottle Stoppers.
Additional Features
How to Make a Bag from a FoodSaver Roll
4. For accessories with a large knob on lid, turn knob to Vacuum. Vacuum package using instructions below. When vacuum process is complete, turn knob to Closed before removing Accessory Hose.
5. For accessories without a large knob on lid, vacuum package using instructions below.
Seal Only
Use this feature to reseal
1.Turn Seal Control Switch (E) to Seal Only.
2.Lift appliance lid and place open end of bag across Sealing Strip (K).
3.Press down firmly on lid and hold until Indicator Light (D) turns off.
4.Open lid and remove sealed bag.
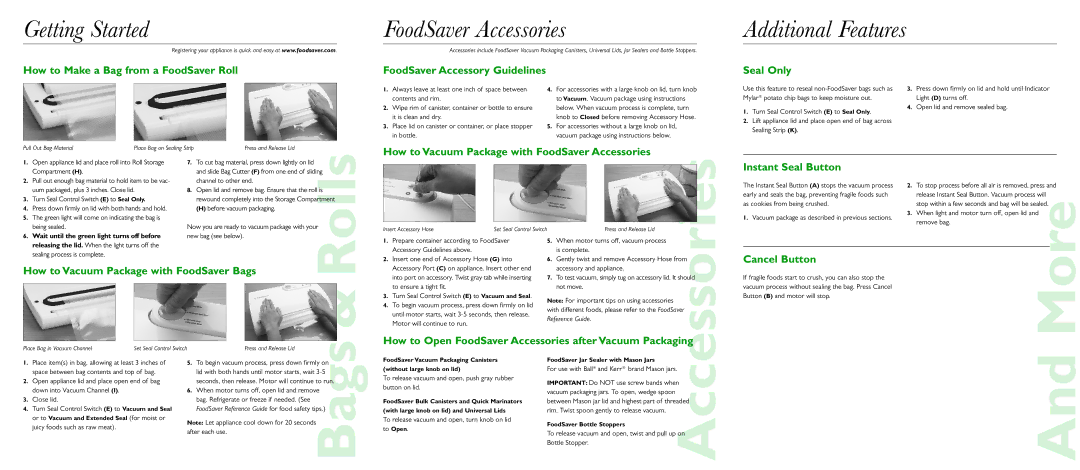
Pull Out Bag Material | Place Bag on Sealing Strip |
| Press and Release Lid |
|
| ||||
1. | Open appliance lid and place roll into Roll Storage | 7. | To cut bag material, press down lightly on lid |
|
| ||||
| Compartment (H). |
|
| and slide Bag Cutter (F) from one end of sliding | |||||
2. | Pull out enough bag material to hold item to be vac- |
| channel to other end. |
|
| ||||
| uum packaged, plus 3 inches. Close lid. | 8. | Open lid and remove bag. Ensure that the roll is | ||||||
3. | Turn Seal Control Switch (E) to Seal Only. |
| rewound completely into the Storage Compartment | ||||||
4. | Press down firmly on lid with both hands and hold. |
| (H) before vacuum packaging. |
|
| ||||
5. | The green light will come on indicating the bag is |
|
|
|
|
|
| ||
| being sealed. |
| Now you are ready to vacuum package with your | ||||||
6. | Wait until the green light turns off before | new bag (see below). | Rolls | ||||||
| releasing the lid. When the light turns off the |
|
|
|
| ||||
| sealing process is complete. |
|
|
|
|
| |||
How to Vacuum Package with FoodSaver Bags | |||||||||
|
|
|
|
|
|
|
|
|
|
|
|
|
|
|
|
|
| & | |
|
|
|
|
|
|
|
| ||
Place Bag in Vacuum Channel | Set Seal Control Switch |
|
| Press and Release Lid |
|
| |||
1. | Place item(s) in bag, allowing at least 3 inches of | 5. To begin vacuum process, press down firmly on | |||||||
| space between bag contents and top of bag. |
| lid with both hands until motor starts, wait | ||||||
2. | Open appliance lid and place open end of bag |
| seconds, then release. Motor will continue to run. | ||||||
| down into Vacuum Channel (I). |
| 6. When motor turns off, open lid and remove | ||||||
3. | Close lid. |
|
| bag. Refrigerate or freeze if needed. (See |
|
| |||
4. | Turn Seal Control Switch (E) to Vacuum and Seal |
| FoodSaver Reference Guide for food safety tips.) | ||||||
| or to Vacuum and Extended Seal (for moist or | Note: Let appliance cool down for 20 seconds | |||||||
| juicy foods such as raw meat). |
| |||||||
|
| after each use. | Bags | ||||||
|
|
|
| ||||||
|
|
|
|
|
|
|
| ||
1. | Prepare container according to FoodSaver | 5. When motor turns off, vacuum process |
| |
| Accessory Guidelines above. | is complete. |
| |
2. | Insert one end of Accessory Hose (G) into | 6. Gently twist and remove Accessory Hose from | ||
| Accessory Port (C) on appliance. Insert other end | accessory and appliance. |
| |
| into port on accessory. Twist gray tab while inserting | 7. To test vacuum, simply tug on accessory lid. It should | ||
| to ensure a tight fit. | not move. |
| |
3. | Turn Seal Control Switch (E) to Vacuum and Seal. | Note: For important tips on using accessories |
| |
4. | To begin vacuum process, press down firmly on lid |
| ||
with different foods, please refer to the FoodSaver | ||||
| until motor starts, wait | |||
| Reference Guide. |
| ||
| Motor will continue to run. |
| ||
|
|
| ||
How to Open FoodSaver Accessories after Vacuum Packaging | ||||
|
|
| Accessories | |
For use with Ball® and Kerr ® brand Mason jars.
IMPORTANT: Do NOT use screw bands when vacuum packaging jars. To open, wedge spoon between Mason jar lid and highest part of threaded rim. Twist spoon gently to release vacuum.
on
Instant Seal Button
The Instant Seal Button (A) stops the vacuum process | 2. To stop process before all air is removed, press and | ||
early and seals the bag, preventing fragile foods such | release Instant Seal Button. Vacuum process will | ||
as cookies from being crushed. | MoreAnd | ||
stop within a few seconds and bag will be seal d. | |||
1. Vacuum package as described in previous sections. | 3. When light and motor turn off, open lid and | ||
remove bag. | |||
| |||
|
|
| |
Cancel Button |
|
| |
If fragile foods start to crush, you can also stop the |
|
| |
vacuum process without sealing the bag. Press Cancel |
|
| |
Button (B) and motor will stop. |
|
| |