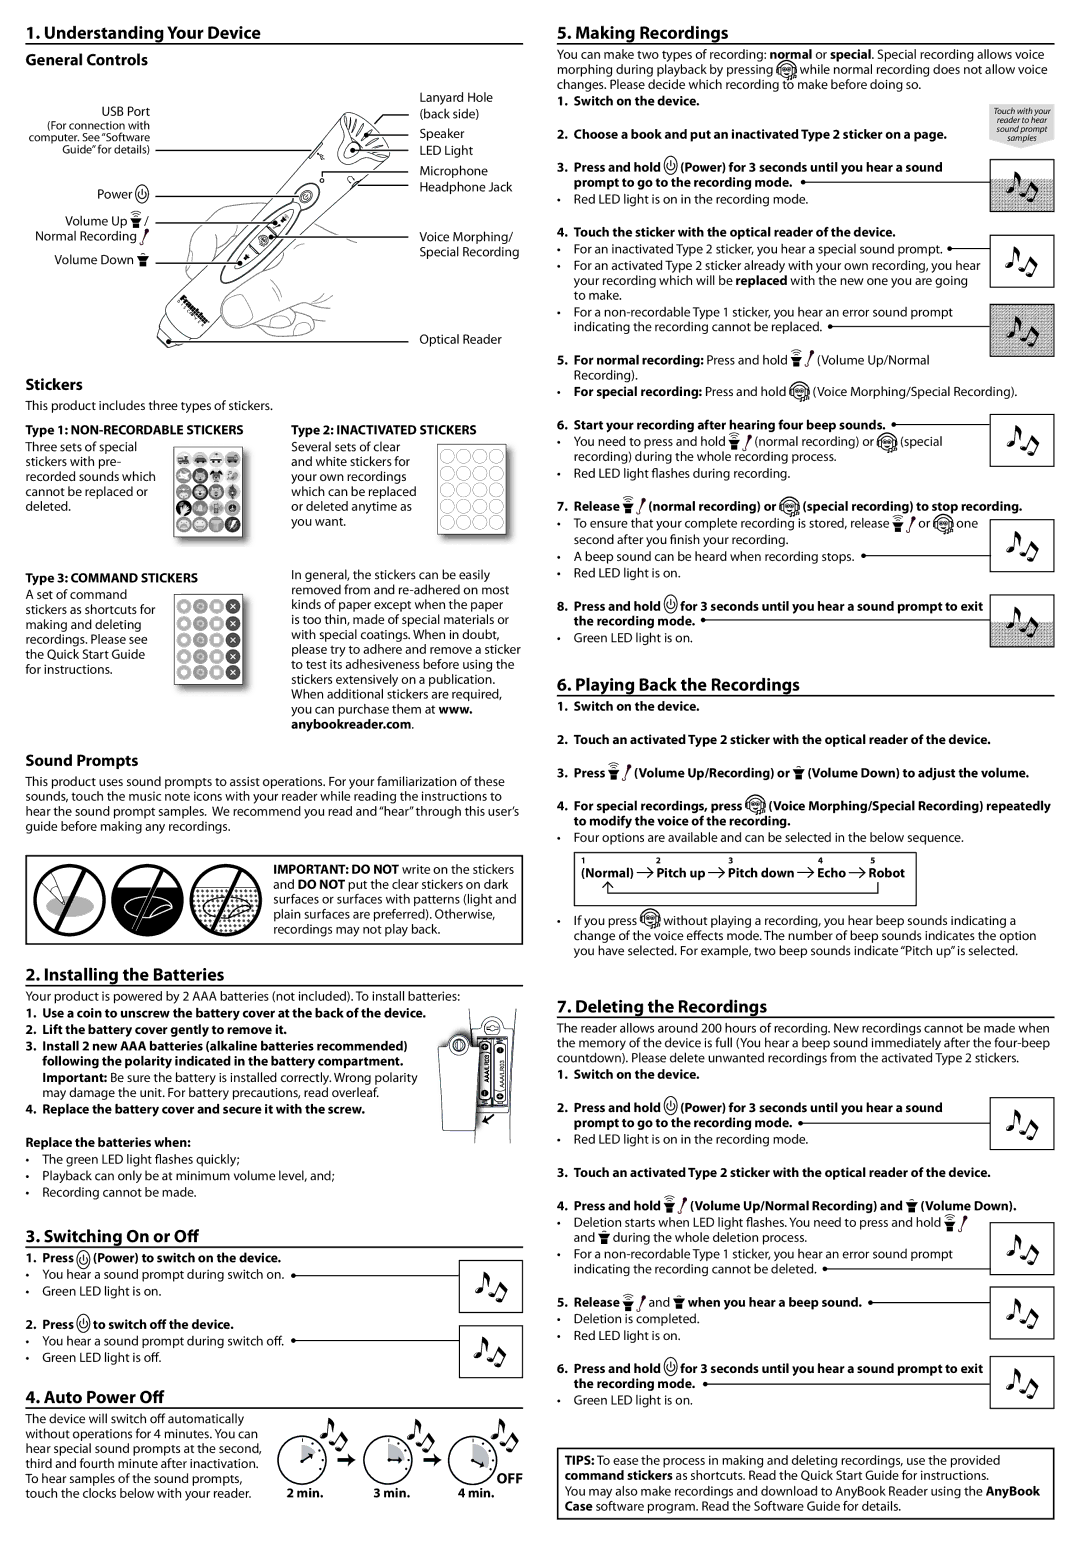
1.Understanding Your Device
General Controls
5. Making Recordings
You can make two types of recording: normal or special. Special recording allows voice
morphing during playback by pressing while normal recording does not allow voice changes. Please decide which recording tomake before doing so.
USB Port | Lanyard Hole |
(back side) | |
(For connection with | Speaker |
computer. See “Software | |
Guide” for details) | LED Light |
| Microphone |
Power | Headphone Jack |
| |
Volume Up / |
|
Normal Recording | Voice Morphing/ |
Volume Down | Special Recording |
|
1.Switch on the device.
2.Choose a book and put an inactivated Type 2 sticker on a page.
3.Press and hold (Power) for 3 seconds until you hear a sound prompt to go to the recording mode.
•Red LED light is on in the recording mode.
4. Touch the sticker with the optical reader of the device.
•For an inactivated Type 2 sticker, you hear a special sound prompt.
•For an activated Type 2 sticker already with your own recording, you hear your recording which will be replaced with the new one you are going to make.
Touch with your
reader to hear sound prompt samples
Optical Reader
• For a
indicating the recording cannot be replaced.
Stickers
This product includes three types of stickers.
Type 1:
Three sets of special stickers with pre- recorded sounds which cannot be replaced or deleted.
Type 3: COMMAND STICKERS
A set of command stickers as shortcuts for making and deleting recordings. Please see the Quick Start Guide for instructions.
Type 2: INACTIVATED STICKERS
Several sets of clear and white stickers for your own recordings which can be replaced or deleted anytime as you want.
In general, the stickers can be easily removed from and
5.For normal recording: Press and hold (Volume Up/Normal Recording).
•For special recording: Press and hold (Voice Morphing/Special Recording).
6. Start your recording after hearing four beep sounds.
• You need to press and hold | (normal recording) or | (special |
recording) during the whole recording process. |
|
• Red LED light flashes during recording.
7.Release (normal recording) or (special recording) to stop recording.
• To ensure that your complete recording is stored, release or one
second after you finish your recording.
• A beep sound can be heard when recording stops.
•Red LED light is on.
8. Press and hold for 3 seconds until you hear a sound prompt to exit the recording mode.
• Green LED light is on.
6. Playing Back the Recordings
1. | Switch on the device. |
2. | Touch an activated Type 2 sticker with the optical reader of the device. |
Sound Prompts
This product uses sound prompts to assist operations. For your familiarization of these sounds, touch the music note icons with your reader while reading the instructions to hear the sound prompt samples. We recommend you read and “hear” through this user’s guide before making any recordings.
IMPORTANT: DO NOT write on the stickers and DO NOT put the clear stickers on dark surfaces or surfaces with patterns (light and plain surfaces are preferred). Otherwise, recordings may not play back.
2. Installing the Batteries
Your product is powered by 2 AAA batteries (not included). To install batteries:
1. Use a coin to unscrew the battery cover at the back of the device.
2. Lift the battery cover gently to remove it.
3. Install 2 new AAA batteries (alkaline batteries recommended) following the polarity indicated in the battery compartment.
Important: Be sure the battery is installed correctly. Wrong polarity may damage the unit. For battery precautions, read overleaf.
4. Replace the battery cover and secure it with the screw.
Replace the batteries when:
•The green LED light flashes quickly;
•Playback can only be at minimum volume level, and;
•Recording cannot be made.
3. Switching On or Off
1. Press (Power) to switch on the device.
•You hear a sound prompt during switch on.
• Green LED light is on.
2. | Press to switch off the device. |
• | You hear a sound prompt during switch off. |
• | Green LED light is off. |
4. Auto Power Off
The device will switch off automatically |
|
|
|
without operations for 4 minutes. You can |
|
|
|
hear special sound prompts at the second, |
|
|
|
third and fourth minute after inactivation. |
|
| OFF |
To hear samples of the sound prompts, |
|
| |
touch the clocks below with your reader. | 2 min. | 3 min. | 4 min. |
3. | Press |
| (Volume Up/Recording) or |
| (Volume Down) to adjust the volume. | |||||
|
| |||||||||
4. | For special recordings, press |
|
|
|
| (Voice Morphing/Special Recording) repeatedly | ||||
|
|
| ||||||||
|
|
| ||||||||
| to modify the voice of the recording. |
• Four options are available and can be selected in the below sequence. | |||||
| 1 | 2 | 3 | 4 | 5 |
| (Normal) | Pitch up | Pitch down | Echo | Robot |
• | If you press | without playing a recording, you hear beep sounds indicating a | |||
| change of the voice effects mode. The number of beep sounds indicates the option | ||||
| you have selected. For example, two beep sounds indicate “Pitch up” is selected. |
7. Deleting the Recordings
The reader allows around 200 hours of recording. New recordings cannot be made when the memory of the device is full (You hear a beep sound immediately after the
1.Switch on the device.
2.Press and hold (Power) for 3 seconds until you hear a sound
prompt to go to the recording mode.
• Red LED light is on in the recording mode.
3.Touch an activated Type 2 sticker with the optical reader of the device.
4.Press and hold(Volume Up/Normal Recording) and(Volume Down).
• Deletion starts when LED light flashes. You need to press and hold and during the whole deletion process.
• For a
5. Release and when you hear a beep sound.
• Deletion is completed.
•Red LED light is on.
6. Press and hold for 3 seconds until you hear a sound prompt to exit the recording mode.
• Green LED light is on.
TIPS: To ease the process in making and deleting recordings, use the provided command stickers as shortcuts. Read the Quick Start Guide for instructions.
You may also make recordings and download to AnyBook Reader using the AnyBook Case software program. Read the Software Guide for details.