®
Precision 2.0
12
S4 ![]()
![]()
![]()
![]() S1
S1
A B
S3 | S2 |
3
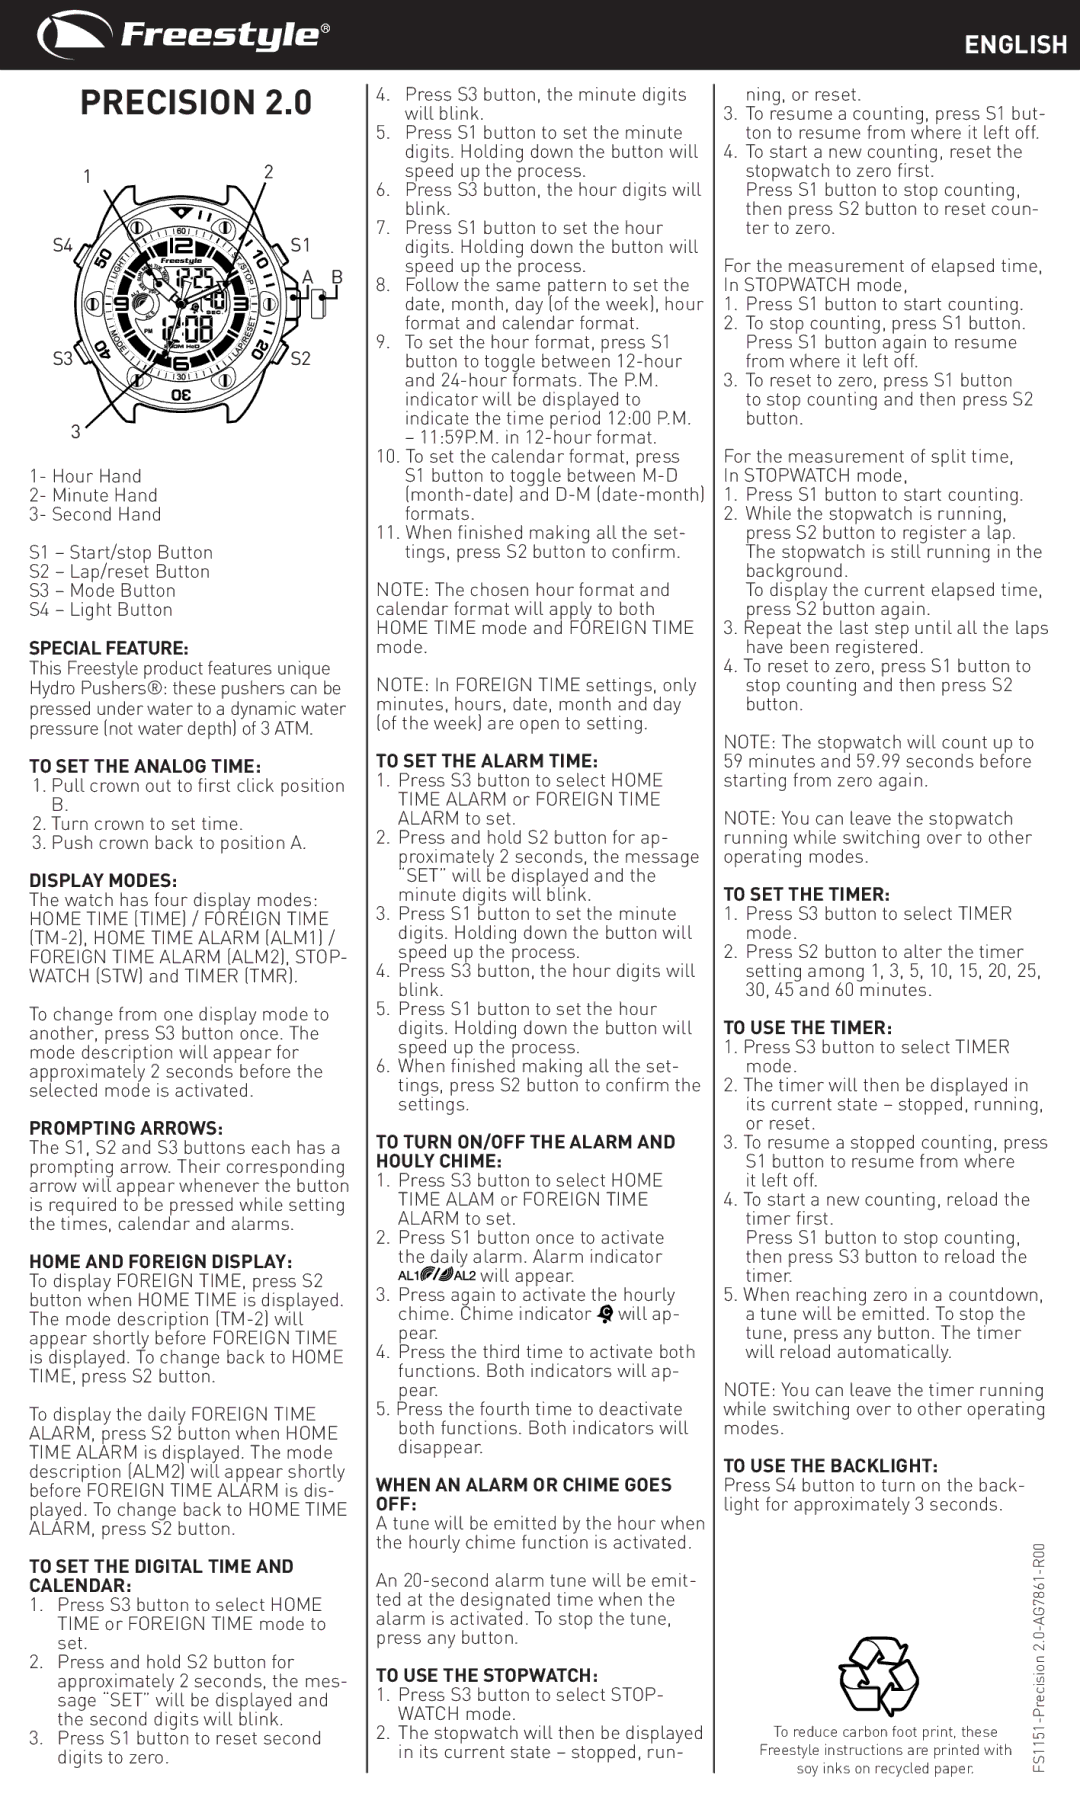
1- Hour Hand
2- Minute Hand
3- Second Hand
S1 – Start/stop Button
S2 – Lap/reset Button
S3 – Mode Button
S4 – Light Button
SPECIAL FEATURE:
This Freestyle product features unique Hydro Pushers®: these pushers can be pressed under water to a dynamic water pressure (not water depth) of 3 ATM.
TO SET THE ANALOG TIME:
1.Pull crown out to first click position B.
2.Turn crown to set time.
3.Push crown back to position A.
DISPLAY MODES:
The watch has four display modes:
HOME TIME (TIME) / FOREIGN TIME (TM-2), HOME TIME ALARM (ALM1) /
FOREIGN TIME ALARM (ALM2), STOP- WATCH (STW) and TIMER (TMR).
To change from one display mode to another, press S3 button once. The mode description will appear for approximately 2 seconds before the selected mode is activated.
PROMPTING ARROWS:
The S1, S2 and S3 buttons each has a prompting arrow. Their corresponding arrow will appear whenever the button is required to be pressed while setting the times, calendar and alarms.
HOME AND FOREIGN DISPLAY:
To display FOREIGN TIME, press S2 button when HOME TIME is displayed. The mode description
To display the daily FOREIGN TIME ALARM, press S2 button when HOME TIME ALARM is displayed. The mode description (ALM2) will appear shortly before FOREIGN TIME ALARM is dis- played. To change back to HOME TIME ALARM, press S2 button.
TO SET THE DIGITAL TIME AND CALENDAR:
1.Press S3 button to select HOME TIME or FOREIGN TIME mode to set.
2.Press and hold S2 button for approximately 2 seconds, the mes- sage “SET” will be displayed and the second digits will blink.
3.Press S1 button to reset second digits to zero.
4.Press S3 button, the minute digits will blink.
5.Press S1 button to set the minute digits. Holding down the button will speed up the process.
6.Press S3 button, the hour digits will blink.
7.Press S1 button to set the hour digits. Holding down the button will speed up the process.
8.Follow the same pattern to set the date, month, day (of the week), hour format and calendar format.
9.To set the hour format, press S1 button to toggle between
– 11:59P.M. in
10.To set the calendar format, press S1 button to toggle between
11.When finished making all the set- tings, press S2 button to confirm.
NOTE: The chosen hour format and calendar format will apply to both HOME TIME mode and FOREIGN TIME mode.
NOTE: In FOREIGN TIME settings, only minutes, hours, date, month and day (of the week) are open to setting.
TO SET THE ALARM TIME:
1.Press S3 button to select HOME TIME ALARM or FOREIGN TIME ALARM to set.
2.Press and hold S2 button for ap- proximately 2 seconds, the message “SET” will be displayed and the minute digits will blink.
3.Press S1 button to set the minute digits. Holding down the button will speed up the process.
4.Press S3 button, the hour digits will blink.
5.Press S1 button to set the hour digits. Holding down the button will speed up the process.
6.When finished making all the set- tings, press S2 button to confirm the settings.
TO TURN ON/OFF THE ALARM AND HOULY CHIME:
1.Press S3 button to select HOME TIME ALAM or FOREIGN TIME ALARM to set.
2.Press S1 button once to activate the daily alarm. Alarm indicator ![]()
![]()
![]()
![]()
![]() will appear.
will appear.
3.Press again to activate the hourly
chime. Chime indicator will ap- pear.
4.Press the third time to activate both functions. Both indicators will ap- pear.
5.Press the fourth time to deactivate both functions. Both indicators will disappear.
WHEN AN ALARM OR CHIME GOES OFF:
A tune will be emitted by the hour when the hourly chime function is activated.
An
TO USE THE STOPWATCH:
1.Press S3 button to select STOP- WATCH mode.
2.The stopwatch will then be displayed in its current state – stopped, run-
ENGLISH
ning, or reset.
3.To resume a counting, press S1 but- ton to resume from where it left off.
4.To start a new counting, reset the stopwatch to zero first.
Press S1 button to stop counting, then press S2 button to reset coun- ter to zero.
For the measurement of elapsed time, In STOPWATCH mode,
1.Press S1 button to start counting.
2.To stop counting, press S1 button. Press S1 button again to resume from where it left off.
3.To reset to zero, press S1 button to stop counting and then press S2 button.
For the measurement of split time, In STOPWATCH mode,
1.Press S1 button to start counting.
2.While the stopwatch is running, press S2 button to register a lap. The stopwatch is still running in the background.
To display the current elapsed time, press S2 button again.
3.Repeat the last step until all the laps have been registered.
4.To reset to zero, press S1 button to stop counting and then press S2 button.
NOTE: The stopwatch will count up to 59 minutes and 59.99 seconds before starting from zero again.
NOTE: You can leave the stopwatch running while switching over to other operating modes.
TO SET THE TIMER:
1.Press S3 button to select TIMER mode.
2.Press S2 button to alter the timer setting among 1, 3, 5, 10, 15, 20, 25, 30, 45 and 60 minutes.
TO USE THE TIMER:
1.Press S3 button to select TIMER mode.
2.The timer will then be displayed in its current state – stopped, running, or reset.
3.To resume a stopped counting, press S1 button to resume from where
it left off.
4.To start a new counting, reload the timer first.
Press S1 button to stop counting, then press S3 button to reload the timer.
5.When reaching zero in a countdown, a tune will be emitted. To stop the tune, press any button. The timer will reload automatically.
NOTE: You can leave the timer running while switching over to other operating modes.
TO USE THE BACKLIGHT:
Press S4 button to turn on the back- light for approximately 3 seconds.
| |
To reduce carbon foot print, these | FS1151 |
soy inks on recycled paper. | |
Freestyle instructions are printed with |
|