591Digital
Pedometer Instructions
Congratulations! You are the proud owner of a Freestyle® digital pedometer, which is one of the most accurate and versatile exercise instruments for the walker or runner today. Your new pedometer includes these useful features:
-STEP COUNTER
-5 STEP FILTER SENSOR
-DISTANCE CALCULATOR
-CALORIE COUNTER
-COUNT-DOWN TIMER
-AUTOMATIC COUNT-UP TIMER
-TIME/DAY/DATE/ALARM/CHIME/24H MODE
-THERMOMETER
-STOPWATCH
-NIGHT VISION® ILLUMINATION
-RECALLS WEEKLY AND TOTAL RECORD
-PULSEMETER
-PACER
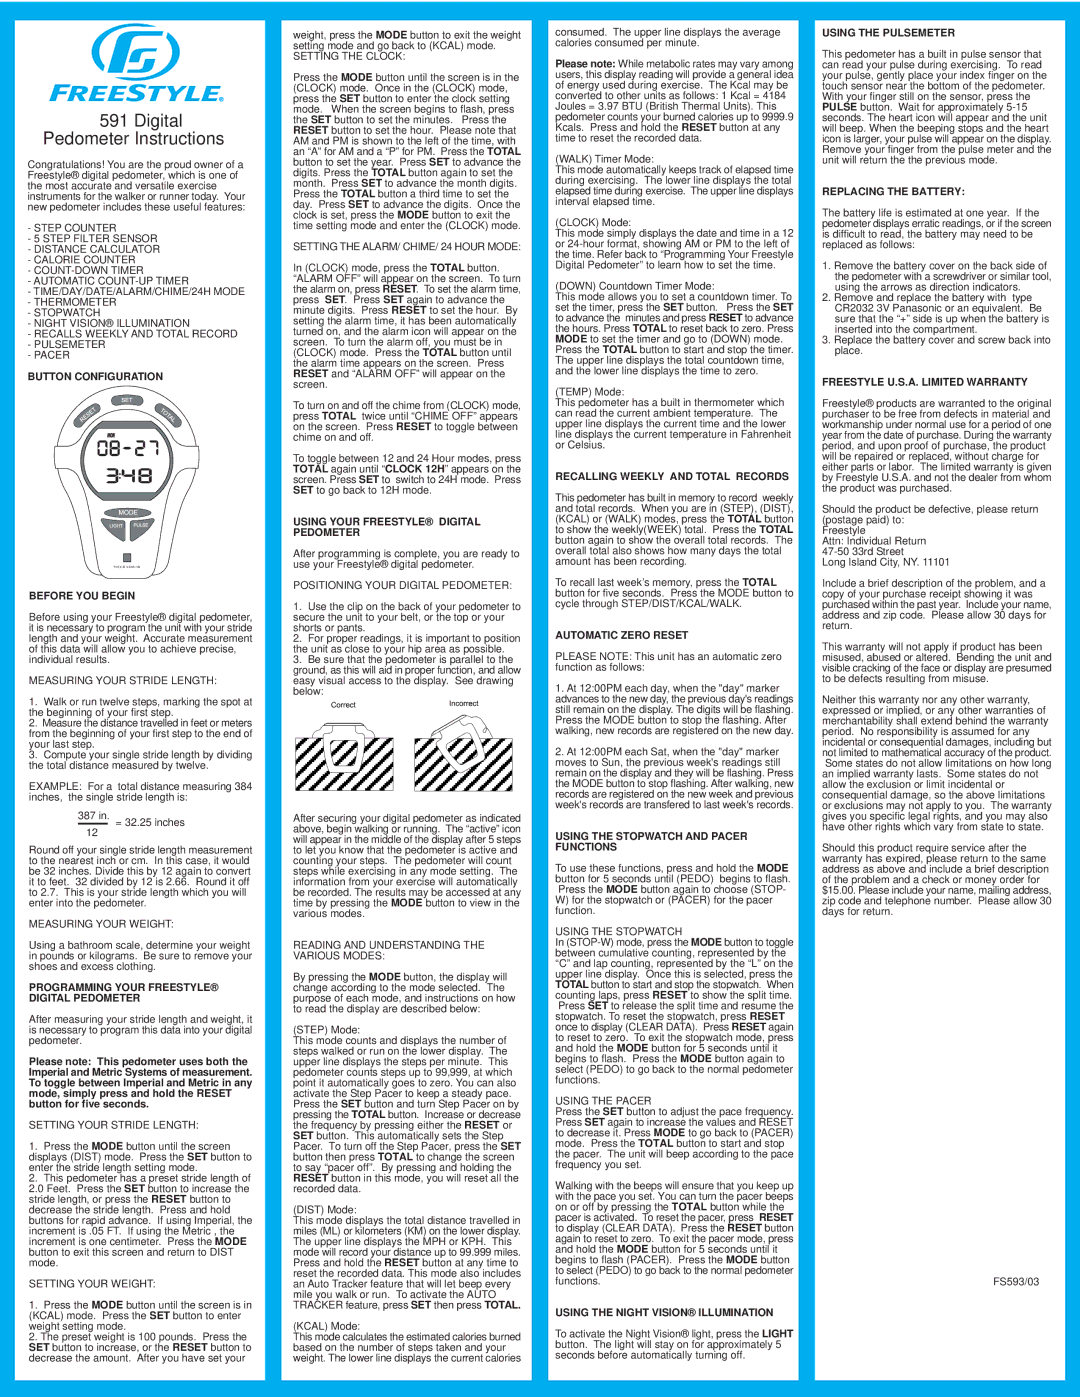
BUTTON CONFIGURATION
TOUCH SENSOR
BEFORE YOU BEGIN
Before using your Freestyle® digital pedometer, it is necessary to program the unit with your stride length and your weight. Accurate measurement of this data will allow you to achieve precise, individual results.
MEASURING YOUR STRIDE LENGTH:
1.Walk or run twelve steps, marking the spot at the beginning of your first step.
2.Measure the distance travelled in feet or meters from the beginning of your first step to the end of your last step.
3.Compute your single stride length by dividing the total distance measured by twelve.
EXAMPLE: For a total distance measuring 384 inches, the single stride length is:
387 in. = 32.25 inches
12
Round off your single stride length measurement to the nearest inch or cm. In this case, it would be 32 inches. Divide this by 12 again to convert it to feet. 32 divided by 12 is 2.66. Round it off to 2.7. This is your stride length which you will enter into the pedometer.
MEASURING YOUR WEIGHT:
Using a bathroom scale, determine your weight in pounds or kilograms. Be sure to remove your shoes and excess clothing.
PROGRAMMING YOUR FREESTYLE® DIGITAL PEDOMETER
After measuring your stride length and weight, it is necessary to program this data into your digital pedometer.
Please note: This pedometer uses both the Imperial and Metric Systems of measurement. To toggle between Imperial and Metric in any mode, simply press and hold the RESET button for five seconds.
SETTING YOUR STRIDE LENGTH:
1.Press the MODE button until the screen displays (DIST) mode. Press the SET button to enter the stride length setting mode.
2.This pedometer has a preset stride length of 2.0 Feet. Press the SET button to increase the stride length, or press the RESET button to decrease the stride length. Press and hold buttons for rapid advance. If using Imperial, the increment is .05 FT. If using the Metric , the increment is one centimeter. Press the MODE button to exit this screen and return to DIST mode.
SETTING YOUR WEIGHT:
1.Press the MODE button until the screen is in (KCAL) mode. Press the SET button to enter weight setting mode.
2.The preset weight is 100 pounds. Press the SET button to increase, or the RESET button to decrease the amount. After you have set your
weight, press the MODE button to exit the weight setting mode and go back to (KCAL) mode.
SETTING THE CLOCK:
Press the MODE button until the screen is in the (CLOCK) mode. Once in the (CLOCK) mode, press the SET button to enter the clock setting mode. When the screen begins to flash, press the SET button to set the minutes. Press the RESET button to set the hour. Please note that AM and PM is shown to the left of the time, with an “A” for AM and a “P” for PM. Press the TOTAL button to set the year. Press SET to advance the digits. Press the TOTAL button again to set the month. Press SET to advance the month digits. Press the TOTAL button a third time to set the day. Press SET to advance the digits. Once the clock is set, press the MODE button to exit the time setting mode and enter the (CLOCK) mode.
SETTING THE ALARM/ CHIME/ 24 HOUR MODE:
In (CLOCK) mode, press the TOTAL button. “ALARM OFF” will appear on the screen. To turn the alarm on, press RESET. To set the alarm time, press SET. Press SET again to advance the minute digits. Press RESET to set the hour. By setting the alarm time, it has been automatically turned on, and the alarm icon will appear on the screen. To turn the alarm off, you must be in (CLOCK) mode. Press the TOTAL button until the alarm time appears on the screen. Press RESET and “ALARM OFF” will appear on the screen.
To turn on and off the chime from (CLOCK) mode, press TOTAL twice until “CHIME OFF” appears on the screen. Press RESET to toggle between chime on and off.
To toggle between 12 and 24 Hour modes, press TOTAL again until “CLOCK 12H” appears on the screen. Press SET to switch to 24H mode. Press SET to go back to 12H mode.
USING YOUR FREESTYLE® DIGITAL PEDOMETER
After programming is complete, you are ready to use your Freestyle® digital pedometer.
POSITIONING YOUR DIGITAL PEDOMETER:
1.Use the clip on the back of your pedometer to secure the unit to your belt, or the top or your shorts or pants.
2.For proper readings, it is important to position the unit as close to your hip area as possible.
3.Be sure that the pedometer is parallel to the ground, as this will aid in proper function, and allow easy visual access to the display. See drawing below:
After securing your digital pedometer as indicated above, begin walking or running. The “active” icon will appear in the middle of the display after 5 steps to let you know that the pedometer is active and counting your steps. The pedometer will count steps while exercising in any mode setting. The information from your exercise will automatically be recorded. The results may be accessed at any time by pressing the MODE button to view in the various modes.
READING AND UNDERSTANDING THE VARIOUS MODES:
By pressing the MODE button, the display will change according to the mode selected. The purpose of each mode, and instructions on how to read the display are described below:
(STEP) Mode:
This mode counts and displays the number of steps walked or run on the lower display. The upper line displays the steps per minute. This pedometer counts steps up to 99,999, at which point it automatically goes to zero. You can also activate the Step Pacer to keep a steady pace.
Press the SET button and turn Step Pacer on by pressing the TOTAL button. Increase or decrease the frequency by pressing either the RESET or SET button. This automatically sets the Step Pacer. To turn off the Step Pacer, press the SET button then press TOTAL to change the screen to say “pacer off”. By pressing and holding the RESET button in this mode, you will reset all the recorded data.
(DIST) Mode:
This mode displays the total distance travelled in miles (ML) or kilometers (KM) on the lower display. The upper line displays the MPH or KPH. This mode will record your distance up to 99.999 miles. Press and hold the RESET button at any time to reset the recorded data. This mode also includes an Auto Tracker feature that will let beep every mile you walk or run. To activate the AUTO TRACKER feature, press SET then press TOTAL.
(KCAL) Mode:
This mode calculates the estimated calories burned based on the number of steps taken and your weight. The lower line displays the current calories
consumed. The upper line displays the average calories consumed per minute.
Please note: While metabolic rates may vary among users, this display reading will provide a general idea of energy used during exercise. The Kcal may be converted to other units as follows: 1 Kcal = 4184 Joules = 3.97 BTU (British Thermal Units). This pedometer counts your burned calories up to 9999.9 Kcals. Press and hold the RESET button at any time to reset the recorded data.
(WALK) Timer Mode:
This mode automatically keeps track of elapsed time during exercising. The lower line displays the total elapsed time during exercise. The upper line displays interval elapsed time.
(CLOCK) Mode:
This mode simply displays the date and time in a 12 or 24-hour format, showing AM or PM to the left of the time. Refer back to “Programming Your Freestyle Digital Pedometer” to learn how to set the time.
(DOWN) Countdown Timer Mode:
This mode allows you to set a countdown timer. To set the timer, press the SET button. Press the SET to advance the minutes and press RESET to advance the hours. Press TOTAL to reset back to zero. Press MODE to set the timer and go to (DOWN) mode.
Press the TOTAL button to start and stop the timer. The upper line displays the total countdown time, and the lower line displays the time to zero.
(TEMP) Mode:
This pedometer has a built in thermometer which can read the current ambient temperature. The upper line displays the current time and the lower line displays the current temperature in Fahrenheit or Celsius.
RECALLING WEEKLY AND TOTAL RECORDS
This pedometer has built in memory to record weekly and total records. When you are in (STEP), (DIST), (KCAL) or (WALK) modes, press the TOTAL button to show the weekly(WEEK) total. Press the TOTAL button again to show the overall total records. The overall total also shows how many days the total amount has been recording.
To recall last week’s memory, press the TOTAL button for five seconds. Press the MODE button to cycle through STEP/DIST/KCAL/WALK.
AUTOMATIC ZERO RESET
PLEASE NOTE: This unit has an automatic zero function as follows:
1.At 12:00PM each day, when the "day" marker advances to the new day, the previous day's readings still remain on the display. The digits will be flashing. Press the MODE button to stop the flashing. After walking, new records are registered on the new day.
2.At 12:00PM each Sat, when the "day" marker moves to Sun, the previous week's readings still remain on the display and they will be flashing. Press the MODE button to stop flashing. After walking, new records are registered on the new week and previous week's records are transfered to last week's records.
USING THE STOPWATCH AND PACER FUNCTIONS
To use these functions, press and hold the MODE button for 5 seconds until (PEDO) begins to flash. Press the MODE button again to choose (STOP-
W)for the stopwatch or (PACER) for the pacer function.
USING THE STOPWATCH
In (STOP-W) mode, press the MODE button to toggle between cumulative counting, represented by the “C” and lap counting, represented by the “L” on the upper line display. Once this is selected, press the TOTAL button to start and stop the stopwatch. When counting laps, press RESET to show the split time. Press SET to release the split time and resume the stopwatch. To reset the stopwatch, press RESET once to display (CLEAR DATA). Press RESET again to reset to zero. To exit the stopwatch mode, press and hold the MODE button for 5 seconds until it begins to flash. Press the MODE button again to select (PEDO) to go back to the normal pedometer functions.
USING THE PACER
Press the SET button to adjust the pace frequency. Press SET again to increase the values and RESET to decrease it. Press MODE to go back to (PACER) mode. Press the TOTAL button to start and stop the pacer. The unit will beep according to the pace frequency you set.
Walking with the beeps will ensure that you keep up with the pace you set. You can turn the pacer beeps on or off by pressing the TOTAL button while the pacer is activated. To reset the pacer, press RESET to display (CLEAR DATA). Press the RESET button again to reset to zero. To exit the pacer mode, press and hold the MODE button for 5 seconds until it begins to flash (PACER). Press the MODE button to select (PEDO) to go back to the normal pedometer functions.
USING THE NIGHT VISION® ILLUMINATION
To activate the Night Vision® light, press the LIGHT button. The light will stay on for approximately 5 seconds before automatically turning off.
USING THE PULSEMETER
This pedometer has a built in pulse sensor that can read your pulse during exercising. To read your pulse, gently place your index finger on the touch sensor near the bottom of the pedometer. With your finger still on the sensor, press the PULSE button. Wait for approximately 5-15 seconds. The heart icon will appear and the unit will beep. When the beeping stops and the heart icon is larger, your pulse will appear on the display. Remove your finger from the pulse meter and the unit will return the the previous mode.
REPLACING THE BATTERY:
The battery life is estimated at one year. If the pedometer displays erratic readings, or if the screen is difficult to read, the battery may need to be replaced as follows:
1.Remove the battery cover on the back side of the pedometer with a screwdriver or similar tool, using the arrows as direction indicators.
2.Remove and replace the battery with type CR2032 3V Panasonic or an equivalent. Be sure that the “+” side is up when the battery is inserted into the compartment.
3.Replace the battery cover and screw back into place.
FREESTYLE U.S.A. LIMITED WARRANTY
Freestyle® products are warranted to the original purchaser to be free from defects in material and workmanship under normal use for a period of one year from the date of purchase. During the warranty period, and upon proof of purchase, the product will be repaired or replaced, without charge for either parts or labor. The limited warranty is given by Freestyle U.S.A. and not the dealer from whom the product was purchased.
Should the product be defective, please return (postage paid) to:
Freestyle
Attn: Individual Return 47-50 33rd Street
Long Island City, NY. 11101
Include a brief description of the problem, and a copy of your purchase receipt showing it was purchased within the past year. Include your name, address and zip code. Please allow 30 days for return.
This warranty will not apply if product has been misused, abused or altered. Bending the unit and visible cracking of the face or display are presumed to be defects resulting from misuse.
Neither this warranty nor any other warranty, expressed or implied, or any other warranties of merchantability shall extend behind the warranty period. No responsibility is assumed for any incidental or consequential damages, including but not limited to mathematical accuracy of the product. Some states do not allow limitations on how long an implied warranty lasts. Some states do not allow the exclusion or limit incidental or consequential damage, so the above limitations or exclusions may not apply to you. The warranty gives you specific legal rights, and you may also have other rights which vary from state to state.
Should this product require service after the warranty has expired, please return to the same address as above and include a brief description of the problem and a check or money order for $15.00. Please include your name, mailing address, zip code and telephone number. Please allow 30 days for return.
FS593/03