FREESTYLE - Instruction Sheet
28/12/2004 #1
MODEL 724
MODEL 724
MEGA SHARK PREDATOR
INSTRUCTIONS AND
WARRANTY INFORMATION
RIGHTEOUS WELCOME!
Congrats on joining the FREESTYLE Team with your ownership of this gnarly FREESTYLE Timepiece. All FREESTYLE products utilize the highest quality materials and timekeeping technology to provide the highest performance under Earth’s elements! FREESTYLE Timepieces are designed by Southern California Natives with you, the core rider, in mind.
OUR ROOTS…
Born in 1981, Freestyle was the brainchild of friendly Surfers whose mission was to create a watch line that could withstand the abusive conditions of their beach lifestyle. Their experience told them no watches in the market could stand up to their standards. Their goal was to fill the void. The result was
FREESTYLE!
They created timepieces which were extremely durable with high quality standards such as 100% Stainless Steel, H20 resistance from 5ATM to 20ATM,
KEEPING YOU ON TIME, WHEN YOU’RE LOSING YOUR MIND!
FEATURES:
•
•SECOND CALENDAR CLOCK FOR FOREIGN TIME
•ONE DAILY, WEEKDAY OR WEEKEND ALARM
•HOURLY CHIMES
•ALARM WITH 5 MINUTE BACKUP ALERT
•1/100 STOPWATCH WITH 30 LAP RECALL
•COUNTDOWN TIMER WITH OPTION AT END
•NIGHT VISION™ ELECTROLUMINISCENT BACKLIGHTING
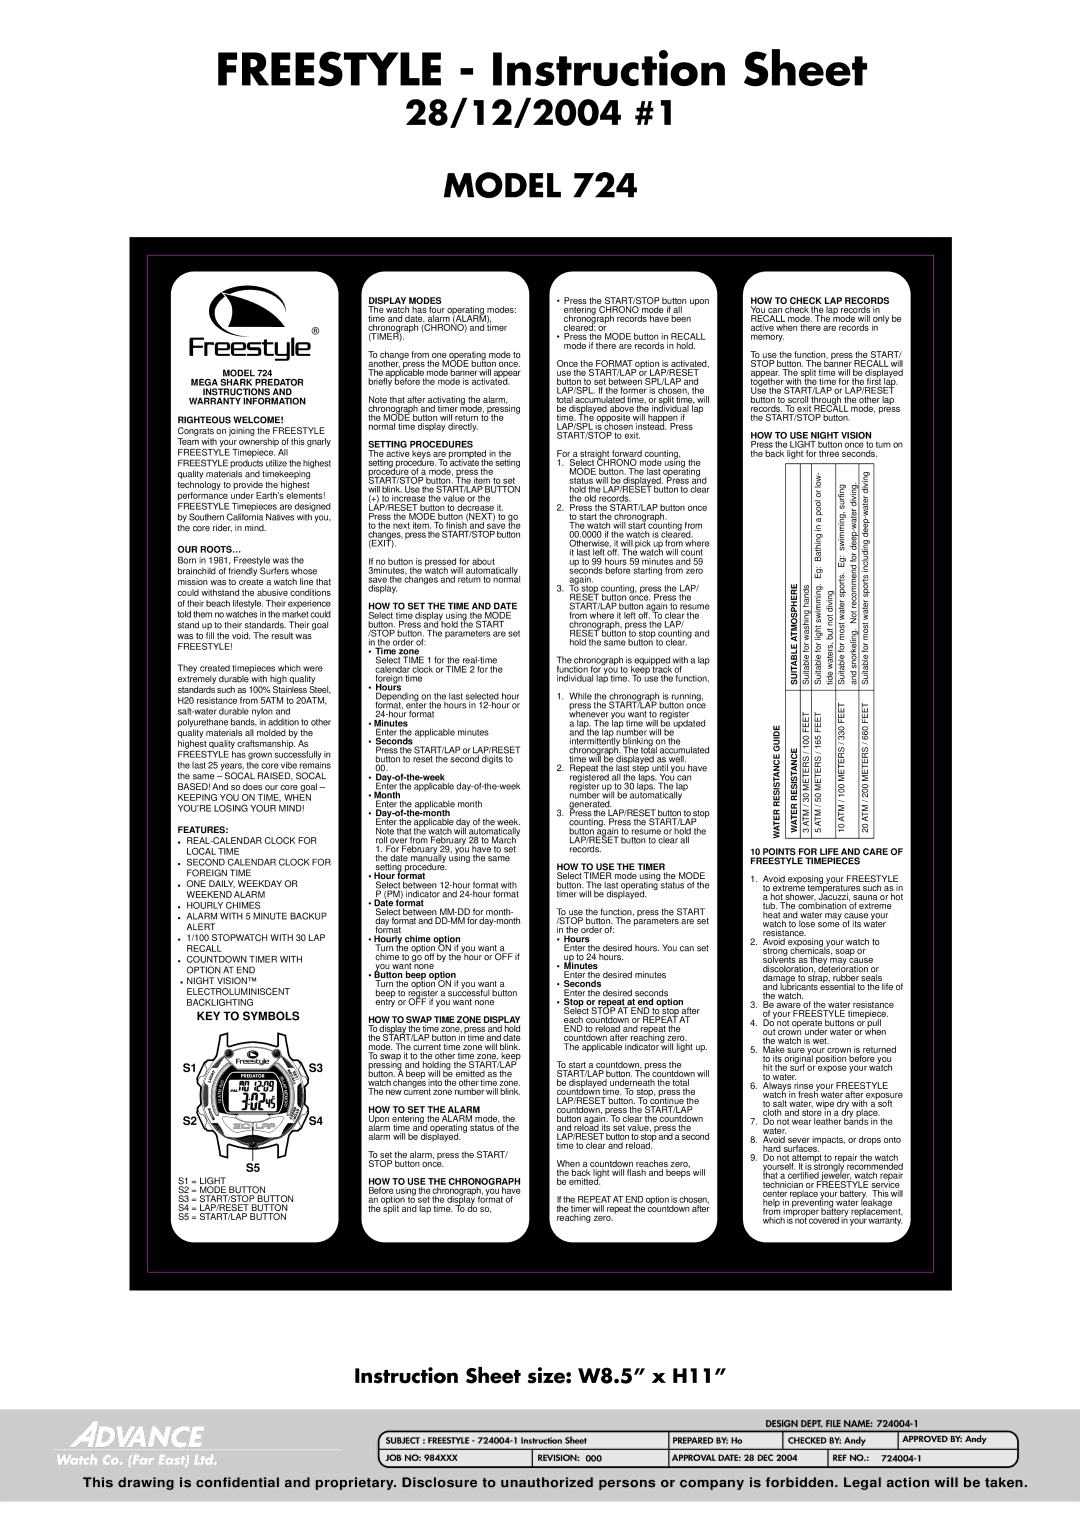
KEY TO SYMBOLS
S1

 S3
S3
S2

 S4
S4
S5
S1 = LIGHT
S2 = MODE BUTTON
S3 = START/STOP BUTTON
S4 = LAP/RESET BUTTON
S5 = START/LAP BUTTON
DISPLAY MODES
The watch has four operating modes: time and date, alarm (ALARM), chronograph (CHRONO) and timer (TIMER).
To change from one operating mode to another, press the MODE button once. The applicable mode banner will appear briefly before the mode is activated.
Note that after activating the alarm, chronograph and timer mode, pressing the MODE button will return to the normal time display directly.
SETTING PROCEDURES
The active keys are prompted in the setting procedure. To activate the setting procedure of a mode, press the START/STOP button. The item to set will blink. Use the START/LAP BUTTON
(+)to increase the value or the
LAP/RESET button to decrease it. Press the MODE button (NEXT) to go to the next item. To finish and save the changes, press the START/STOP button (EXIT).
If no button is pressed for about 3minutes, the watch will automatically save the changes and return to normal display.
HOW TO SET THE TIME AND DATE Select time display using the MODE button. Press and hold the START /STOP button. The parameters are set in the order of:
•Time zone
Select TIME 1 for the
•Hours
Depending on the last selected hour format, enter the hours in
•Minutes
Enter the applicable minutes
•Seconds
Press the START/LAP or LAP/RESET button to reset the second digits to 00.
•
Enter the applicable
•Month
Enter the applicable month
•Day-of-the-month
Enter the applicable day of the week. Note that the watch will automatically roll over from February 28 to March
1.For February 29, you have to set the date manually using the same setting procedure.
•Hour format
Select between
• Date format
Select between
• Hourly chime option
Turn the option ON if you want a chime to go off by the hour or OFF if you want none
• Button beep option
Turn the option ON if you want a beep to register a successful button entry or OFF if you want none
HOW TO SWAP TIME ZONE DISPLAY To display the time zone, press and hold the START/LAP button in time and date mode. The current time zone will blink. To swap it to the other time zone, keep pressing and holding the START/LAP button. A beep will be emitted as the watch changes into the other time zone. The new current zone number will blink.
HOW TO SET THE ALARM
Upon entering the ALARM mode, the alarm time and operating status of the alarm will be displayed.
To set the alarm, press the START/ STOP button once.
HOW TO USE THE CHRONOGRAPH Before using the chronograph, you have an option to set the display format of the split and lap time. To do so,
•Press the START/STOP button upon entering CHRONO mode if all chronograph records have been cleared; or
•Press the MODE button in RECALL mode if there are records in hold.
Once the FORMAT option is activated, use the START/LAP or LAP/RESET button to set between SPL/LAP and LAP/SPL. If the former is chosen, the total accumulated time, or split time, will be displayed above the individual lap time. The opposite will happen if LAP/SPL is chosen instead. Press START/STOP to exit.
For a straight forward counting,
1.Select CHRONO mode using the MODE button. The last operating status will be displayed. Press and hold the LAP/RESET button to clear the old records.
2.Press the START/LAP button once to start the chronograph.
The watch will start counting from 00.0000 if the watch is cleared. Otherwise, it will pick up from where it last left off. The watch will count up to 99 hours 59 minutes and 59 seconds before starting from zero again.
3.To stop counting, press the LAP/ RESET button once. Press the START/LAP button again to resume from where it left off. To clear the chronograph, press the LAP/ RESET button to stop counting and hold the same button to clear.
The chronograph is equipped with a lap function for you to keep track of individual lap time. To use the function,
1.While the chronograph is running, press the START/LAP button once whenever you want to register
a lap. The lap time will be updated and the lap number will be intermittently blinking on the chronograph. The total accumulated time will be displayed as well.
2.Repeat the last step until you have registered all the laps. You can register up to 30 laps. The lap number will be automatically generated.
3.Press the LAP/RESET button to stop counting. Press the START/LAP button again to resume or hold the LAP/RESET button to clear all records.
HOW TO USE THE TIMER
Select TIMER mode using the MODE button. The last operating status of the timer will be displayed.
To use the function, press the START /STOP button. The parameters are set in the order of:
•Hours
Enter the desired hours. You can set up to 24 hours.
•Minutes
Enter the desired minutes
•Seconds
Enter the desired seconds
•Stop or repeat at end option Select STOP AT END to stop after each countdown or REPEAT AT END to reload and repeat the countdown after reaching zero.
The applicable indicator will light up.
To start a countdown, press the START/LAP button. The countdown will be displayed underneath the total countdown time. To stop, press the LAP/RESET button. To continue the countdown, press the START/LAP button again. To clear the countdown and reload its set value, press the LAP/RESET button to stop and a second time to clear and reload.
When a countdown reaches zero, the back light will flash and beeps will be emitted.
If the REPEAT AT END option is chosen, the timer will repeat the countdown after reaching zero.
HOW TO CHECK LAP RECORDS You can check the lap records in RECALL mode. The mode will only be active when there are records in memory.
To use the function, press the START/ STOP button. The banner RECALL will appear. The split time will be displayed together with the time for the first lap.
Use the START/LAP or LAP/RESET button to scroll through the other lap records. To exit RECALL mode, press the START/STOP button.
HOW TO USE NIGHT VISION
Press the LIGHT button once to turn on the back light for three seconds.
| SUITABLE ATMOSPHERE | Suitable for washing hands | Suitable for light swimming. Eg: Bathing in a pool or low- | tide waters, but not diving | Suitable for most water sports. Eg: swimming, surfing | and snorkeling. Not recommend for | Suitable for most water sports including |
|
|
|
|
|
|
|
|
WATER RESISTANCE GUIDE | WATER RESISTANCE | 3 ATM / 30 METERS / 100 FEET | 5 ATM / 50 METERS / 165 FEET |
| 10 ATM / 100 METERS / 330 FEET |
| 20 ATM / 200 METERS / 660 FEET |
10 POINTS FOR LIFE AND CARE OF FREESTYLE TIMEPIECES
1.Avoid exposing your FREESTYLE to extreme temperatures such as in a hot shower, Jacuzzi, sauna or hot tub. The combination of extreme heat and water may cause your watch to lose some of its water resistance.
2.Avoid exposing your watch to strong chemicals, soap or solvents as they may cause discoloration, deterioration or damage to strap, rubber seals and lubricants essential to the life of the watch.
3.Be aware of the water resistance of your FREESTYLE timepiece.
4.Do not operate buttons or pull out crown under water or when the watch is wet.
5.Make sure your crown is returned to its original position before you hit the surf or expose your watch to water.
6.Always rinse your FREESTYLE watch in fresh water after exposure to salt water, wipe dry with a soft cloth and store in a dry place.
7.Do not wear leather bands in the water.
8.Avoid sever impacts, or drops onto hard surfaces.
9.Do not attempt to repair the watch yourself. It is strongly recommended that a certified jeweler, watch repair technician or FREESTYLE service center replace your battery. This will help in preventing water leakage from improper battery replacement, which is not covered in your warranty.
|
|
| DESIGN DEPT. FILE NAME: | ||||
SUBJECT : FREESTYLE - | PREPARED BY: Ho |
| CHECKED BY: Andy |
| APPROVED BY: Andy | ||
|
|
|
|
|
|
| |
JOB NO: 984XXX | REVISION: 000 | APPROVAL DATE: 28 DEC 2004 | REF NO.: | ||||
|
|
|
|
|
|
|
|
This drawing is confidential and proprietary. Disclosure to unauthorized persons or company is forbidden. Legal action will be taken.