818OUTSIDER™ WATCH INSTRUCTIONS
FEATURES:
•TWO TIME ZONES WITH AUTO CALENDAR
•THERMOMETER RANGE FROM
•HI AND LO TIDE TIME DATA FOR THE PRESENT AND FUTURE TIMES
•TIDE DATA FOR 30 PRESET AND 5 CUSTOM LOCATIONS
•CHRONOGRAPH MODE WITH SPLIT FUNCTION
•SEQUENTIAL HEAT TIMER WITH 4 ADJUSTABLE PRESET VALUES
•
•NIGHT VISION™ ELECTRO- LUMINESCENT BACKLIGHTING
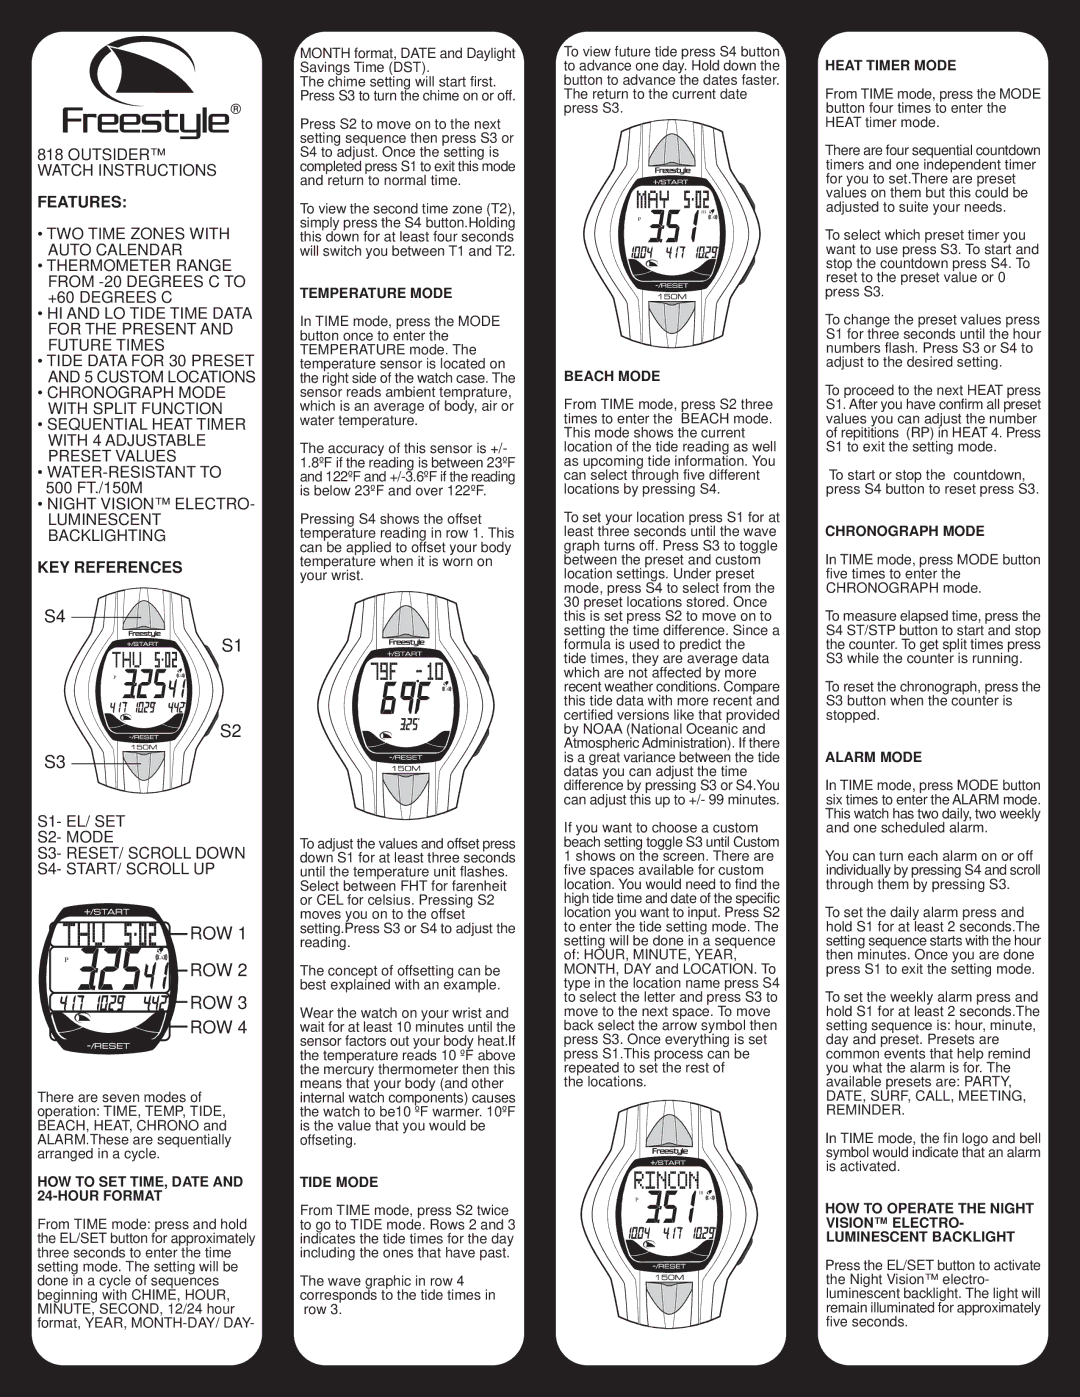
KEY REFERENCES
MONTH format, DATE and Daylight Savings Time (DST).
The chime setting will start first. Press S3 to turn the chime on or off.
Press S2 to move on to the next setting sequence then press S3 or S4 to adjust. Once the setting is completed press S1 to exit this mode and return to normal time.
To view the second time zone (T2), simply press the S4 button.Holding this down for at least four seconds will switch you between T1 and T2.
TEMPERATURE MODE
In TIME mode, press the MODE button once to enter the TEMPERATURE mode. The temperature sensor is located on the right side of the watch case. The sensor reads ambient temprature, which is an average of body, air or water temperature.
The accuracy of this sensor is +/- 1.8ºF if the reading is between 23ºF and 122ºF and
Pressing S4 shows the offset temperature reading in row 1. This can be applied to offset your body temperature when it is worn on your wrist.
To view future tide press S4 button to advance one day. Hold down the button to advance the dates faster. The return to the current date press S3.
HII
PLO ![]() A
A![]()
A
BEACH MODE
From TIME mode, press S2 three times to enter the BEACH mode. This mode shows the current location of the tide reading as well as upcoming tide information. You can select through five different locations by pressing S4.
To set your location press S1 for at least three seconds until the wave graph turns off. Press S3 to toggle between the preset and custom location settings. Under preset mode, press S4 to select from the 30 preset locations stored. Once
HEAT TIMER MODE
From TIME mode, press the MODE button four times to enter the HEAT timer mode.
There are four sequential countdown timers and one independent timer for you to set.There are preset values on them but this could be adjusted to suite your needs.
To select which preset timer you want to use press S3. To start and stop the countdown press S4. To reset to the preset value or 0 press S3.
To change the preset values press S1 for three seconds until the hour numbers flash. Press S3 or S4 to adjust to the desired setting.
To proceed to the next HEAT press S1. After you have confirm all preset values you can adjust the number of repititions (RP) in HEAT 4. Press S1 to exit the setting mode.
To start or stop the countdown, press S4 button to reset press S3.
CHRONOGRAPH MODE
In TIME mode, press MODE button five times to enter the CHRONOGRAPH mode.
S4
| HI |
P | LO A |
A
S3
S1- EL/ SET
S2- MODE
![]() S1
S1
![]() S2
S2
HI
PLO ![]() A
A![]()
A
To adjust the values and offset press
this is set press S2 to move on to setting the time difference. Since a formula is used to predict the tide times, they are average data which are not affected by more recent weather conditions. Compare this tide data with more recent and certified versions like that provided by NOAA (National Oceanic and Atmospheric Administration). If there is a great variance between the tide datas you can adjust the time difference by pressing S3 or S4.You can adjust this up to +/- 99 minutes.
If you want to choose a custom beach setting toggle S3 until Custom
To measure elapsed time, press the S4 ST/STP button to start and stop the counter. To get split times press S3 while the counter is running.
To reset the chronograph, press the S3 button when the counter is stopped.
ALARM MODE
In TIME mode, press MODE button six times to enter the ALARM mode. This watch has two daily, two weekly and one scheduled alarm.
S3- RESET/ SCROLL DOWN
S4- START/ SCROLL UP
ROW 1
HI
PLO ![]()
![]() A
A![]()
![]()
A 


 ROW 2
ROW 2


 ROW 3
ROW 3 


 ROW 4
ROW 4
There are seven modes of operation: TIME, TEMP, TIDE, BEACH, HEAT, CHRONO and ALARM.These are sequentially arranged in a cycle.
HOW TO SET TIME, DATE AND 24-HOUR FORMAT
From TIME mode: press and hold the EL/SET button for approximately three seconds to enter the time setting mode. The setting will be done in a cycle of sequences beginning with CHIME, HOUR, MINUTE, SECOND, 12/24 hour format, YEAR,
down S1 for at least three seconds until the temperature unit flashes. Select between FHT for farenheit or CEL for celsius. Pressing S2 moves you on to the offset setting.Press S3 or S4 to adjust the reading.
The concept of offsetting can be best explained with an example.
Wear the watch on your wrist and wait for at least 10 minutes until the sensor factors out your body heat.If the temperature reads 10 ºF above the mercury thermometer then this means that your body (and other internal watch components) causes the watch to be10 ºF warmer. 10ºF is the value that you would be offseting.
TIDE MODE
From TIME mode, press S2 twice to go to TIDE mode. Rows 2 and 3 indicates the tide times for the day including the ones that have past.
The wave graphic in row 4 corresponds to the tide times in row 3.
1 shows on the screen. There are five spaces available for custom location. You would need to find the high tide time and date of the specific location you want to input. Press S2 to enter the tide setting mode. The setting will be done in a sequence of: HOUR, MINUTE, YEAR, MONTH, DAY and LOCATION. To type in the location name press S4 to select the letter and press S3 to move to the next space. To move back select the arrow symbol then press S3. Once everything is set press S1.This process can be repeated to set the rest of
the locations.
HII
PLO ![]() A
A![]()
A
You can turn each alarm on or off individually by pressing S4 and scroll through them by pressing S3.
To set the daily alarm press and hold S1 for at least 2 seconds.The setting sequence starts with the hour then minutes. Once you are done press S1 to exit the setting mode.
To set the weekly alarm press and hold S1 for at least 2 seconds.The setting sequence is: hour, minute, day and preset. Presets are common events that help remind you what the alarm is for. The available presets are: PARTY, DATE, SURF, CALL, MEETING, REMINDER.
In TIME mode, the fin logo and bell symbol would indicate that an alarm is activated.
HOW TO OPERATE THE NIGHT VISION™ ELECTRO- LUMINESCENT BACKLIGHT
Press the EL/SET button to activate the Night Vision™ electro- luminescent backlight. The light will remain illuminated for approximately five seconds.