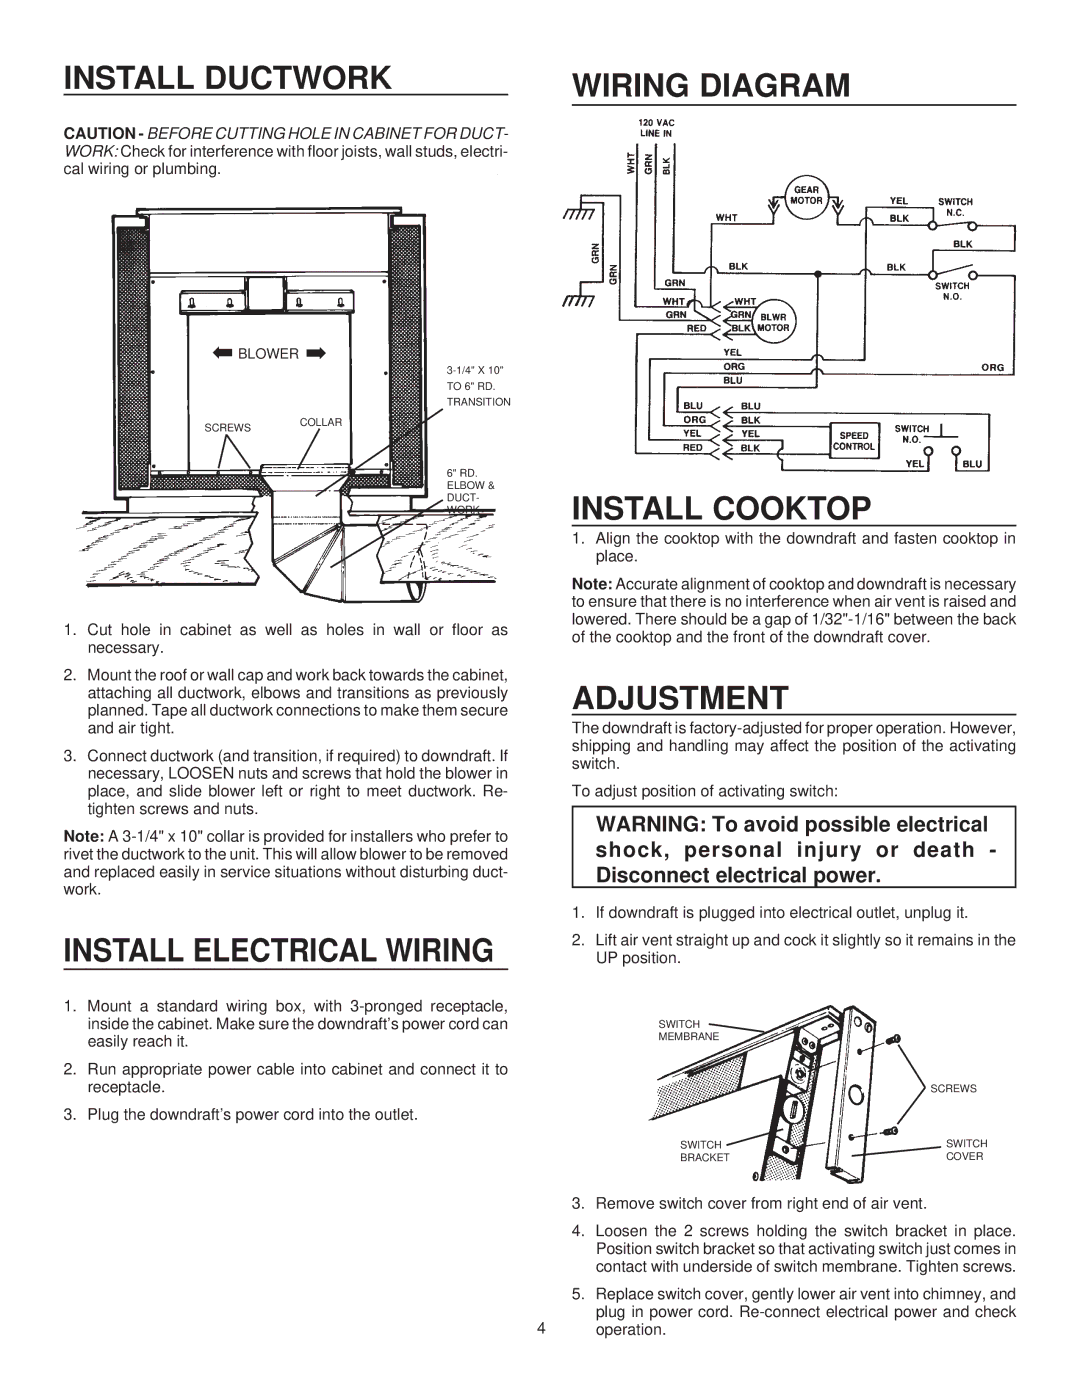
INSTALL DUCTWORK


WIRING DIAGRAM


CAUTION - BEFORE CUTTING HOLE IN CABINET FOR DUCT- WORK: Check for interference with floor joists, wall studs, electri- cal wiring or plumbing.

BLOWER


3-1/4" X 10"


TO 6" RD.


TRANSITION

SCREWS

COLLAR


6" RD.


ELBOW &


DUCT-


WORK

1.Cut hole in cabinet as well as holes in wall or floor as necessary.

2.Mount the roof or wall cap and work back towards the cabinet, attaching all ductwork, elbows and transitions as previously planned. Tape all ductwork connections to make them secure and air tight.

3.Connect ductwork (and transition, if required) to downdraft. If necessary, LOOSEN nuts and screws that hold the blower in place, and slide blower left or right to meet ductwork. Re- tighten screws and nuts.

Note: A 3-1/4" x 10" collar is provided for installers who prefer to rivet the ductwork to the unit. This will allow blower to be removed and replaced easily in service situations without disturbing duct- work.

INSTALL ELECTRICAL WIRING

1.Mount a standard wiring box, with 3-pronged receptacle, inside the cabinet. Make sure the downdraft’s power cord can easily reach it.

2.Run appropriate power cable into cabinet and connect it to receptacle.

3.Plug the downdraft’s power cord into the outlet.

INSTALL COOKTOP

1.Align the cooktop with the downdraft and fasten cooktop in place.

Note: Accurate alignment of cooktop and downdraft is necessary to ensure that there is no interference when air vent is raised and lowered. There should be a gap of 1/32"-1/16" between the back of the cooktop and the front of the downdraft cover.

ADJUSTMENT

The downdraft is factory-adjusted for proper operation. However, shipping and handling may affect the position of the activating switch.

To adjust position of activating switch:

WARNING: To avoid possible electrical shock, personal injury or death - Disconnect electrical power.

1.If downdraft is plugged into electrical outlet, unplug it.

2.Lift air vent straight up and cock it slightly so it remains in the UP position.

SWITCH

MEMBRANE


SCREWS

SWITCH

SWITCH

BRACKET

COVER

3.Remove switch cover from right end of air vent.

4.Loosen the 2 screws holding the switch bracket in place. Position switch bracket so that activating switch just comes in contact with underside of switch membrane. Tighten screws.

5.Replace switch cover, gently lower air vent into chimney, and plug in power cord. Re-connect electrical power and check

4 operation.

Page 4
Image 4
Frigidaire PL30DD, PL36DD warranty Install Ductwork Wiring Diagram, Install Electrical Wiring, Install Cooktop, Adjustment

PL36DD, PL30DD specifications

Frigidaire has long been recognized for its commitment to quality kitchen appliances, and the PL30DD and PL36DD represent the brand's latest advancements in refrigerator technology. Tailored to modern households, these models combine style, functionality, and cutting-edge features to meet diverse culinary needs.

The Frigidaire PL30DD and PL36DD are notable for their sleek designs, available in a variety of finishes that complement any kitchen décor. The stainless steel exterior not only enhances aesthetic appeal but also provides durability and resistance to fingerprints. This means less time spent on cleaning and more time focused on family and meals.

A standout feature of both models is their advanced cooling technology. Employing a unique dual evaporator system, these refrigerators maintain optimal humidity levels in each compartment, preventing food from drying out and ensuring freshness. The precise temperature control helps save energy while keeping perishables in ideal conditions.

Equipped with Frigidaire’s SpaceWise organization system, the PL30DD and PL36DD offer adjustable shelving and multiple storage options that cater to various items, from large trays to small condiments. With a dedicated deli drawer and crisper drawers designed for fruits and vegetables, users can easily access and store food with minimal fuss.

Energy efficiency is another hallmark of the PL30DD and PL36DD. Both models are ENERGY STAR certified, meaning they consume less energy while offering robust performance. This not only helps reduce utility bills but also contributes positively to environmental sustainability.

Another innovative feature includes the built-in PureSource Ultra water filtration system. This system ensures that water and ice dispensed from the refrigerator meet high purity standards, offering peace of mind for families concerned about the quality of drinking water.

In addition to these features, both models incorporate smart technology options. With Wi-Fi connectivity, users can monitor and control temperature settings remotely via a smartphone app. This convenience makes it easy to adjust settings while away from home or check whether the door is closed properly.

Overall, the Frigidaire PL30DD and PL36DD stand out as ideal choices for anyone looking to elevate their kitchen experience. With a combination of style, functionality, and innovative features, these refrigerators are designed to meet the demands of modern living while ensuring food stays fresher longer.