INSTALL THE DUCTWORK

(DUCTED HOODS ONLY)

! CAUTION: To reduce the risk of fire, use only metal ductwork.

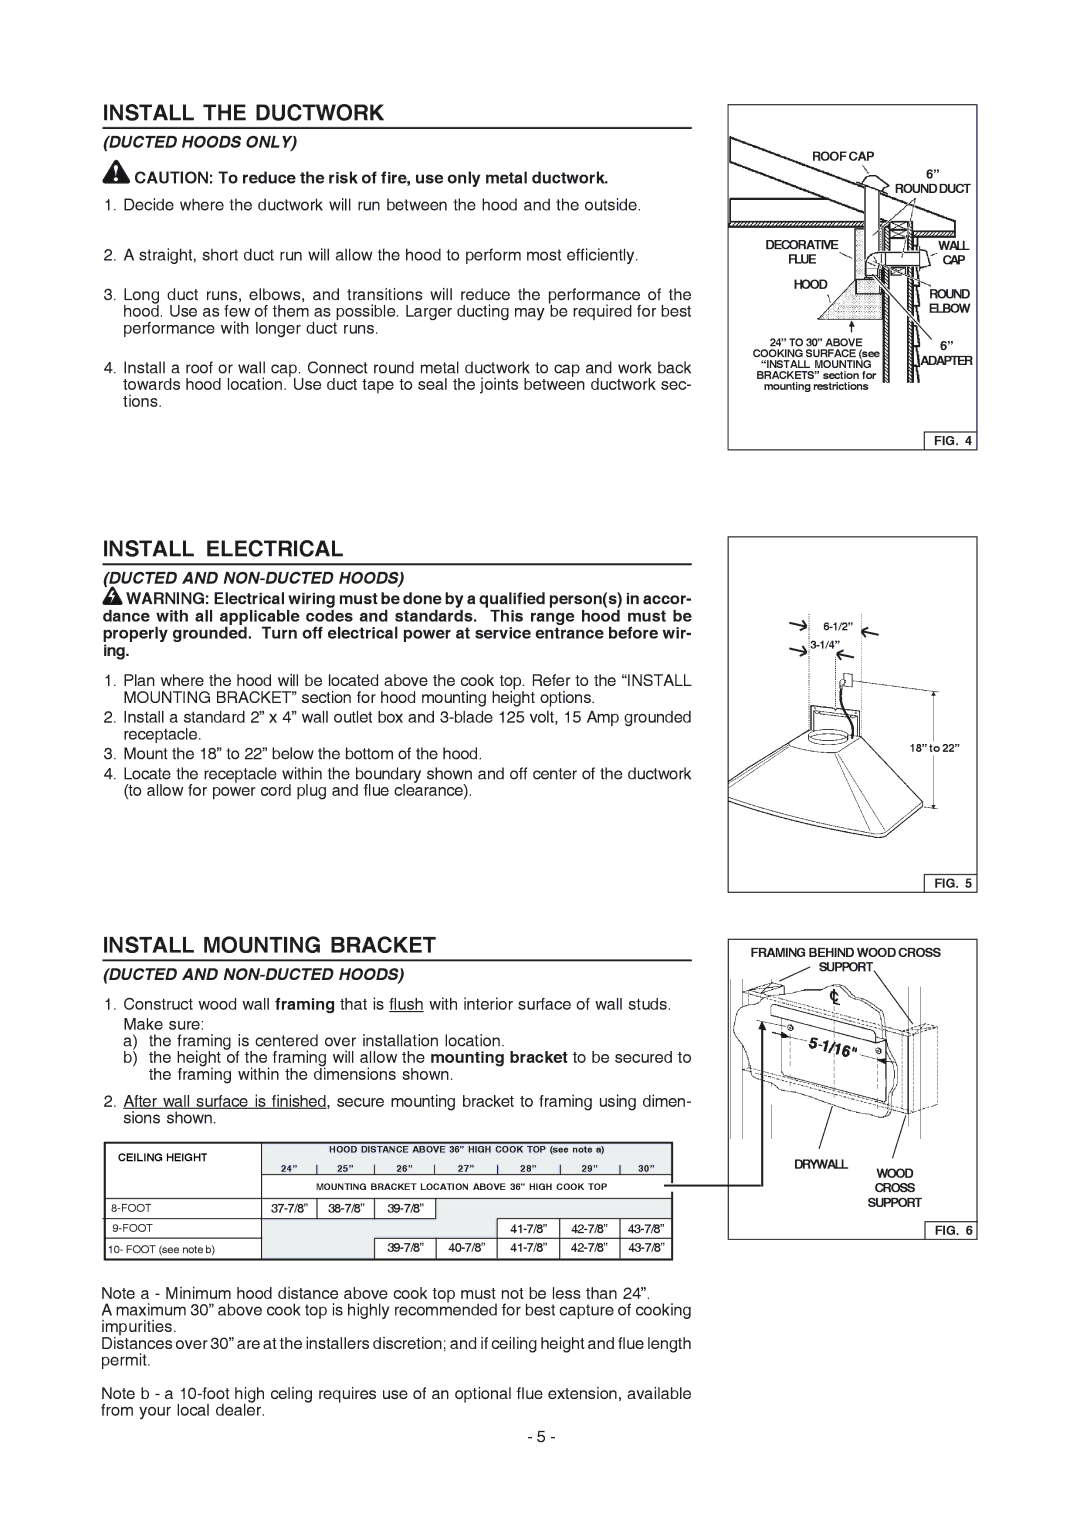
1.Decide where the ductwork will run between the hood and the outside.

2.A straight, short duct run will allow the hood to perform most efficiently.

3.Long duct runs, elbows, and transitions will reduce the performance of the hood. Use as few of them as possible. Larger ducting may be required for best performance with longer duct runs.

4.Install a roof or wall cap. Connect round metal ductwork to cap and work back towards hood location. Use duct tape to seal the joints between ductwork sec- tions.

ROOF CAP


6”


ROUND DUCT

DECORATIVE


WALL

FLUE


CAP

HOOD


ROUND


ELBOW

24” TO 30” ABOVE


6”

COOKING SURFACE (see

ADAPTER

“INSTALL MOUNTING

BRACKETS” section for


mounting restrictions


FIG. 4

INSTALL ELECTRICAL

(DUCTED AND NON-DUCTED HOODS)

WARNING: Electrical wiring must be done by a qualified person(s) in accor- dance with all applicable codes and standards. This range hood must be properly grounded. Turn off electrical power at service entrance before wir- ing.

1.Plan where the hood will be located above the cook top. Refer to the “INSTALL MOUNTING BRACKET” section for hood mounting height options.

2.Install a standard 2” x 4” wall outlet box and 3-blade 125 volt, 15 Amp grounded receptacle.

3.Mount the 18” to 22” below the bottom of the hood.

4.Locate the receptacle within the boundary shown and off center of the ductwork (to allow for power cord plug and flue clearance).

INSTALL MOUNTING BRACKET

(DUCTED AND NON-DUCTED HOODS)

1.Construct wood wall framing that is flush with interior surface of wall studs. Make sure:

a)the framing is centered over installation location.

b)the height of the framing will allow the mounting bracket to be secured to the framing within the dimensions shown.

2.After wall surface is finished, secure mounting bracket to framing using dimen- sions shown.

CEILING HEIGHT


HOOD DISTANCE ABOVE 36” HIGH COOK TOP (see note a)


24”


25”


26”


27”


28”


29”


30”


MOUNTING BRACKET LOCATION ABOVE 36” HIGH COOK TOP


8-FOOT

37-7/8”


38-7/8”


39-7/8”


9-FOOT


41-7/8”


42-7/8”


43-7/8”

10- FOOT (see note b)


39-7/8”

40-7/8”


41-7/8”


42-7/8”


43-7/8”


Note a - Minimum hood distance above cook top must not be less than 24”.

A maximum 30” above cook top is highly recommended for best capture of cooking impurities.

Distances over 30” are at the installers discretion; and if ceiling height and flue length permit.

Note b - a 10-foot high celing requires use of an optional flue extension, available from your local dealer.

- 5 -

6-1/2”

3-1/4”

18” to 22”

FIG. 5

FRAMING BEHIND WOOD CROSS

SUPPORT

DRYWALL

WOOD

CROSS

SUPPORT

FIG. 6

Page 5
Image 5
Frigidaire PL30WC51EC, PL42WC51EC Install the Ductwork, Install Electrical, Install Mounting Bracket, Ducted Hoods only

PL30WC51EC, PL36WC51EC, PL42WC51EC specifications

Frigidaire has long been synonymous with high-quality appliances, and its line of professional refrigerators, including the PL36WC51EC, PL30WC51EC, and PL42WC51EC, continues this tradition. Each model is designed to cater to the needs of both residential and commercial kitchens, showcasing superior engineering, functionality, and aesthetics.

The PL36WC51EC is a standout choice for those needing ample storage and versatility. With a spacious 36-inch width, this refrigerator offers generous capacity, making it ideal for larger families or avid cooks. Its sleek stainless-steel finish not only enhances kitchen aesthetics but is also easy to clean. The unit features advanced cooling technologies, including a powerful compressor and innovative airflow systems, ensuring consistent temperatures and preserving food freshness.

Similarly, the PL30WC51EC provides a slightly more compact option without sacrificing performance. This 30-inch model is perfect for smaller kitchens or as a secondary refrigerator. It boasts a well-organized interior with adjustable shelving and door bins, enabling users to customize the storage space based on their needs. Featuring a digital temperature control system, this model allows for precise adjustments, enhancing food preservation and energy efficiency.

The PL42WC51EC, on the other hand, is designed for those who prioritize elegance and functionality. With a 42-inch width, this refrigerator provides an impressive amount of space. It includes dual cooling systems that separate the refrigerator and freezer environments, ensuring optimal conditions for both fresh and frozen foods. The intuitive control panel allows users to monitor and adjust settings easily, ensuring the perfect environment for food storage.

All three models are engineered with Energy Star certification, signaling their commitment to sustainability and efficiency. They come equipped with LED lighting that illuminates the interior, making it easy to find items even in the deepest corners. The durability of each unit is enhanced through stainless-steel construction, capable of withstanding the rigors of busy kitchens.

In conclusion, the Frigidaire PL36WC51EC, PL30WC51EC, and PL42WC51EC models are exceptional choices for anyone seeking reliable and stylish refrigeration solutions. With advanced features, energy efficiency, and a focus on user convenience, these refrigerators demonstrate Frigidaire's dedication to producing appliances that enhance the culinary experience.