To cancel the sleep timer:
Press the SLEEP button repeated- ly until “SLEEP 0” is displayed.
SLEEP 10

PREPARATION FOR USE

LANGUAGE SELECTION

If you want to change the language of the on-screen menu, follow the procedure below.

1)Connect the power cord to a standard AC outlet.

2)Press the POWER button to turn on the TV.

3)

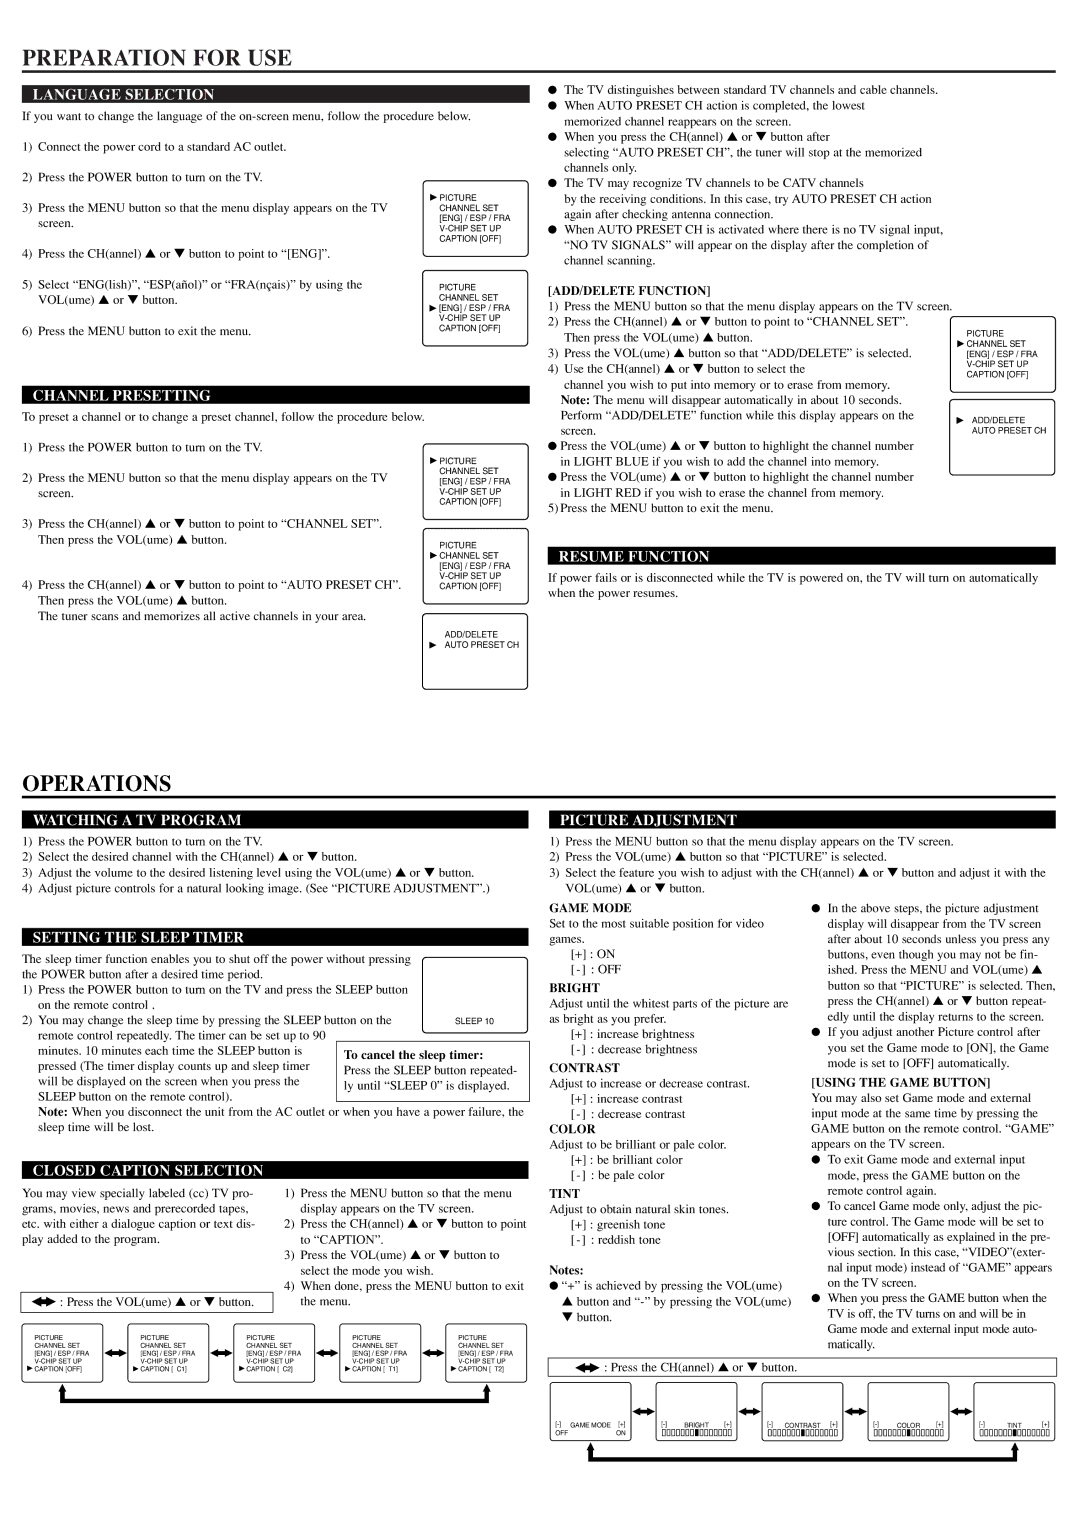
Press the MENU button so that the menu display appears on the TV

PICTURE

CHANNEL SET


screen.

[ENG] / ESP / FRA


V-CHIP SET UP


CAPTION [OFF]

4)

Press the CH(annel) or button to point to “[ENG]”.


5)

Select “ENG(lish)”, “ESP(añol)” or “FRA(nçais)” by using the

PICTURE


VOL(ume) or button.

CHANNEL SET


[ENG] / ESP / FRA


V-CHIP SET UP

6)

Press the MENU button to exit the menu.

CAPTION [OFF]

CHANNEL PRESETTING

The TV distinguishes between standard TV channels and cable channels.

When AUTO PRESET CH action is completed, the lowest memorized channel reappears on the screen.

When you press the CH(annel) or button after

selecting “AUTO PRESET CH”, the tuner will stop at the memorized channels only.

The TV may recognize TV channels to be CATV channels

by the receiving conditions. In this case, try AUTO PRESET CH action again after checking antenna connection.

When AUTO PRESET CH is activated where there is no TV signal input, “NO TV SIGNALS” will appear on the display after the completion of channel scanning.

[ADD/DELETE FUNCTION]

1)Press the MENU button so that the menu display appears on the TV screen.

2)Press the CH(annel) or button to point to “CHANNEL SET”. Then press the VOL(ume) button.

3)Press the VOL(ume) button so that “ADD/DELETE” is selected.

4)Use the CH(annel) or button to select the

channel you wish to put into memory or to erase from memory. Note: The menu will disappear automatically in about 10 seconds.

PICTURE CHANNEL SET [ENG] / ESP / FRA V-CHIP SET UP CAPTION [OFF]

To preset a channel or to change a preset channel, follow the procedure below.

1)

Press the POWER button to turn on the TV.

2)

Press the MENU button so that the menu display appears on the TV


screen.

3)

Press the CH(annel) or button to point to “CHANNEL SET”.


Then press the VOL(ume) button.

PICTURE CHANNEL SET [ENG] / ESP / FRA V-CHIP SET UP CAPTION [OFF]

PICTURE

Perform “ADD/DELETE” function while this display appears on the screen.

Press the VOL(ume) or button to highlight the channel number in LIGHT BLUE if you wish to add the channel into memory.

Press the VOL(ume) or button to highlight the channel number

in LIGHT RED if you wish to erase the channel from memory.

5) Press the MENU button to exit the menu.

ADD/DELETE AUTO PRESET CH

4) Press the CH(annel) or button to point to “AUTO PRESET CH”.

Then press the VOL(ume) button.

The tuner scans and memorizes all active channels in your area.

CHANNEL SET [ENG] / ESP / FRA V-CHIP SET UP CAPTION [OFF]

RESUME FUNCTION

If power fails or is disconnected while the TV is powered on, the TV will turn on automatically when the power resumes.

ADD/DELETE

AUTO PRESET CH

OPERATIONS

WATCHING A TV PROGRAM

PICTURE ADJUSTMENT

1)Press the POWER button to turn on the TV.

2)Select the desired channel with the CH(annel) or button.

3)Adjust the volume to the desired listening level using the VOL(ume) or button.

4)Adjust picture controls for a natural looking image. (See “PICTURE ADJUSTMENT”.)

SETTING THE SLEEP TIMER

The sleep timer function enables you to shut off the power without pressing the POWER button after a desired time period.

1)Press the POWER button to turn on the TV and press the SLEEP button on the remote control .

2) You may change the sleep time by pressing the SLEEP button on the remote control repeatedly. The timer can be set up to 90

minutes. 10 minutes each time the SLEEP button is pressed (The timer display counts up and sleep timer will be displayed on the screen when you press the SLEEP button on the remote control).

Note: When you disconnect the unit from the AC outlet or when you have a power failure, the sleep time will be lost.

1)Press the MENU button so that the menu display appears on the TV screen.

2)Press the VOL(ume) button so that “PICTURE” is selected.

3)Select the feature you wish to adjust with the CH(annel) or button and adjust it with the VOL(ume) or button.

GAME MODE

In the above steps, the picture adjustment

Set to the most suitable position for video

display will disappear from the TV screen

games.

after about 10 seconds unless you press any

[+] : ON

buttons, even though you may not be fin-

[ - ] : OFF

ished. Press the MENU and VOL(ume)

BRIGHT

button so that “PICTURE” is selected. Then,

Adjust until the whitest parts of the picture are

press the CH(annel) or button repeat-

as bright as you prefer.

edly until the display returns to the screen.

[+] : increase brightness

If you adjust another Picture control after

[ - ] : decrease brightness

you set the Game mode to [ON], the Game

CONTRAST

mode is set to [OFF] automatically.

[USING THE GAME BUTTON]

Adjust to increase or decrease contrast.

[+] : increase contrast

You may also set Game mode and external

[ - ] : decrease contrast

input mode at the same time by pressing the

COLOR

GAME button on the remote control. “GAME”

Adjust to be brilliant or pale color.

appears on the TV screen.

[+] : be brilliant color

To exit Game mode and external input

CLOSED CAPTION SELECTION

You may view specially labeled (cc) TV pro- grams, movies, news and prerecorded tapes, etc. with either a dialogue caption or text dis- play added to the program.

: Press the VOL(ume) or button.

1)Press the MENU button so that the menu display appears on the TV screen.

2)Press the CH(annel) or button to point to “CAPTION”.

3)Press the VOL(ume) or button to select the mode you wish.

4)When done, press the MENU button to exit the menu.

[ - ] : be pale color

mode, press the GAME button on the

TINT

remote control again.

Adjust to obtain natural skin tones.

To cancel Game mode only, adjust the pic-

[+] : greenish tone

ture control. The Game mode will be set to

[ - ] : reddish tone

[OFF] automatically as explained in the pre-


vious section. In this case, “VIDEO”(exter-

Notes:

nal input mode) instead of “GAME” appears

“+” is achieved by pressing the VOL(ume)

on the TV screen.

button and “-” by pressing the VOL(ume)

When you press the GAME button when the

button.

TV is off, the TV turns on and will be in


Game mode and external input mode auto-

PICTURE

PICTURE

PICTURE

PICTURE

PICTURE

CHANNEL SET

CHANNEL SET

CHANNEL SET

CHANNEL SET

CHANNEL SET

[ENG] / ESP / FRA

[ENG] / ESP / FRA

[ENG] / ESP / FRA

[ENG] / ESP / FRA

[ENG] / ESP / FRA

V-CHIP SET UP

V-CHIP SET UP

V-CHIP SET UP

V-CHIP SET UP

V-CHIP SET UP

CAPTION [OFF]

CAPTION [ C1]

CAPTION [ C2]

CAPTION [ T1]

CAPTION [ T2]

matically.

: Press the CH(annel) or button.

[-]

GAME MODE [+]

[-]

BRIGHT

[+]

[-]CONTRAST [+]

[-]

COLOR

[+]

[-]

TINT

[+]

OFF

ON


Page 3
Image 3
FUNAI ET413E, ET419E owner manual Preparation for USE, Operations

ET413E, ET419E specifications

The FUNAI ET413E and ET419E are notable additions to the realm of consumer electronics, particularly in the domain of television technology. These models exemplify FUNAI’s commitment to delivering high-quality experiences while keeping user needs at the forefront.

The ET413E and ET419E are equipped with full HD resolution, providing crystal clear images and vibrant colors for an immersive viewing experience. The clarity achieved through the 1080p resolution makes both models ideal for watching movies, sports, and playing video games, ensuring that every detail is visible and lifelike.

One of the standout features of these models is the inclusion of advanced image processing technology. This technology enhances the quality of the images displayed, reducing noise and increasing the overall sharpness of the picture. As a result, users can enjoy a more dynamic range of colors and contrasts, making their viewing experience much more engaging.

Connectivity is another essential aspect of the FUNAI ET413E and ET419E models. Both televisions come with multiple HDMI ports, allowing users to connect various devices such as gaming consoles, Blu-ray players, and soundbars effortlessly. Additionally, USB ports provide the convenience of playing media directly from external drives, catering to users who enjoy watching their favorite shows and films from USB storage.

Furthermore, these models are designed with energy efficiency in mind. With energy-saving technologies incorporated, both ET413E and ET419E meet strict energy consumption guidelines, helping users reduce their carbon footprint while also saving on electricity bills.

Durability is a hallmark of FUNAI products, and these models are no exception. Constructed from high-quality materials, the ET413E and ET419E are built to withstand the rigors of daily use. The sleek design not only adds to the aesthetic appeal but also ensures that they fit seamlessly into any home décor.

In conclusion, the FUNAI ET413E and ET419E models are distinguished by their full HD display, advanced image processing, extensive connectivity options, energy efficiency, and robust build quality. These televisions cater to a wide range of viewing preferences, making them a versatile choice for consumers seeking an exceptional entertainment solution. With these features, FUNAI continues to solidify its position as a manufacturer of reliable and innovative consumer electronics.