DESCRIPTION OF CONTROLS
Front Panel | Remote Control |
|
|
| 10 | 11 |
|
|
|
|
POWER | REPEAT |
| PICTURE |
|
|
| STOP/EJECT |
|
|
| REW F.FWD | PLAY |
|
| |||
| PLAY |
| SELECT |
|
| |||
|
|
|
|
|
|
| ||
|
|
| POWER | REPEAT PLAY |
|
|
|
|
9 | 6 | 8 | 7 | 3 | 5 | 4 | 2 | 1 |
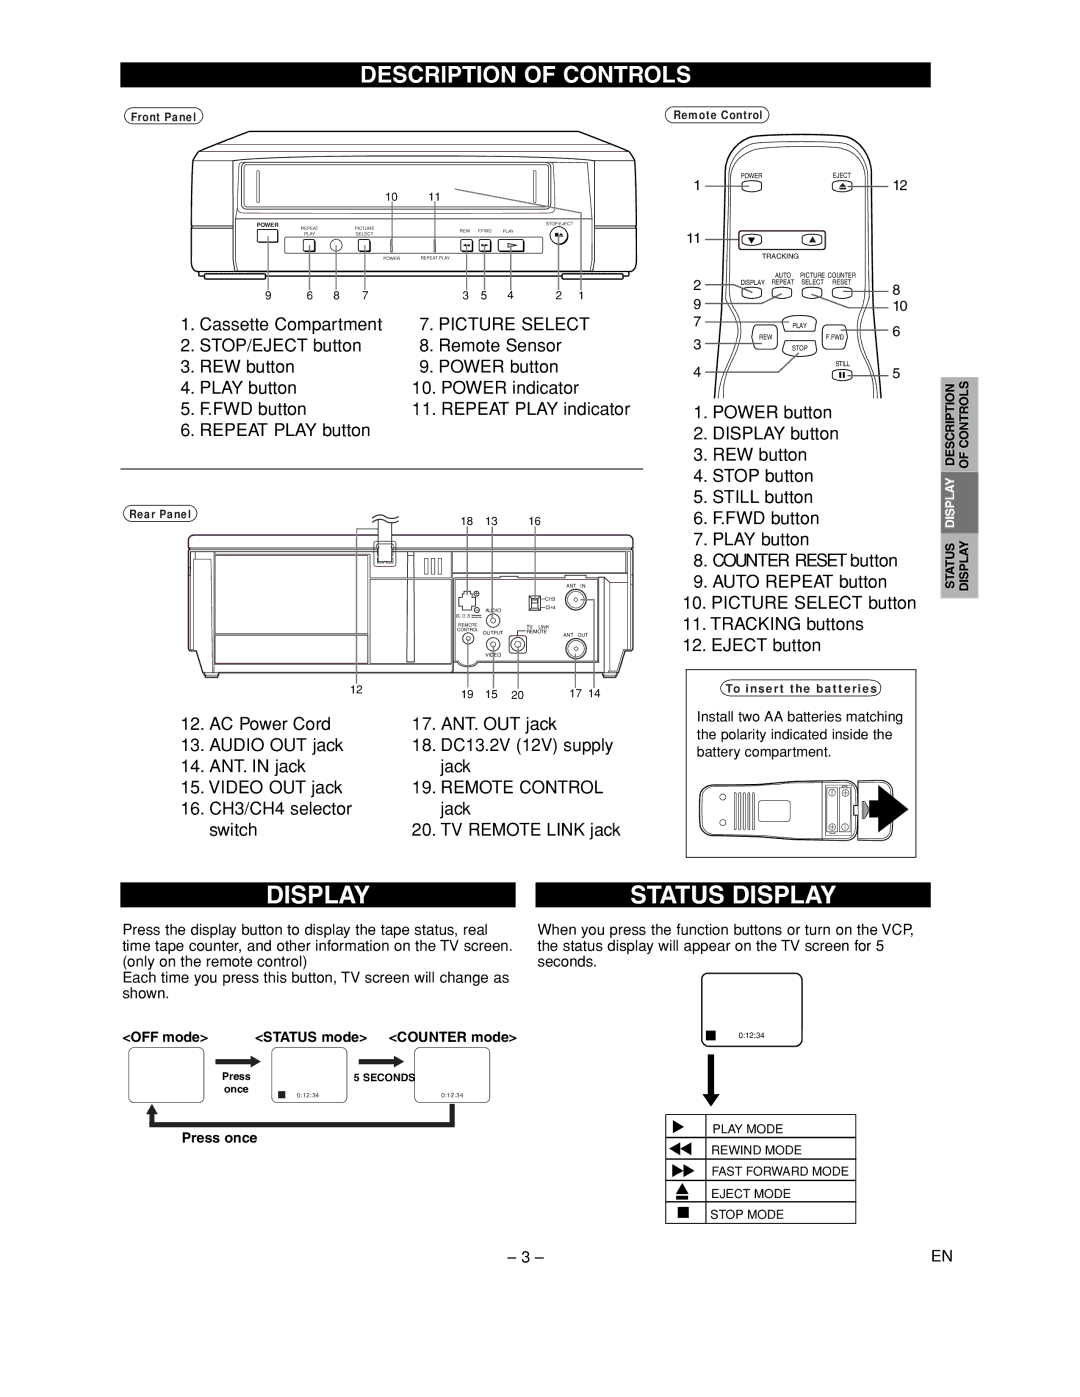
1. Cassette Compartment | 7. PICTURE SELECT | |||||||
2. STOP/EJECT button | 8. Remote Sensor |
| ||||||
3. REW button |
|
|
| 9. POWER button |
| |||
4. PLAY button | 10. POWER indicator |
5. F.FWD button | 11. REPEAT PLAY indicator |
6. REPEAT PLAY button |
|
|
|
Rear Panel | 18 | 13 | 16 |
|
|
| |||
|
|
|
| ANT IN |
|
|
| CH3 |
|
|
| AUDIO | CH4 |
|
|
|
|
| |
| DC 13. 2V |
|
|
|
| REMOTE |
| TV LINK |
|
| CONTROL | OUTPUT | REMOTE | ANT OUT |
|
|
|
| |
|
| VIDEO |
|
|
12 | 19 | 15 | 20 | 17 14 |
| ||||
12. AC Power Cord | 17. ANT. OUT jack |
| ||
13. AUDIO OUT jack | 18. DC13.2V (12V) supply | |||
14. ANT. IN jack | jack |
|
|
|
15. VIDEO OUT jack | 19. REMOTE CONTROL | |||
16. CH3/CH4 selector | jack |
|
|
|
switch | 20. TV REMOTE LINK jack | |||
1 | POWER | EJECT | 12 |
|
| ||
11 |
|
|
|
| TRACKING |
| |
2 | AUTO | PICTURE COUNTER |
|
DISPLAY REPEAT SELECT RESET | 8 | ||
|
| ||
9 |
|
| |
|
| 10 | |
7 |
| PLAY | 6 |
3 | REW | F.FWD | |
| STOP |
| |
4 |
| STILL | 5 |
|
| ||
1.POWER button
2.DISPLAY button
3.REW button
4.STOP button
5.STILL button
6.F.FWD button
7.PLAY button
8.COUNTER RESET button
9.AUTO REPEAT button
10.PICTURE SELECT button
11.TRACKING buttons
12.EJECT button
To insert the batteries
Install two AA batteries matching the polarity indicated inside the battery compartment.
DESCRIPTION | OF CONTROLS |
DISPLAY |
|
STATUS | DISPLAY |
DISPLAY |
| STATUS DISPLAY |
Press the display button to display the tape status, real | When you press the function buttons or turn on the VCP, | |
time tape counter, and other information on the TV screen. | the status display will appear on the TV screen for 5 | |
(only on the remote control) | seconds. | |
Each time you press this button, TV screen will change as |
| |
shown. |
| |
<OFF mode> | <STATUS mode> | <COUNTER mode> |
Press | 5 SECONDS | |
once | 0:12:34 | 0:12:34 |
| ||
Press once
0:12:34
PLAY MODE
REWIND MODE
FAST FORWARD MODE
EJECT MODE
STOP MODE
– 3 – | EN |
