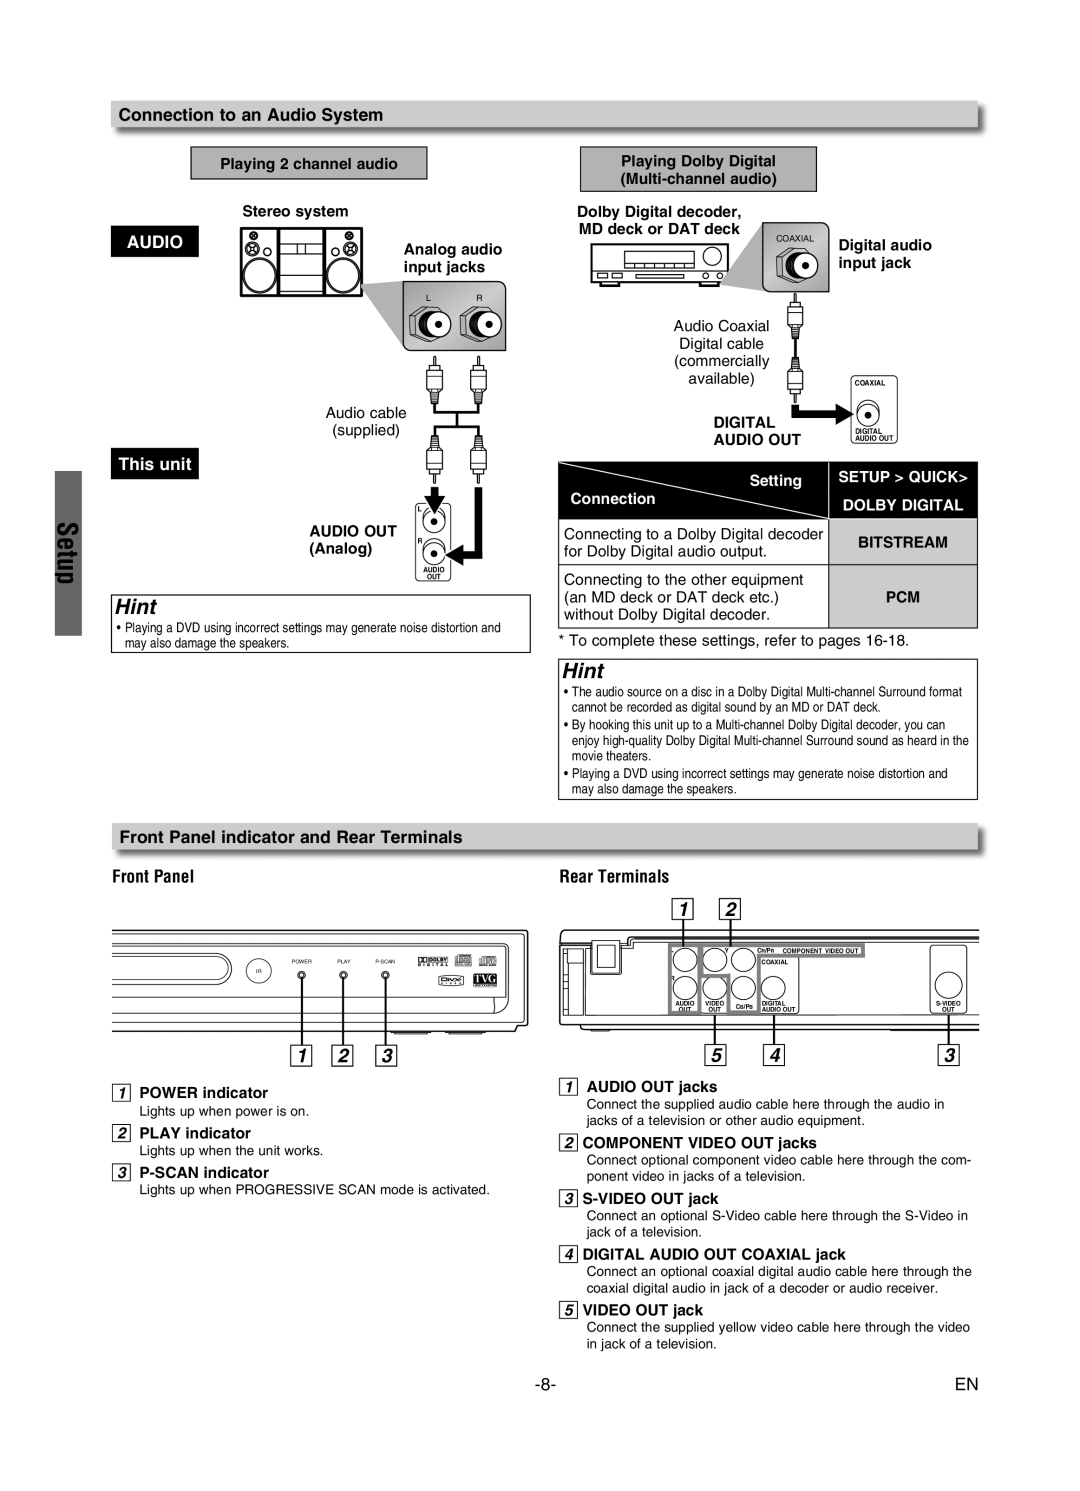
Connection to an Audio System
| Playing 2 channel audio |
| Playing Dolby Digital |
|
|
|
|
| |
| Stereo system |
| Dolby Digital decoder, |
|
AUDIO |
|
| MD deck or DAT deck |
|
Analog audio | COAXIAL | Digital audio | ||
| ||||
| input jacks |
| input jack | |
| L | R |
|
|
|
|
| Audio Coaxial |
|
|
|
| Digital cable |
|
|
|
| (commercially |
|
|
|
| available) | COAXIAL |
Audio cable | DIGITAL |
| |
(supplied) | DIGITAL | ||
AUDIO OUT | |||
| AUDIO OUT | ||
|
|
Setup
This unit
L
AUDIO OUT
(Analog) R![]()
AUDIO
OUT
Hint
• Playing a DVD using incorrect settings may generate noise distortion and |
Setting
Connection
Connecting to a Dolby Digital decoder for Dolby Digital audio output.
Connecting to the other equipment (an MD deck or DAT deck etc.) without Dolby Digital decoder.
SETUP > QUICK> DOLBY DIGITAL
BITSTREAM
PCM
may also damage the speakers. |
* To complete these settings, refer to pages
Hint
• The audio source on a disc in a Dolby Digital
• By hooking this unit up to a
• Playing a DVD using incorrect settings may generate noise distortion and may also damage the speakers.
Front Panel indicator and Rear Terminals
Front Panel | Rear Terminals |
|
|
|
|
|
|
|
POWER PLAY
IR
1POWER indicator
Lights up when power is on.
2PLAY indicator
Lights up when the unit works.
3P-SCAN indicator
Lights up when PROGRESSIVE SCAN mode is activated.
RR COMPONENT VIDEO OUT COAXIAL
AUDIO | VIDEO | CB/PB | DIGITAL | ||
OUT | OUT | AUDIO OUT | OUT | ||
|
5 |
| 4 |
| 3 |
1AUDIO OUT jacks
Connect the supplied audio cable here through the audio in jacks of a television or other audio equipment.
2COMPONENT VIDEO OUT jacks
Connect optional component video cable here through the com- ponent video in jacks of a television.
3
Connect an optional
4DIGITAL AUDIO OUT COAXIAL jack
Connect an optional coaxial digital audio cable here through the coaxial digital audio in jack of a decoder or audio receiver.
5VIDEO OUT jack
Connect the supplied yellow video cable here through the video in jack of a television.
EN |
