AUX OPERATION
Aux Connect
Connect an audio source to the AUX cable in the rear panel.
Aux Mode Selection
Press the SOURCE button to select AUX mode.
Radio - CD - iPod - AUX
ADDITIONAL FUNCTIONS
Additional functions avaliable while CD/MP3 or iPod is playing
Intro Scan - Shuffle - Repeat Track - Repeat Folder
To activate additional functions when the CD is playing;
-Press and hold the joystick and the CD FUNCTIONS screen will appear
-Select a function by using the joystick encoder, confirm your selection by pressing the joystick
INSTALLATION GUIDE
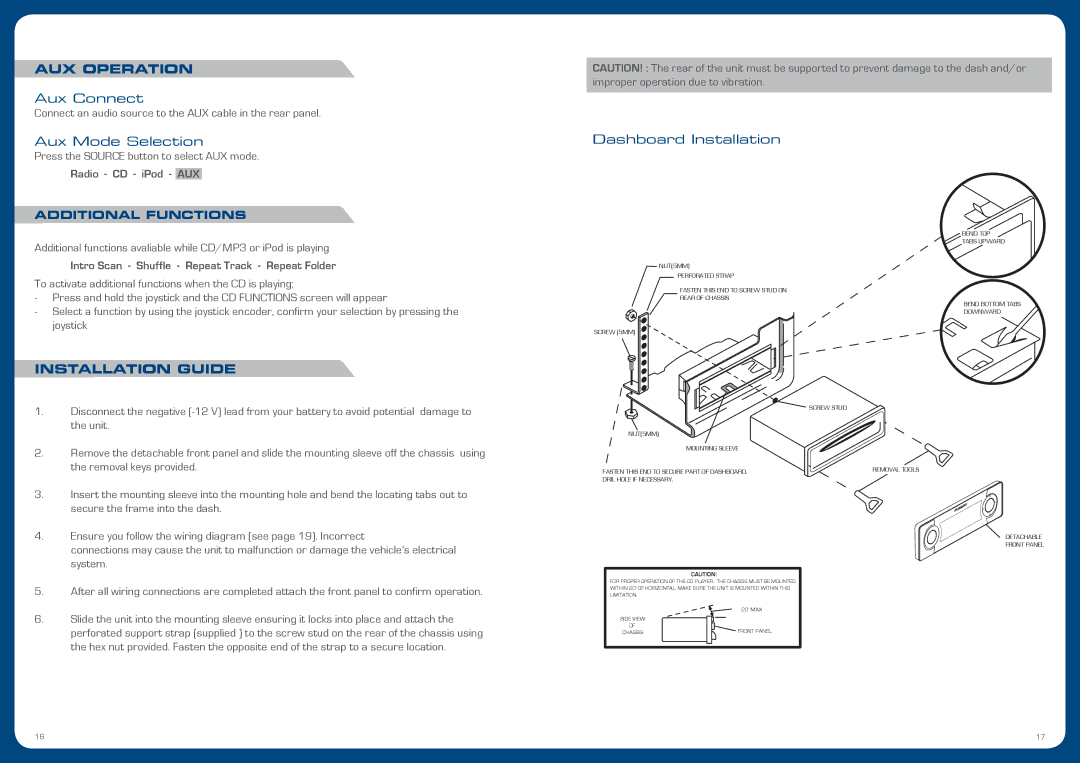
1.Disconnect the negative
2.Remove the detachable front panel and slide the mounting sleeve off the chassis using the removal keys provided.
3.Insert the mounting sleeve into the mounting hole and bend the locating tabs out to secure the frame into the dash.
4.Ensure you follow the wiring diagram (see page 19). Incorrect
connections may cause the unit to malfunction or damage the vehicle’s electrical system.
5.After all wiring connections are completed attach the front panel to confirm operation.
6.Slide the unit into the mounting sleeve ensuring it locks into place and attach the perforated support strap (supplied ) to the screw stud on the rear of the chassis using the hex nut provided. Fasten the opposite end of the strap to a secure location.
CAUTION! : The rear of the unit must be supported to prevent damage to the dash and/or improper operation due to vibration.
Dashboard Installation
BEND TOP
![]() TABS UPWARD
TABS UPWARD
NUT(5MM)
PERFORATED STRAP
FASTEN THIS END TO SCREW STUD ON
REAR OF CHASSIS
BEND BOTTOM TABS DOWNWARD
SCREW (5MM)
| SCREW STUD |
NUT(5MM) |
|
MOUNTING SLEEVE |
|
FASTEN THIS END TO SECURE PART OF DASHBOARD. | REMOVAL TOOLS |
| |
DRIL HOLE IF NECESSARY. |
|
DETACHABLE
FRONT PANEL
CAUTION:
FOR PROPER OPERATION OF THE CD PLAYER, THE CHASSIS MUST BE MOUNTED
WITHIN 20' OF HORIZONTAL. MAKE SURE THE UNIT IS MOUNTED WITHIN THIS
LIMITATION.
|
|
| 20' MAX |
SIDE VIEW |
|
|
|
|
|
| |
OF |
|
| FRONT PANEL |
CHASSIS |
|
| |
|
|
|
|
16 | 17 |