8.Use the touch-tone pad to enter 1YES or use CID/VOL ( or ) button to scroll to 1YES.
NOTE: Press the *EXIT button once to keep the previous setting and return to the main menu screen.
9.Press the MUTE/PROG button to confirm the deregistration. DE-REGISTER... displays for 30 seconds, then HANDSET # DE- REGISTERED displays for one second followed byHANDSET NEEDS REGISTRATION.
NOTE: If you choose YES all settings in the programmable menu return to the factory default settings.
NOTE: Press the *EXIT button once to keep the previous setting and return to the main menu.
7.Press the MUTE/PROG button to save your selection, and return to the main menu. The default setting you choose shows on the display for two seconds, and you will hear a confirmation tone.
•Keep batteries out of the reach of children.
•Remove batteries if storing over 30 days.
Contains
Nickel-Cadmium
Rechargeable Battery | NOTE: This product contains a nickel-cadmium |
|
| rechargeable battery and must be recycled or disposed of |
| properly. We suggest that you check with your local |
Ni-Cd | Environmental Agency regarding recycling or disposal. |
Must be Recycled or | |
Disposed of Properly | |
HEADSET AND BELT CLIP INSTALLATION
CAUSES OF POOR RECEPTION
• Aluminum siding. |
• Foil backing on insulation. |
• Heating ducts and other metal construction that can shield radio |
signals. |
• You’re too close to appliances such as microwaves, stoves, |
computers, etc. |
• Atmospheric conditions, such as strong storms. |
• Base is installed in the basement or lower floor of the house. |
• Base is plugged into AC outlet with other electronic devices. |
SERVICE
ATLINKS Communications Canada, Inc., warrants to the purchaser or gift recipient that if any manufacturing defect becomes apparent in this product within 1 year from the original date of purchase, it will be replaced free of charge, including return transportation.
This warranty does not include damage to the product resulting from accidents, misuse or leaking batteries.
Should your product not perform properly during the warranty period, either:
1. Return it to the selling dealer with proof of purchase for |
ACCESSORY INFORMATION |
DESCRIPTION | MODEL NO. |
Belt clip | 5-2649 |
| |
Replacement battery | 5-2522 |
Headset | 5-2425 |
| |
To place order, have your Visa, MasterCard, or Discover Card ready
and call toll-free 1-800-338-0376.
A shipping and handling fee will be charged upon ordering.
We are required by law to collect appropriate sales tax for each individual state, country, and locality to which the merchandise is
GLOBAL DE-REGISTRATION
If one or more handsets becomes lost, you should de-register all handsets to ensure proper system operation. Follow the steps below to deregister both handsets at the same time.
1.Press and hold the page button on the base of GE 21018/21028 or the PAGE/INT button of GE21098 until the in use/charge indicator on the base flashes.
2.Press and hold the page/int button on the base of GE 21018/21028 or the PAGE/INT button of GE21098 again until in use/charge indicator on the base flashes rapidly.
3.Press and release the page/int button on the base of GE 21018/ 21028 or the PAGE/INT button of GE21098 once. All handsets are deregistered and HANDSET NEEDS REGISTRATION shows in the display.
IMPORTANT : It is strongly recommended that a handset not be de-registered unless absolutely necessary.
DEFAULT
As you become familiar with this system, you may prefer to use the system’s original settings. Follow the steps below to return to the factory default settings.
1.Make sure your handset is in menu mode. Make sure your phone is OFF (not in talk mode).
2.Press the MUTE/PROG button to display main menus: ROOM MONITOR and HANDSET SETUP.
3.Use CID down button to locate to HANDSET SETUP and then press MUTE/PROG button to select.
4.Use CID up/down button to locate the DEFAULT SETTING and then press MUTE/PROG button to select.
5.Then the handset shows DEFAULT SETTING 1YES 2NO in display.
6.Use the touch-tone pad on your handset to enter 1YES or 2NO, or use the CID/VOL ( or ) button on your handset to scroll to 1YES or 2NO. 2NO is the default setting.
DEFAULT SETTING
1YES  2NO
2NO
PAGING ALL HANDSETS FROM A HANDSET
1.Make sure the originating phone is OFF (not in talk mode).
2.Press and release the PAGE/INT button on a handset. PAGING EXTENSION? shows in the display.
3.Use the touch-tone pad to enter the handset number you want to page. (1=to page Handset 1, 2=to page handset 2, 3=to page handset 3, 4=to page handset 4, and 5=to page all handsets)
4.To cancel the page on the originating handset, press the *EXIT, PAGE/INT, or TALK/END/CALLBACK button.
REPLACING THE BATTERY
CAUTION: to reduce the risk of fire or personal injury,  use only the 5-2522 replacement battery listed on the
accessory order form, which is compatible with this unit.
CAUTION: To ensure the phone/battery performance, use ONLY 21009 charging cradle, 21018, 21028 or 21098 base for battery charging only.
1.Make sure the telephone is OFF before you replace battery.
2.Remove the battery compartment door.
3.Disconnect the cord attached to the
battery pack from the jack inside the battery compartment and remove the battery pack from the handset.
4.Insert the new battery pack and reconnect the battery plug.
5.Put the battery compartment door back on.
6.Place handset in the base to charge. If you don’t charge the handset battery
properly (for 16 hours) when you first set up the phone and/or when you install a new battery pack, the battery’s long-term performance will be compromised.
Note: If the battery is not properly installed in the handset, or if the battery pack is not properly connected to the jack inside the battery compartment. “NO BATTERY” shows in the display when the handset is placed in the charging cradle.
BATTERY SAFETY PRECAUTIONS
•Do not burn, disassemble, mutilate, or puncture. Like other batteries of this type, toxic materials could be released which can cause injury.
1.Insert the headset plug into the headset jack.
2.Adjust the headset to rest comfortably on the ear.
3.Move the microphone to approximately 2 to 3 inches from your mouth.
4.Press the talk/callback button to answer or place a call while using the headset.
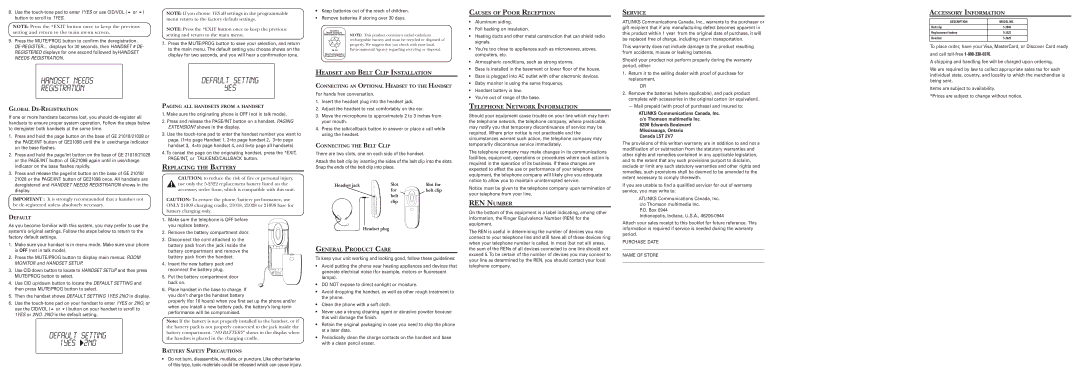
CONNECTING THE BELT CLIP
There are two slots, one on each side of the handset.
Attach the belt clip by inserting the sides of the belt clip into the slots. Snap the ends of the belt clip into place.
Headset jack | Slot | Slot for |
| for | belt clip |
| belt | |
| clip | |
Headset plug
GENERAL PRODUCT CARE
To keep your unit working and looking good, follow these guidelines:
•Avoid putting the phone near heating appliances and devices that generate electrical noise (for example, motors or fluorescent lamps).
•DO NOT expose to direct sunlight or moisture.
•Avoid dropping the handset, as well as other rough treatment to the phone.
•Clean the phone with a soft cloth.
•Never use a strong cleaning agent or abrasive powder because this will damage the finish.
•Retain the original packaging in case you need to ship the phone at a later date.
•Periodically clean the charge contacts on the handset and base with a clean pencil eraser.
TELEPHONE NETWORK INFORMATION
Should your equipment cause trouble on your line which may harm the telephone network, the telephone company, where practicable, may notify you that temporary discontinuance of service may be required. Where prior notice is not practicable and the circumstances warrant such action, the telephone company may temporarily discontinue service immediately.
The telephone company may make changes in its communications facilities, equipment, operations or procedures where such action is required in the operation of its business. If these changes are expected to affect the use or performance of your telephone equipment, the telephone company will likely give you adequate notice to allow you to maintain uninterrupted service.
Notice must be given to the telephone company upon termination of your telephone from your line.
REN NUMBER
On the bottom of this equipment is a label indicating, among other information, the Ringer Equivalence Number (REN) for the equipment.
The REN is useful in determining the number of devices you may connect to your telephone line and still have all of these devices ring when your telephone number is called. In most (but not all) areas, the sum of the RENs of all devices connected to one line should not exceed 5. To be certain of the number of devices you may connect to your line as determined by the REN, you should contact your local telephone company.
— Mail prepaid (with proof of purchase) and insured to: |
ATLINKS Communications Canada, Inc.
c/o Thomson multimedia Inc.
6200 Edwards Boulevard
Mississauga, Ontario
Canada L5T 2V7
The provisions of this written warranty are in addition to and not a modification of or subtraction from the statutory warranties and other rights and remedies contained in any applicable legislation, and to the extent that any such provisions purport to disclaim, exclude or limit any such statutory warranties and other rights and remedies, such provisions shall be deemed to be amended to the extent necessary to comply therewith.
If you are unable to find a qualified servicer for out of warranty service, you may write to:
ATLINKS Communications Canada, Inc.
c/o Thomson multimedia Inc.
P.O. Box 0944
Indianapolis, Indiana, U.S.A., 46206-0944
Attach your sales receipt to this booklet for future reference. This information is required if service is needed during the warranty period.
PURCHASE DATE
_____________________________________________________________________
NAME OF STORE
_____________________________________________________________________