MINIMUM

MAX.

MIN.

75°C INSULATION MAX. MOTOR

PRESSURE PLATE


COPPER

LOAD

INSUL-


LOAD (HP)


WIRE SIZE

(AMP)

ATION


Figure 1

(AWG)


TEMP(°C)

SINGLE PHASE

3 PHASE

TERMINAL SCREW


120 V.

240 V.

208 V.

240 V.


14

15

60

1/2

2

N/A

N/A

MAKE SURE WIRE


12

20

60

1

2 1/2

INSULATION CLEARS


10

30

60

2

3


PRESSURE PLATE


8

40

105

-

5


Typical Wiring Diagrams—SPDT

Typical Wiring Diagrams—DPDT

Timer and Load, Same Voltage

120V Timer, 200/240/277V Load Double Break

Wired as Single Throw

Wired as Single Throw

T

T

TIMERN NC OC OM

H

TIMERN

CN O COM NC2 NO2 COM2

TO POWER SUPPLY

TO LOAD

TO 120V LINE

TO 200/240/277V LINE


LOAD


N


Timer and Load, Different Voltage


120V Timer, 120V Load and 24V Load

Wired as Single Throw


Wired as Single Throw

T


T


TIMERN

CN

OC OM

H


TIMERN

CN

O

COM NC2 NO2 COM2

TO POWER SUPPLY 1


TO POWER SUPPLY 2

TO 120V LINE


TO 24V LINE


N


LOAD


N


LOAD


TO LOAD


H


120V Two Speed Fan


Wired as Double Throw

200/240/277V Timer, 200/240/277V Load, Double Break


T


Wired as Single Throw


T


TIMERN

CN

OC OM


H TO 120V LINE


HIGH


COM NC2 NO2 COM2


LOW


L1

TIMERN

CN

O

N


COM


Field Wiring


LOAD

Timer Internab Wiring


L2


Operating Instructions

Basic Settings:

Initial Set Up:

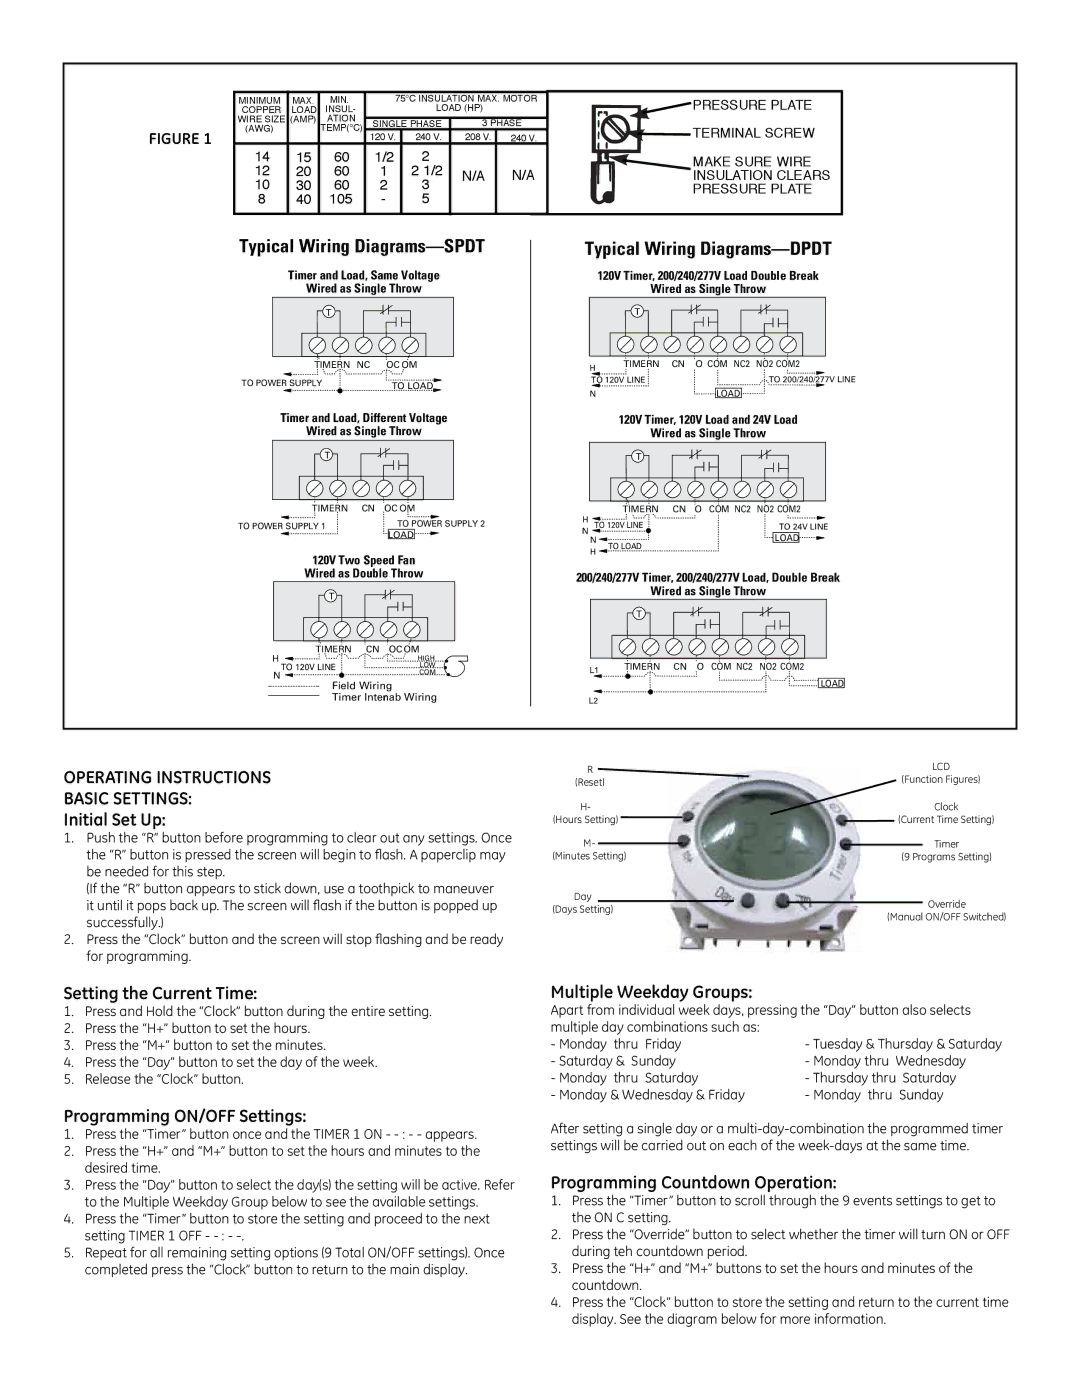
1.Push the “R” button before programming to clear out any settings. Once the “R” button is pressed the screen will begin to flash. A paperclip may be needed for this step.

(If the “R” button appears to stick down, use a toothpick to maneuver it until it pops back up. The screen will flash if the button is popped up successfully.)

2.Press the “Clock” button and the screen will stop flashing and be ready for programming.

R

(Reset)

H-

(Hours Setting)

M-

(Minutes Setting)

Day

(Days Setting)

LCD

(Function Figures)

Clock

(Current Time Setting)

Timer

(9 Programs Setting)

Override

(Manual ON/OFF Switched)

Setting the Current Time:

1.Press and Hold the “Clock” button during the entire setting.

2.Press the “H+” button to set the hours.

3.Press the “M+” button to set the minutes.

4.Press the “Day” button to set the day of the week.

5.Release the “Clock” button.

Programming ON/OFF Settings:

1.Press the “Timer” button once and the TIMER 1 ON - - : - - appears.

2.Press the “H+” and “M+” button to set the hours and minutes to the desired time.

3.Press the “Day” button to select the day(s) the setting will be active. Refer to the Multiple Weekday Group below to see the available settings.

4.Press the “Timer” button to store the setting and proceed to the next setting TIMER 1 OFF - - : - -.

5.Repeat for all remaining setting options (9 Total ON/OFF settings). Once completed press the “Clock” button to return to the main display.

Multiple Weekday Groups:

Apart from individual week days, pressing the “Day” button also selects

multiple day combinations such as:


- Monday thru Friday

- Tuesday & Thursday & Saturday

- Saturday & Sunday

- Monday thru Wednesday

- Monday thru Saturday

- Thursday thru Saturday

- Monday & Wednesday & Friday

- Monday thru Sunday

After setting a single day or a multi-day-combination the programmed timer settings will be carried out on each of the week-days at the same time.

Programming Countdown Operation:

1.Press the “Timer” button to scroll through the 9 events settings to get to the ON C setting.

2.Press the “Override” button to select whether the timer will turn ON or OFF during teh countdown period.

3.Press the “H+” and “M+” buttons to set the hours and minutes of the countdown.

4.Press the “Clock” button to store the setting and return to the current time display. See the diagram below for more information.

Page 2
Image 2
GE EM-A301US9-O2 Operating Instructions Basic Settings Initial Set Up, Setting the Current Time, Multiple Weekday Groups

120VAC, EM-A301US9-O2 specifications

The GE EM-A301US9-O2 is a cutting-edge electronic device designed for efficient operation at 120VAC, catering to various applications in both residential and commercial settings. This model is recognized for its reliability, versatility, and user-friendly features, making it a preferred choice among many users looking for a dependable electronic solution.

One of the standout features of the GE EM-A301US9-O2 is its advanced energy management technology. This feature allows users to monitor and control their energy consumption effectively. By providing real-time data on power usage, it helps in identifying energy-draining appliances and ensures optimal energy utilization. This capability not only promotes energy conservation but also leads to cost savings on electricity bills.

The device is equipped with state-of-the-art surge protection technology that safeguards connected appliances from voltage spikes and power surges. This is particularly beneficial in areas prone to electrical fluctuations, as it prolongs the lifespan of sensitive electronics and prevents potential damage. The robust protection measures instill confidence in users, ensuring that their devices are safe and secure.

The GE EM-A301US9-O2 also boasts an intuitive interface, making it accessible for individuals of all technical backgrounds. Its user-friendly controls facilitate easy setup and navigation, allowing users to adjust settings with minimal effort. Additionally, it incorporates advanced monitoring features, which enable systematic tracking of device performance over time, ensuring users can stay informed about their electrical usage patterns.

Another significant characteristic of this device is its compact design, which allows for easy installation in various settings without occupying much space. This is particularly advantageous in crowded environments where space is at a premium. Moreover, the durable construction of the GE EM-A301US9-O2 ensures that it can withstand daily wear and tear, affirming its longevity and reliability.

Overall, the GE EM-A301US9-O2, 120VAC model is an innovative solution that combines energy efficiency, safety features, and user convenience. Its blend of advanced technologies and thoughtful design makes it an excellent choice for those looking to enhance their electrical management systems while ensuring the protection of their valuable devices. With its impressive feature set and characteristics, it is poised to meet the needs of modern users efficiently and effectively.