The GVX-12, GVX-15 and GVX-215 can be used in suspended “flying” rigs by using an appropriate suspension chain or wire. Consult an installation expert to arrange for installation or construction work.
For proper installation and saftey please follow these guidelines:
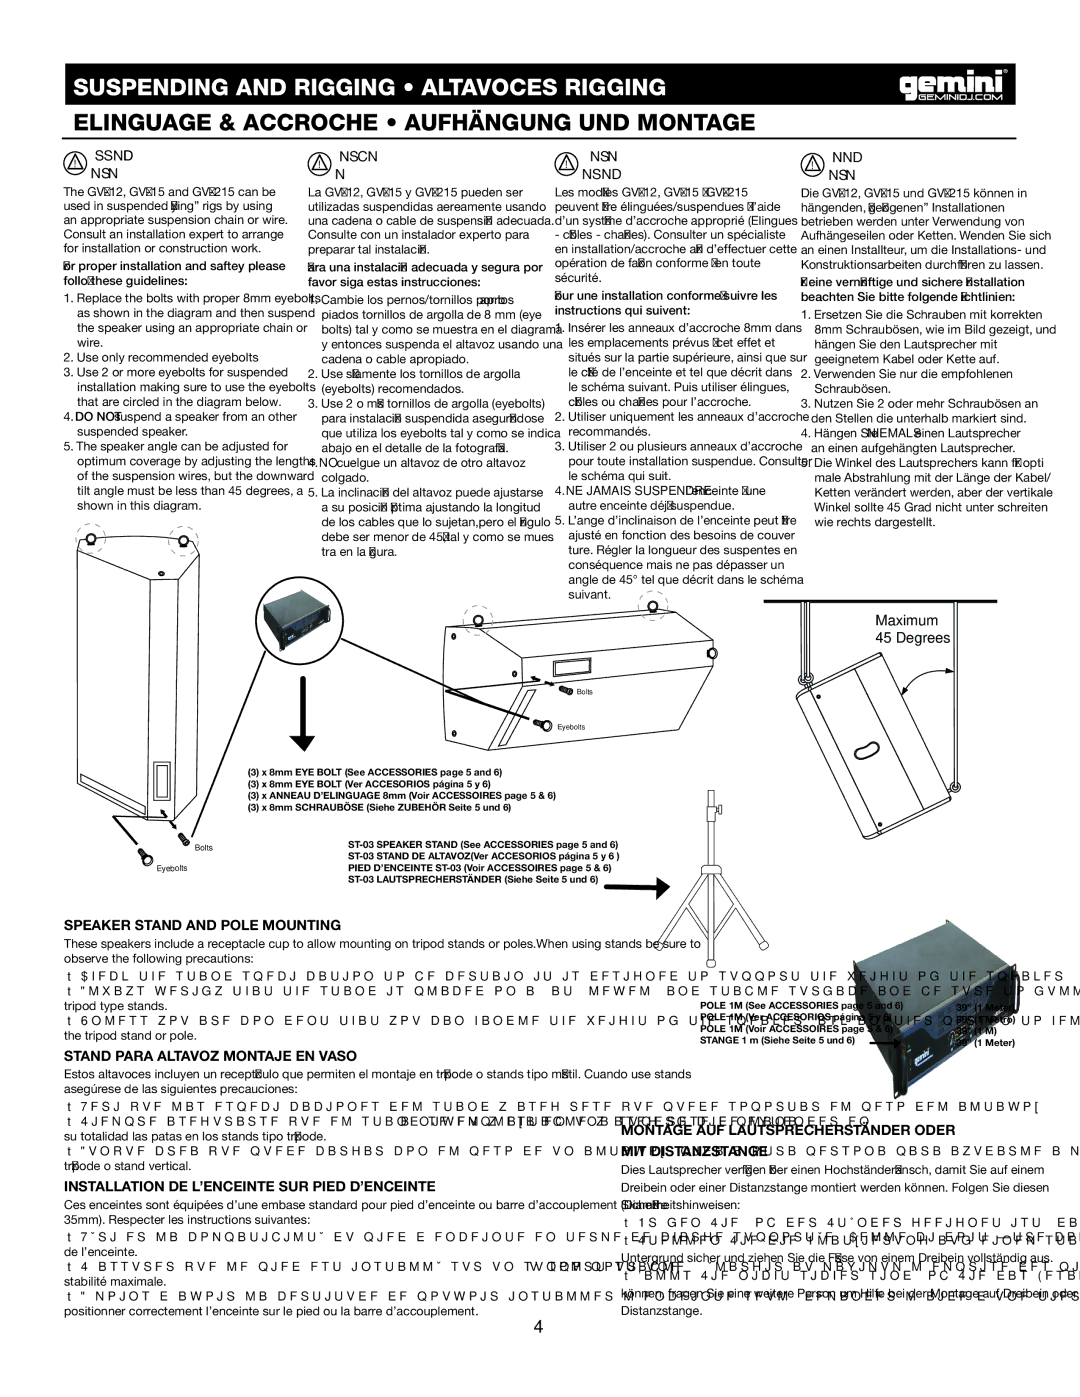
1.Replace the bolts with proper 8mm eyebolts as shown in the diagram and then suspend the speaker using an appropriate chain or wire.
2.Use only recommended eyebolts
3.Use 2 or more eyebolts for suspended installation making sure to use the eyebolts that are circled in the diagram below.
4.DO NOT suspend a speaker from an other suspended speaker.
5.The speaker angle can be adjusted for optimum coverage by adjusting the lengths of the suspension wires, but the downward tilt angle must be less than 45 degrees, a shown in this diagram.
La GVX-12, GVX-15 y GVX-215 pueden ser utilizadas suspendidas aereamente usando una cadena o cable de suspensión adecuada. Consulte con un instalador experto para preparar tal instalación.
Para una instalación adecuada y segura por favor siga estas instrucciones:
1.Cambie los pernos/tornillos por los apro piados tornillos de argolla de 8 mm (eye bolts) tal y como se muestra en el diagrama y entonces suspenda el altavoz usando una cadena o cable apropiado.
2.Use sólamente los tornillos de argolla (eyebolts) recomendados.
3.Use 2 o más tornillos de argolla (eyebolts) para instalación suspendida asegurándose que utiliza los eyebolts tal y como se indica abajo en el detalle de la fotografía.
4.NO cuelgue un altavoz de otro altavoz colgado.
5.La inclinación del altavoz puede ajustarse a su posición óptima ajustando la longitud de los cables que lo sujetan,pero el ángulo debe ser menor de 45º,tal y como se mues tra en la figura.
Les modèles GVX-12, GVX-15 & GVX-215 peuvent être élinguées/suspendues à l’aide d’un système d’accroche approprié (Elingues
-câbles - chaînes). Consulter un spécialiste en installation/accroche afin d’effectuer cette opération de façon conforme & en toute sécurité.
Pour une installation conforme, suivre les instructions qui suivent:
1.Insérer les anneaux d’accroche 8mm dans les emplacements prévus à cet effet et situés sur la partie supérieure, ainsi que sur le côté de l’enceinte et tel que décrit dans le schéma suivant. Puis utiliser élingues, câbles ou chaînes pour l’accroche.
2.Utiliser uniquement les anneaux d’accroche recommandés.
3.Utiliser 2 ou plusieurs anneaux d’accroche pour toute installation suspendue. Consulter le schéma qui suit.
4.NE JAMAIS SUSPENDRE l’enceinte à une autre enceinte déjà suspendue.
5.L’ange d’inclinaison de l’enceinte peut être ajusté en fonction des besoins de couver ture. Régler la longueur des suspentes en conséquence mais ne pas dépasser un angle de 45° tel que décrit dans le schéma suivant. 
Die GVX-12, GVX-15 und GVX-215 können in hängenden, “geflogenen” Installationen betrieben werden unter Verwendung von Aufhängeseilen oder Ketten. Wenden Sie sich an einen Installteur, um die Installations- und Konstruktionsarbeiten durchführen zu lassen.
Für eine vernünftige und sichere Installation beachten Sie bitte folgende Richtlinien:
1.Ersetzen Sie die Schrauben mit korrekten 8mm Schraubösen, wie im Bild gezeigt, und hängen Sie den Lautsprecher mit geeignetem Kabel oder Kette auf.
2.Verwenden Sie nur die empfohlenen Schraubösen.
3.Nutzen Sie 2 oder mehr Schraubösen an den Stellen die unterhalb markiert sind.
4.Hängen Sie NIEMALS einen Lautsprecher an einen aufgehängten Lautsprecher.
5.Die Winkel des Lautsprechers kann für opti male Abstrahlung mit der Länge der Kabel/ Ketten verändert werden, aber der vertikale Winkel sollte 45 Grad nicht unter schreiten wie rechts dargestellt.
Maximum
45 Degrees
 Bolts
Bolts
Eyebolts
(3)x 8mm EYE BOLT (See ACCESSORIES page 5 and 6)
(3)x 8mm EYE BOLT (Ver ACCESORIOS página 5 y 6)
(3)x ANNEAU D’ELINGUAGE 8mm (Voir ACCESSOIRES page 5 & 6)  (3) x 8mm SCHRAUBÖSE (Siehe ZUBEHÖR Seite 5 und 6)
ST-03 SPEAKER STAND (See ACCESSORIES page 5 and 6)
ST-03 STAND DE ALTAVOZ(Ver ACCESORIOS página 5 y 6 )
PIED D’ENCEINTE ST-03 (Voir ACCESSOIRES page 5 & 6)
ST-03 LAUTSPRECHERSTÄNDER (Siehe Seite 5 und 6)
SPEAKER STAND AND POLE MOUNTING
These speakers include a receptacle cup to allow mounting on tripod stands or poles.When using stands be sure to observe the following precautions:
•Check the stand specification to be certain it is designed to support the weight of the speaker.
•Always verify that the stand is placed on a flat, level, and stable surface and be sure to fully extend the legs of tripod type stands.
•Unless you are confident that you can handle the weight of the speaker, ask another person to help you get it onto the tripod stand or pole.
STAND PARA ALTAVOZ MONTAJE EN VASO
POLE 1M (See ACCESSORIES page 5 and 6) POLE 1M (Ver ACCESORIOS página 5 y 6) POLE 1M (Voir ACCESSOIRES page 5 & 6) STANGE 1 m (Siehe Seite 5 und 6) 
39” (1 Meter)
39” (1 Metro)
39” (1 M)
39” (1 Meter)
Estos altavoces incluyen un receptáculo que permiten el montaje en trípode o stands tipo mástil. Cuando use stands asegúrese de las siguientes precauciones:
•Verifique las especificaciones del stand y asegúrese que puede soportar el peso del altavoz.
•Siempre asegurarse que el stand se emplaza en una superfície plana, a nivel y estable y asegúrese de extender en su totalidad las patas en los stands tipo trípode.
•Aunque crea que puede cargar con el peso de un altavoz, pida a otra persona para ayudarle a montarlo en un trípode o stand vertical.
MONTAGE AUF LAUTSPRECHERSTÄNDER ODER MIT DISTANZSTANGE
Dies Lautsprecher verfügen über einen Hochständerflansch, damit Sie auf einem
INSTALLATION DE L’ENCEINTE SUR PIED D’ENCEINTE
Ces enceintes sont équipées d’une embase standard pour pied d’enceinte ou barre d’accouplement (Diamètre 35mm). Respecter les instructions suivantes:
•Vérifier la compatibilté du pied d’enceinte en terme de charge supportée. Celle-ci doit être compatible avec le poids de l’enceinte.
•S’assurer que le pied est installé sur un support stable & élargir au maximum l’emprise des pieds au sol pour une stabilité maximale.
•A moins d’avoir la certitude de pouvoir installer l’enceinte seul, demander l’aide d’une tierce personne afin de
positionner correctement l’enceinte sur le pied ou la barre d’accouplement.
4
Dreibein oder einer Distanzstange montiert werden können. Folgen Sie diesen Sicherheitshinweisen:
•Prüfen Sie, ob der Ständer geeignet ist, das Gewicht des Lautsprechers zu tragen.
•Stellen Sie die Platzierung auf einem stabilen, flachen und waagerechten
Untergrund sicher und ziehen Sie die Füsse von einem Dreibein vollständig aus.
•Falls Sie nicht sicher sind, ob Sie das Gesamtgewicht des Lautsprechers heben können, fragen Sie eine weitere Person um Hilfe bei der Montage auf Dreibein oder Distanzstange.