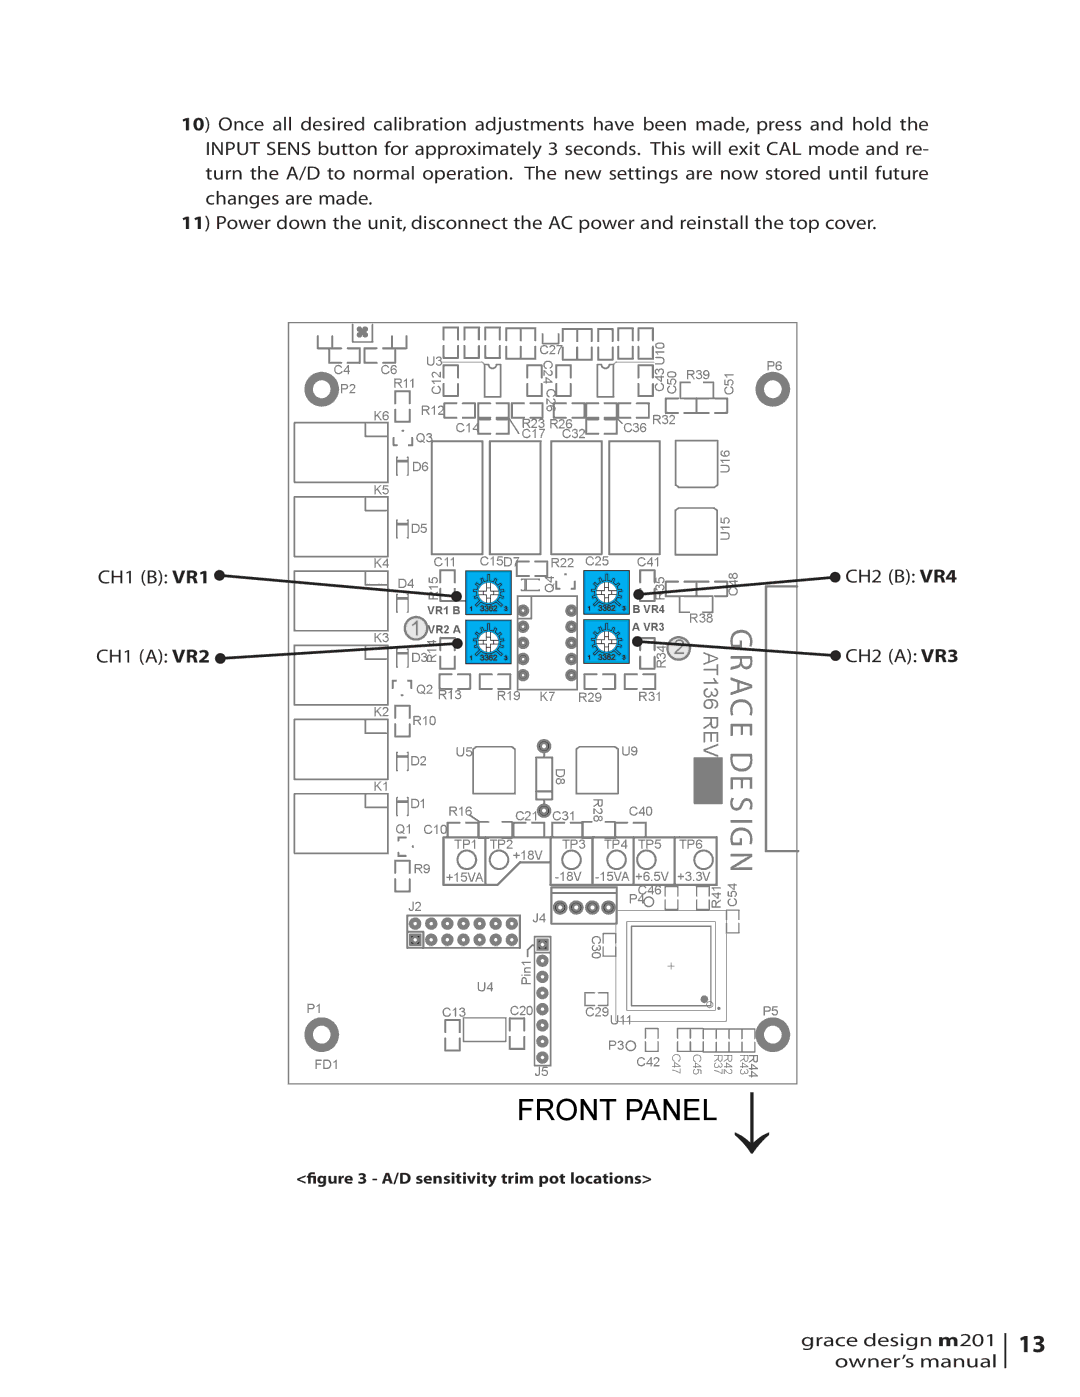
10) Once all desired calibration adjustments have been made, press and hold the INPUT SENS button for approximately 3 seconds. This will exit CAL mode and re- turn the A/D to normal operation. The new settings are now stored until future changes are made. 11) Power down the unit, disconnect the AC power and reinstall the top cover.

CH1 (B): VR1

CH1 (A): VR2

C4

P2

P1

FD1


R11

U3


C27


C43U10


R39


C24


P6

C6


C12


C50


C51


C


K6


R12


26


C36 R32


R23

R26


C14


Q3


C17

C32


U16


D6


K5


D5


U15


K4


C11

C15D7


R22


C25


C41


C48


D4

R15


Q4


R35


VR1 B 1

3362

3


1

3362

3

B VR4


R38


1 VR2 A


A VR3


K3


2


K1

D3R14


D8


R34


1

3362

3


1

3362

3


VER631TA ������


K2


Q2 R13

R19

K7

R29


R31


R10


D2

U5


U9


D1

R16


C21

C31


R2


C40


8


Q1


C10

TP2+18V


TP1

TP3


TP4

TP5

TP6


R9


+15VA


-18V


-15VA +6.5V

+3.3V


C46


R41 C54


J2


P4


J4


Pin1


C30


U4


C13


C20


C29U11


P5


P3

C42

C47


R

44


C45

R RR


J5


4

3


372

4

FRONT PANEL

CH2 (B): VR4

CH2 (A): VR3

<figure 3 - A/D sensitivity trim pot locations>

grace design m201 owner’s manual

13

Page 13
Image 13
Grace M201 owner manual Front Panel

M201 specifications

The Grace M201 is a remarkable addition to the cutting-edge landscape of mid-range smartphones, designed to offer users an exceptional blend of performance, style, and functionality. Built with a sleek and modern aesthetic, the device features a premium glass and metal body that not only enhances its visual appeal but also provides a lightweight and comfortable grip.

One of the standout features of the Grace M201 is its impressive display. The phone boasts a vibrant 6.5-inch Full HD+ screen, offering a resolution of 2400 x 1080 pixels. This ensures that users experience sharp, clear visuals whether they're watching videos, browsing photos, or playing games. The display is complemented by an IPS panel, providing wide viewing angles and excellent color reproduction, making it an ideal choice for media consumption.

Under the hood, the Grace M201 is powered by a robust octa-core processor that delivers fluid performance and efficient multitasking. Coupled with up to 8GB of RAM, the device can handle demanding applications with ease, while ensuring smooth transitions between apps. Additionally, users can choose from multiple storage options, ranging from 128GB to 256GB, expandable via a microSD card, ensuring ample space for photos, music, and apps.

The Grace M201 excels in the photography department with its versatile triple-camera setup. The primary sensor features a high-resolution lens, allowing users to capture stunning images in a variety of conditions. Accompanying the main camera are an ultra-wide-angle lens and a macro lens, providing users with creative flexibility to explore different photography styles. The front-facing camera is no less impressive, featuring a high-resolution sensor and AI enhancements for beautiful selfies.

Powering the Grace M201 is a robust battery that lasts all day, offering a capacity of around 5000mAh. This ensures users can enjoy their device without the frequent worry of recharging. Fast charging technology is also supported, allowing users to quickly top up their battery when needed.

In terms of connectivity, the Grace M201 is equipped with the latest 4G LTE technology, ensuring fast internet speeds whether streaming, browsing, or gaming. Additionally, the device features dual SIM capabilities, enhancing convenience for users who rely on multiple phone numbers. For security, users can take advantage of advanced biometric options such as facial recognition and fingerprint scanning.

With a blend of advanced features, powerful performance, and an elegant design, the Grace M201 stands out as a desirable choice for anyone in the market for a reliable and feature-rich smartphone.