Wall rack
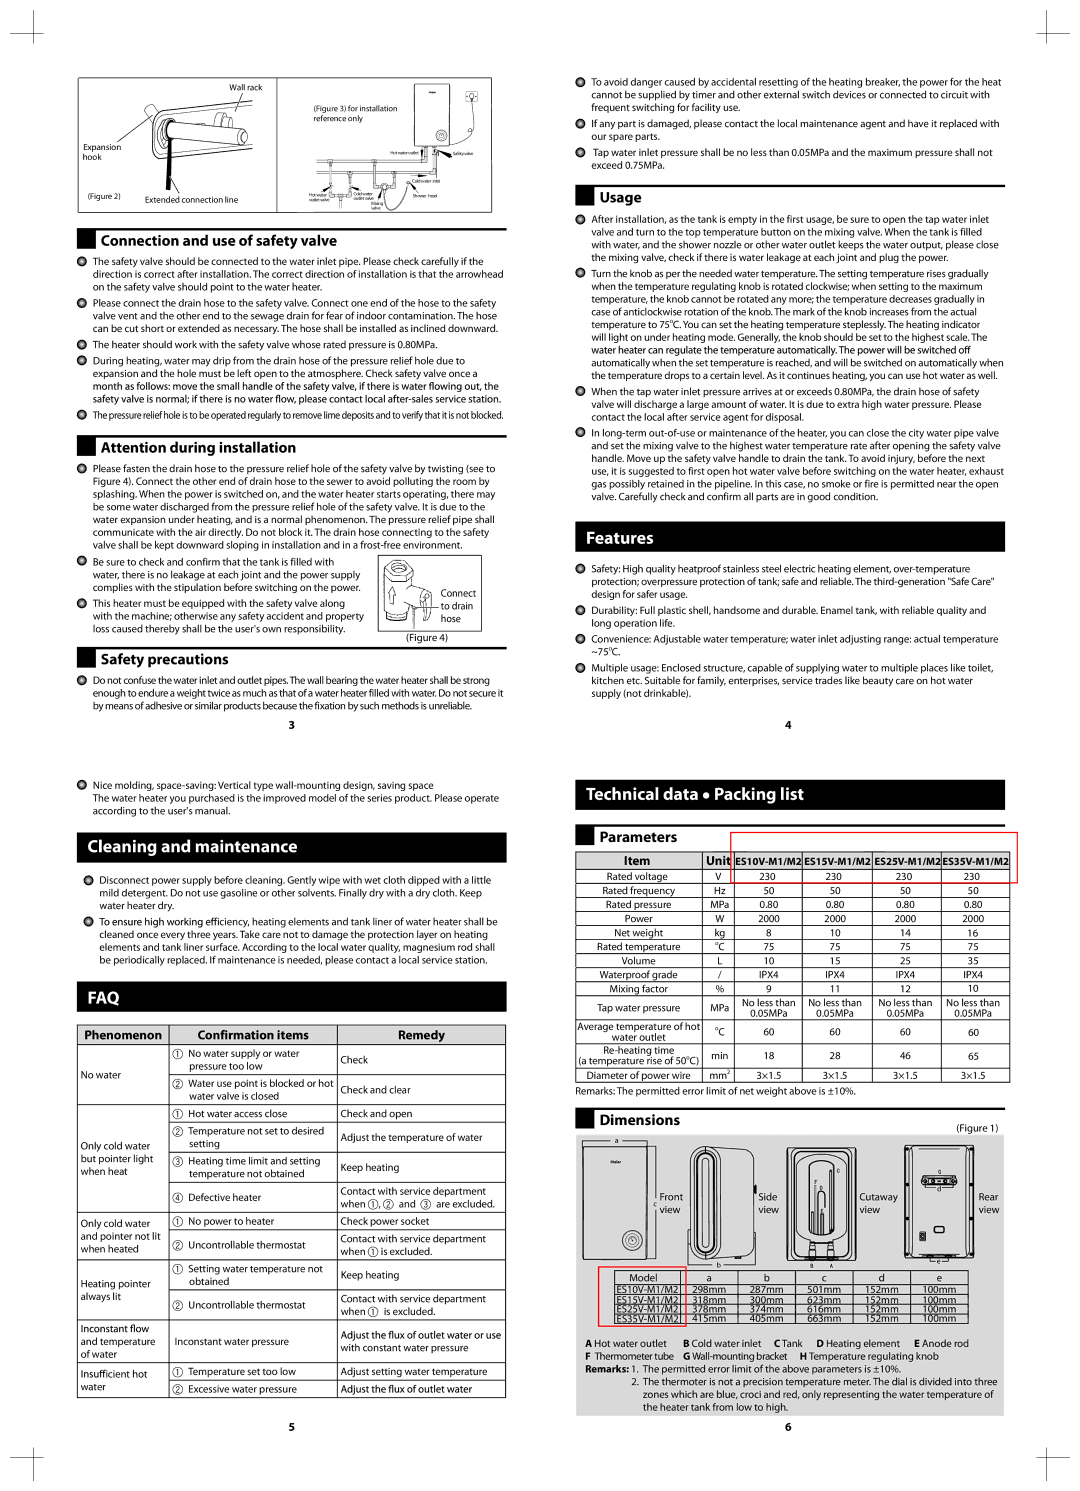
(Figure 3) for installation reference only
Expansion | | | | Hot water outlet | Safety valve |
hook | | | |
| | | | |
| | | | Cold water inlet | |
(Figure 2) | Extended connection line | Hot water | Cold water | Shower head | |
outlet valve | outlet valve | | |
| | Mixing | | |
| | | valve | | |
 Connection and use of safety valve
The safety valve should be connected to the water inlet pipe. Please check carefully if the direction is correct after installation. The correct direction of installation is that the arrowhead on the safety valve should point to the water heater.
Please connect the drain hose to the safety valve. Connect one end of the hose to the safety valve vent and the other end to the sewage drain for fear of indoor contamination. The hose can be cut short or extended as necessary. The hose shall be installed as inclined downward.
The heater should work with the safety valve whose rated pressure is 0.80MPa.
During heating, water may drip from the drain hose of the pressure relief hole due to expansion and the hole must be left open to the atmosphere. Check safety valve once a
The pressure relief hole is to be operated regularly to remove lime deposits and to verify that it is not blocked.
 Attention during installation
 Please fasten the drain hose to the pressure relief hole of the safety valve by twisting (see to Figure 4). Connect the other end of drain hose to the sewer to avoid polluting the room by splashing. When the power is switched on, and the water heater starts operating, there may be some water discharged from the pressure relief hole of the safety valve. It is due to the water expansion under heating, and is a normal phenomenon. The pressure relief pipe shall communicate with the air directly. Do not block it. The drain hose connecting to the safety valve shall be kept downward sloping in installation and in a frost-free environment.
| Be sure to check and confirm that the tank is filled with | | | |
| water, there is no leakage at each joint and the power supply | | | |
| complies with the stipulation before switching on the power. | | | Connect |
| This heater must be equipped with the safety valve along | | |
| | | to drain |
| with the machine; otherwise any safety accident and property | | | hose |
| loss caused thereby shall be the user's own responsibility. | | | |
| (Figure 4) |
| |
 Safety precautions
Do not confuse the water inlet and outlet pipes. The wall bearing the water heater shall be strong enough to endure a weight twice as much as that of a water heater filled with water. Do not secure it by means of adhesive or similar products because the fixation by such methods is unreliable.
3
Nice molding, space-saving: Vertical type wall-mounting design, saving space
The water heater you purchased is the improved model of the series product. Please operate according to the user's manual.
Cleaning and maintenance
 Disconnect power supply before cleaning. Gently wipe with wet cloth dipped with a little mild detergent. Do not use gasoline or other solvents. Finally dry with a dry cloth. Keep water heater dry.
iciency, heating elements and tank liner of water heater shall be cleaned once every three years. Take care not to damage the protection layer on heating elements and tank liner surface. According to the local water quality, magnesium rod shall be periodically replaced. If maintenance is needed, please contact a local service station.
FAQ
| Phenomenon | | Confirmation items | Remedy |
| | | | |
| | 1 | No water supply or water | Check |
| | | pressure too low |
| No water | | |
| | | |
| 2 | Water use point is blocked or hot | Check and clear |
| |
| | | water valve is closed | |
| | 1 | Hot water access close | Check and open |
| | | | |
| | 2 | Temperature not set to desired | Adjust the temperature of water |
| Only cold water | | setting |
| | |
| but pointer light | 3 | Heating time limit and setting | Keep heating |
| when heat | | temperature not obtained |
| | |
| | | | |
| | 4 | Defective heater | Contact with service department |
| | when 1, 2 and 3 are excluded. |
| | | |
| | | |
| Only cold water | 1 No power to heater | Check power socket |
| and pointer not lit | 2 | Uncontrollable thermostat | Contact with service department |
| when heated | when 1 is excluded. |
| | |
| | | | |
| | 1 | Setting water temperature not | Keep heating |
| Heating pointer | | obtained |
| | |
| always lit | 2 | Uncontrollable thermostat | Contact with service department |
| | when 1 is excluded. |
| | | |
| | | |
| and temperature | Inconstant water pressure | with constant water pressure |
| of water | | |
| | | |
| | | |
| icient hot | 1 Temperature set too low | Adjust setting water temperature |
| water | 2 Excessive water pressure | |
| | | | |
To avoid danger caused by accidental resetting of the heating breaker, the power for the heat cannot be supplied by timer and other external switch devices or connected to circuit with frequent switching for facility use.
If any part is damaged, please contact the local maintenance agent and have it replaced with our spare parts.
Tap water inlet pressure shall be no less than 0.05MPa and the maximum pressure shall not exceed 0.75MPa.
 Usage
Usage
After installation, as the tank is empty in the first usage, be sure to open the tap water inlet valve and turn to the top temperature button on the mixing valve. When the tank is filled with water, and the shower nozzle or other water outlet keeps the water output, please close the mixing valve, check if there is water leakage at each joint and plug the power.
Turn the knob as per the needed water temperature. The setting temperature rises gradually when the temperature regulating knob is rotated clockwise; when setting to the maximum temperature, the knob cannot be rotated any more; the temperature decreases gradually in case of anticlockwise rotation of the knob. The mark of the knob increases from the actual temperature to 75oC. You can set the heating temperature steplessly. The heating indicator will light on under heating mode. Generally, the knob should be set to the highest scale. The
automatically when the set temperature is reached, and will be switched on automatically when the temperature drops to a certain level. As it continues heating, you can use hot water as well.
When the tap water inlet pressure arrives at or exceeds 0.80MPa, the drain hose of safety valve will discharge a large amount of water. It is due to extra high water pressure. Please contact the local after service agent for disposal.
In long-term out-of-use or maintenance of the heater, you can close the city water pipe valve and set the mixing valve to the highest water temperature rate after opening the safety valve handle. Move up the safety valve handle to drain the tank. To avoid injury, before the next use, it is suggested to first open hot water valve before switching on the water heater, exhaust gas possibly retained in the pipeline. In this case, no smoke or fire is permitted near the open valve. Carefully check and confirm all parts are in good condition.
Features
Safety: High quality heatproof stainless steel electric heating element, over-temperature protection; overpressure protection of tank; safe and reliable. The third-generation "Safe Care" design for safer usage.
Durability: Full plastic shell, handsome and durable. Enamel tank, with reliable quality and long operation life.
Convenience: Adjustable water temperature; water inlet adjusting range: actual temperature ~75oC.
Multiple usage: Enclosed structure, capable of supplying water to multiple places like toilet, kitchen etc. Suitable for family, enterprises, service trades like beauty care on hot water supply (not drinkable).
4
Technical data • Packing list
 Parameters
| Item | Unit | ES10V-M1/M2 | ES15V-M1/M2 | ES25V-M1/M2 | ES35V-M1/M2 |
| Rated voltage | V | 230 | 230 | 230 | 230 |
| Rated frequency | Hz | 50 | 50 | 50 | 50 |
| Rated pressure | MPa | 0.80 | 0.80 | 0.80 | 0.80 |
| Power | W | 2000 | 2000 | 2000 | 2000 |
| Net weight | kg | 8 | 10 | 14 | 16 |
| Rated temperature | oC | 75 | 75 | 75 | 75 |
| Volume | L | 10 | 15 | 25 | 35 |
| Waterproof grade | / | IPX4 | IPX4 | IPX4 | IPX4 |
| Mixing factor | % | 9 | 11 | 12 | 10 |
| Tap water pressure | MPa | No less than | No less than | No less than | No less than |
| 0.05MPa | 0.05MPa | 0.05MPa | 0.05MPa |
| | |
| Average temperature of hot | oC | 60 | 60 | 60 | 60 |
| water outlet | | | | | |
| Re-heating time | min | 18 | 28 | 46 | 65 |
| (a temperature rise of 50oC) |
| Diameter of power wire | mm2 | 3×1.5 | 3×1.5 | 3×1.5 | 3×1.5 |
Remarks: The permitted error limit of net weight above is ±10%.
| Front | Side | Cutaway | d | Rear |
c | |
view | view | view | | view |
| | b | | e | |
| | | | |
Model | a | b | c | d | e |
ES10V-M1/M2 | 298mm | 287mm | 501mm | 152mm | 100mm |
ES15V-M1/M2 | 318mm | 300mm | 623mm | 152mm | 100mm |
ES25V-M1/M2 | 378mm | 374mm | 616mm | 152mm | 100mm |
ES35V-M1/M2 | 415mm | 405mm | 663mm | 152mm | 100mm |
A Hot water outlet | B Cold water inlet C Tank D Heating element E Anode rod |
F Thermometer tube | G Wall-mounting bracket H Temperature regulating knob |
Remarks: 1. The permitted error limit of the above parameters is ±10%.
2.The thermoter is not a precision temperature meter. The dial is divided into three zones which are blue, croci and red, only representing the water temperature of the heater tank from low to high.