Quick Start Guide
This Quick Start Guide is designed to help you set up and start using your LCD TV. Refer to the User's Manual for more detailed installation and safety instructions.
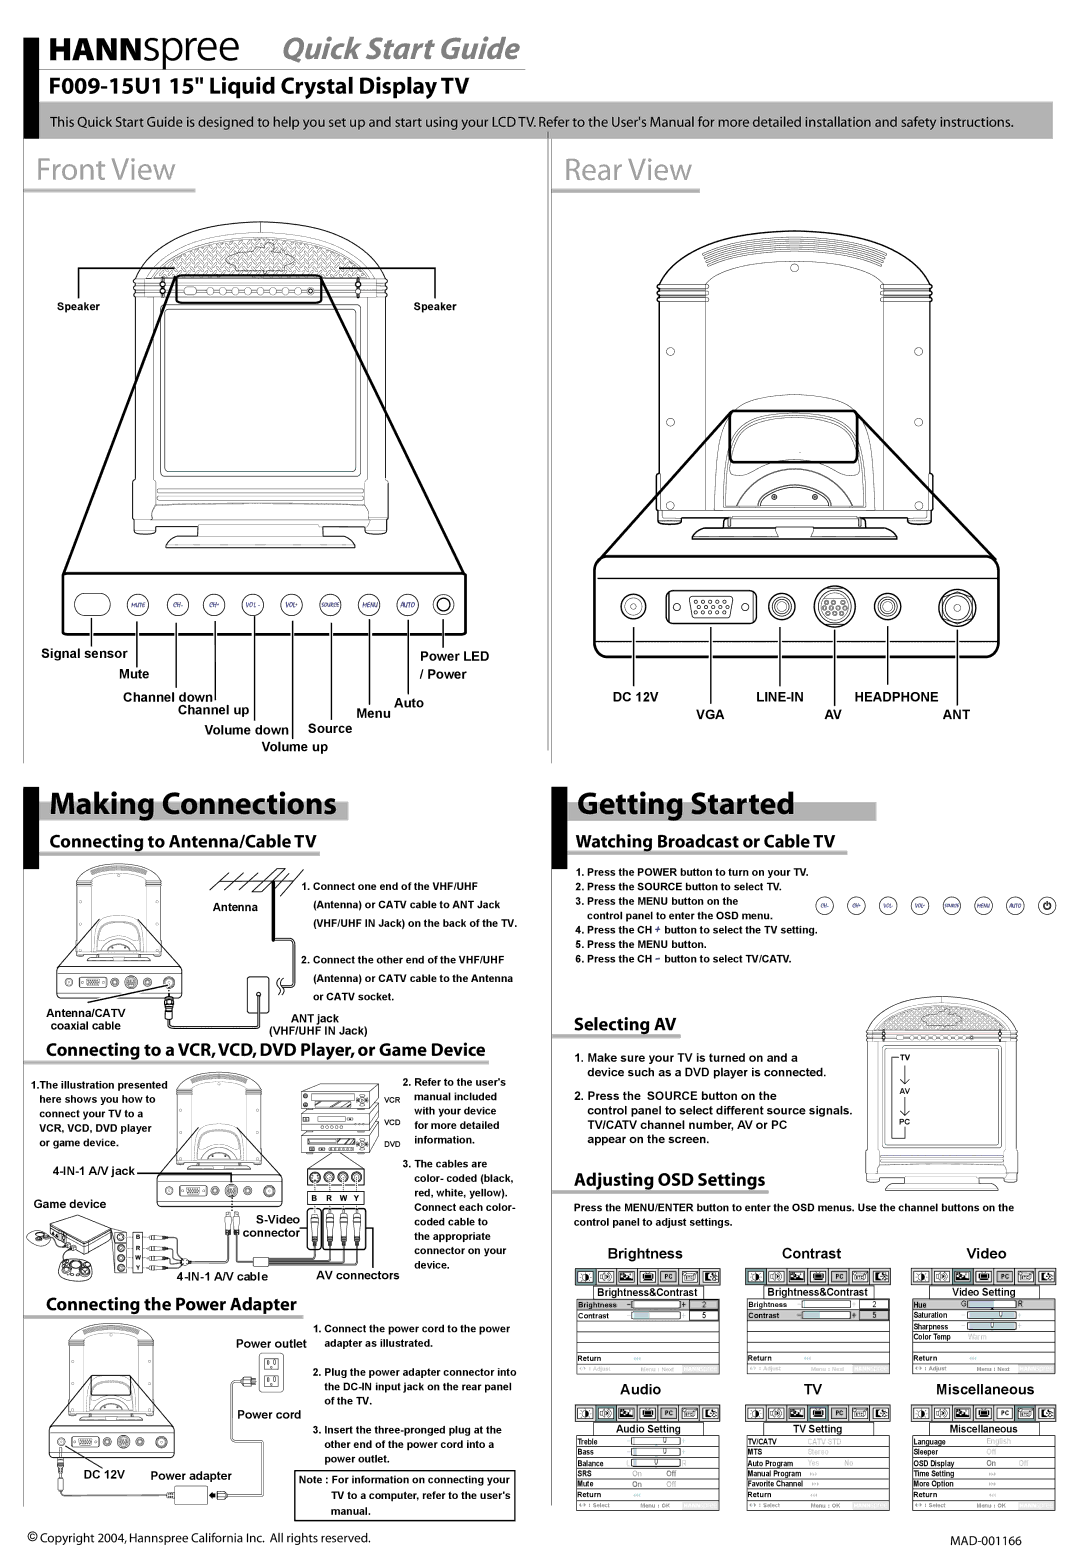
Front View |
|
Speaker | Speaker |
Signal sensor | Power LED |
Mute | / Power |
Channel down | Menu Auto |
Channel up | |
Volume down | Source |
Volume up | |
Rear View
|
|
|
|
|
|
|
|
|
|
|
|
|
|
|
|
|
|
|
|
|
|
|
|
|
|
|
DC 12V |
|
| HEADPHONE |
| ||||
| VGA |
| AV |
| ANT | |||
Making Connections
Connecting to Antenna/Cable TV
Getting Started
Watching Broadcast or Cable TV
Antenna/CATV
coaxial cable
1. Connect one end of the VHF/UHF
Antenna (Antenna) or CATV cable to ANT Jack (VHF/UHF IN Jack) on the back of the TV.
2.Connect the other end of the VHF/UHF (Antenna) or CATV cable to the Antenna
or CATV socket.
ANT jack (VHF/UHF IN Jack)
1. | Press the POWER button to turn on your TV. | |
2. | Press the SOURCE button to select TV. | |
3. | Press the MENU button on the | |
| control panel to enter the OSD menu. | |
4. | Press the CH | button to select the TV setting. |
5. | Press the MENU button. | |
6. | Press the CH | button to select TV/CATV. |
Selecting AV |
Connecting to a VCR, VCD, DVD Player, or Game Device
1.The illustration presented |
| 2. Refer to the user's | |
here shows you how to | VCR | manual included | |
connect your TV to a | VCD | with your device | |
VCR, VCD, DVD player | for more detailed | ||
| |||
or game device. | DVD | information. |
3. The cables are | ||
color- coded (black, | ||
| ||
Game device | red, white, yellow). | |
Connect each color- | ||
coded cable to | ||
connector | the appropriate |
1. Make sure your TV is turned on and a |
|
|
|
|
|
| |
device such as a DVD player is connected. |
|
|
|
2. Press the SOURCE button on the |
| AV | |
|
|
| |
control panel to select different source signals. |
|
|
|
TV/CATV channel number, AV or PC |
| PC | |
|
|
| |
appear on the screen. |
|
|
|
|
|
| |
Adjusting OSD Settings
Press the MENU/ENTER button to enter the OSD menus. Use the channel buttons on the control panel to adjust settings.
|
|
| connector on your |
| AV connectors | device. | |
|
| ||
Connecting the Power Adapter |
|
| |
|
| 1. Connect the power cord to the power | |
| Power outlet adapter as illustrated. | ||
|
| 2. Plug the power adapter connector into | |
|
| the | |
|
| of the TV. |
|
| Power cord |
| |
|
| 3. Insert the | |
|
| other end of the power cord into a | |
|
| power outlet. |
|
DC 12V | Power adapter | Note : For information on connecting your | |
|
| TV to a computer, refer to the user's | |
|
| manual. |
|
Brightness
PC |
|
Brightness&Contrast | 2 |
Brightness | |
Contrast | 5 |
Return
Adjust | Menu Next |
Audio
PC |
Audio Setting |
Treble
Bass
Balance | L |
|
| R |
|
| |||
|
|
|
|
|
SRS |
| On | Off | |
Mute |
| On | Off | |
Return |
|
|
|
|
Select |
| Menu | OK | |
Contrast
PC |
|
Brightness&Contrast | 2 |
Brightness | |
Contrast | 5 |
Return
Adjust | Menu Next |
TV
PC |
TV Setting |
TV/CATV | CATV STD | |
MTS | Stereo |
|
Auto Program | Yes | No |
Manual Program |
|
|
Favorite Channel |
|
|
Return |
|
|
Select | Menu | OK |
Video
| PC |
|
| Video Setting |
|
Hue | G | R |
Saturation |
|
|
Sharpness |
|
|
|
|
|
| |
|
|
|
|
Color Temp | Warm | ||
|
|
|
|
Return |
|
|
|
Adjust | Menu Next | ||
Miscellaneous
PC |
Miscellaneous |
Language | English | |
Sleeper | Off |
|
OSD Display | On | Off |
Time Setting |
|
|
More Option |
|
|
Return |
|
|
Select | Menu | OK |
Copyright 2004, Hannspree California Inc. All rights reserved. |