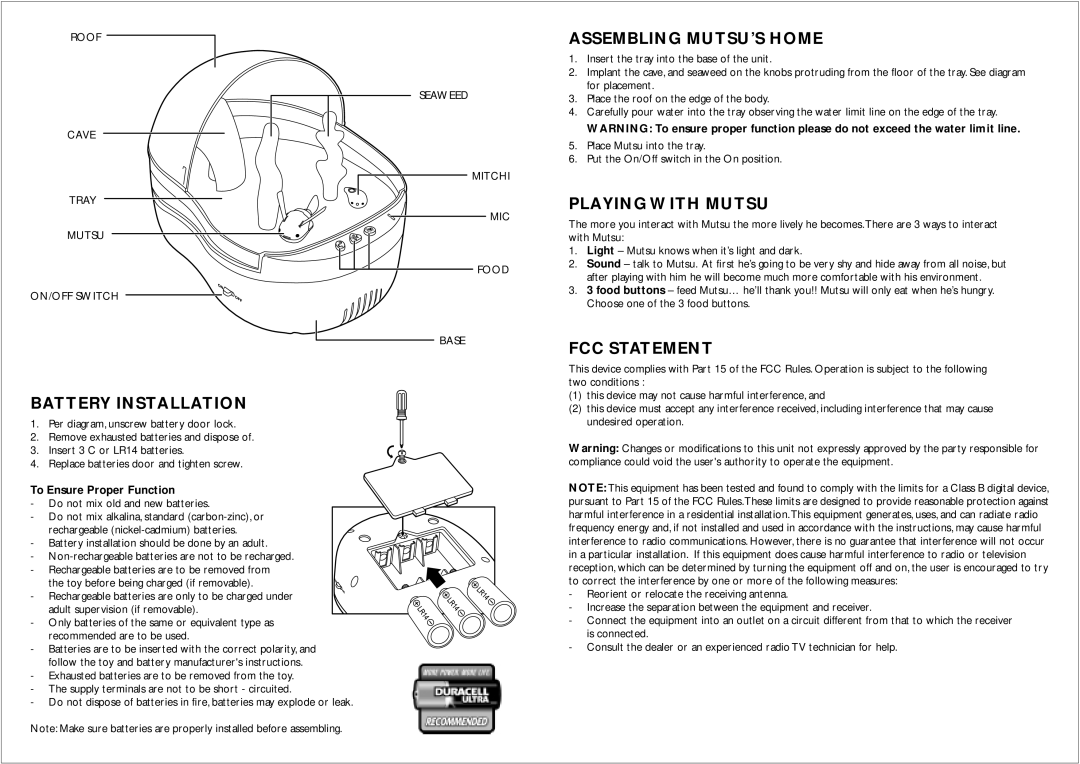
ROOF
CAVE
TRAY
MUTSU
ON/OFF SWITCH
SEAWEED
MITCHI
MIC
FOOD
BASE
ASSEMBLING MUTSU’S HOME
1.Insert the tray into the base of the unit.
2.Implant the cave, and seaweed on the knobs protruding from the floor of the tray. See diagram for placement.
3.Place the roof on the edge of the body.
4.Carefully pour water into the tray observing the water limit line on the edge of the tray.
WARNING: To ensure proper function please do not exceed the water limit line.
5.Place Mutsu into the tray.
6.Put the On/Off switch in the On position.
PLAYING WITH MUTSU
The more you interact with Mutsu the more lively he becomes.There are 3 ways to interact with Mutsu:
1.Light – Mutsu knows when it’s light and dark.
2.Sound – talk to Mutsu. At first he’s going to be very shy and hide away from all noise, but after playing with him he will become much more comfortable with his environment.
3.3 food buttons – feed Mutsu… he’ll thank you!! Mutsu will only eat when he’s hungry. Choose one of the 3 food buttons.
FCC STATEMENT
This device complies with Part 15 of the FCC Rules. Operation is subject to the following two conditions :
BATTERY INSTALLATION
1.Per diagram, unscrew battery door lock.
2.Remove exhausted batteries and dispose of.
3.Insert 3 C or LR14 batteries.
4.Replace batteries door and tighten screw.
To Ensure Proper Function
-Do not mix old and new batteries.
-Do not mix alkalina, standard
rechargeable
- Battery installation should be done by an adult.
-
-Rechargeable batteries are to be removed from
the toy before being charged (if removable).
- Rechargeable batteries are only to be charged under adult supervision (if removable).
-Only batteries of the same or equivalent type as recommended are to be used.
-Batteries are to be inserted with the correct polarity, and follow the toy and battery manufacturer's instructions.
-Exhausted batteries are to be removed from the toy.
-The supply terminals are not to be short - circuited.
-Do not dispose of batteries in fire, batteries may explode or leak.
Note: Make sure batteries are properly installed before assembling.
(1)this device may not cause harmful interference, and
(2)this device must accept any interference received, including interference that may cause undesired operation.
Warning: Changes or modifications to this unit not expressly approved by the party responsible for compliance could void the user's authority to operate the equipment.
NOTE: This equipment has been tested and found to comply with the limits for a Class B digital device, pursuant to Part 15 of the FCC Rules.These limits are designed to provide reasonable protection against harmful interference in a residential installation.This equipment generates, uses, and can radiate radio frequency energy and, if not installed and used in accordance with the instructions, may cause harmful interference to radio communications. However, there is no guarantee that interference will not occur in a particular installation. If this equipment does cause harmful interference to radio or television reception, which can be determined by turning the equipment off and on, the user is encouraged to try to correct the interference by one or more of the following measures:
-Reorient or relocate the receiving antenna.
-Increase the separation between the equipment and receiver.
-Connect the equipment into an outlet on a circuit different from that to which the receiver is connected.
-Consult the dealer or an experienced radio TV technician for help.