PLASMA TELEVISION
Operating Guide for 42HDX61, 55HDX61
YOUR HITACHI PLASMA TELEVISION
IMPORTANT SAFETY INSTRUCTIONS
SAFETY POINTS YOU SHOULD KNOW ABOUT
POWER SOURCE
PUBLIC VIEWING OF COPYRIGHTED MATERIAL
IMPORTANT SAFETY INSTRUCTIONS
Read before operating equipment
PREVENTION OF SCREEN BURN
ACCESSORIES
TIME
FIRST
Caution when moving the main unit
HOW TO SETUP YOUR NEW HITACHI PLASMA TELEVISION
FIRST
TIME USE
HOW TO SET UP YOUR NEW HITACHI PLASMA TELEVISION
FIRST TIME USE
VIEWING
“F” Type 75-OhmCoaxial Antenna Connector
HOOKUP CABLES
300-OhmTwin Lead Connector
Phono Connector
VHF 75-Ohmantenna/CATV Cable TV
ANTENNA CONNECTIONS TO REAR PANEL JACKS
When both VHF and UHF antennas are connected
FIRST TIME USE
MENU/SELECT button
FRONT PANEL CONTROLS
VOLUME level
FIRST TIME USE
REMOTE CONTROL sensor
POWER button Display Monitor “MAIN POWER” button
42”55” AVC POWER button
POWER light indicator
Audio/Video Inputs 1, 2, 3 and
REAR PANEL JACKS
FIRST TIME USE
Antenna Input
REAR PANEL JACKS
SUB-POWERbutton
Upgrade Card
To Power Swivel Connector
CableCARD Slot
REAR PANEL JACKS
FIRST TIME USE
CableCARD
CONNECTING PLASMA DISPLAY MONITOR TO AVC BOX
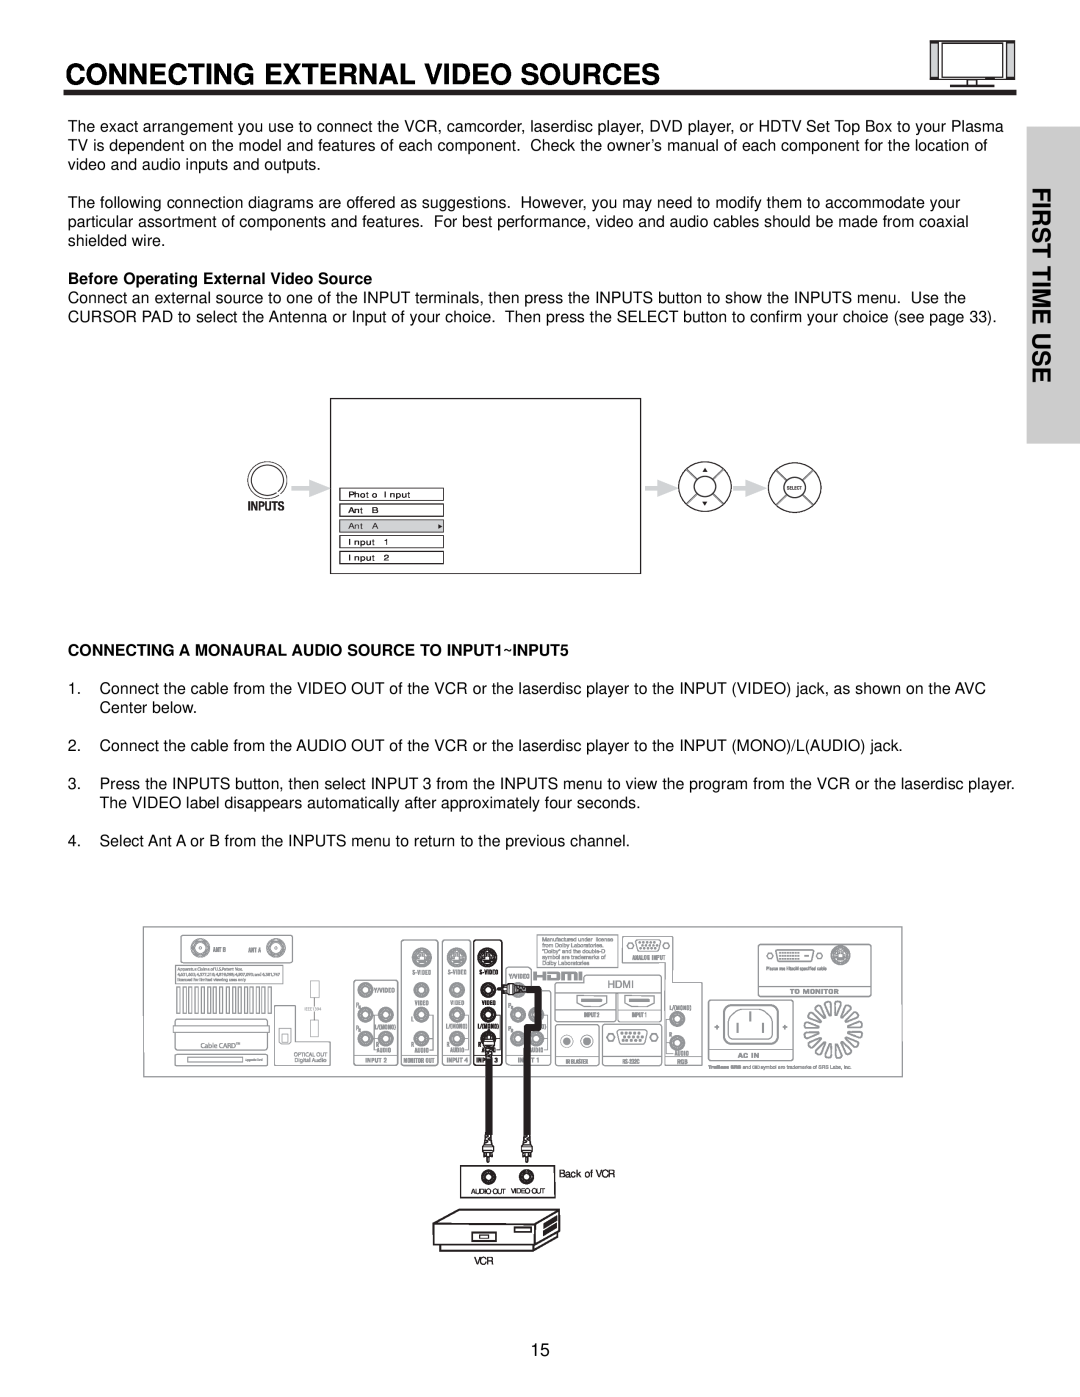
CONNECTING EXTERNAL VIDEO SOURCES
FIRST TIME USE
Back of VCR
CONNECTING EXTERNAL VIDEO SOURCES
FIRST TIME USE
Before Operating External Video Source
CONNECTING EXTERNAL VIDEO SOURCES
FIRST TIME USE
R L OUTPUT
VCR or Laserdisc Player
CONNECTING EXTERNAL VIDEO SOURCES
CONNECTING S-VIDEOVCR OR LASERDISC PLAYER
FIRST TIME USE
DVI to HDMI Input
CONNECTING EXTERNAL VIDEO SOURCES
FIRST TIME USE
HDMI input
CONNECTING EXTERNAL VIDEO SOURCES
FIRST TIME USE
2. See page 26 for tips on REAR PANEL CONNECTIONS
FIRST TIME USE
CONNECTING EXTERNAL VIDEO SOURCES
CONNECTING EXTERNAL AUDIO/VIDEO DEVICES
CONNECTING EXTERNAL AUDIO AMPLIFIER
FIRST TIME USE
Infrared Sensor DVD Player VCR
CONNECTING AV NETWORK
FIRST TIME USE
InfraredSensor IR Mouse
AV NETWORK SETUP WIZARD
SETUP PROCEDURE DVD setup example below
FIRST TIME USE
SATELLITE BRAND Set-Top-Box. . . . . . . . . .CODE
FIRST TIME USE
Rear Panel of Display Monitor
REAR PANEL CONNECTIONS
NOTE: Cables are optional, except when specified
FIRST TIME USE
FIRST TIME USE
TIPS ON REAR PANEL CONNECTIONS
THE REMOTE CONTROL
THE REMOTE CONTROL
MODE Indicator
HOW TO USE THE REMOTE TO CONTROL YOUR PLASMA TV
THE REMOTE CONTROL
POWER button
HOW TO USE THE REMOTE TO CONTROL YOUR PLASMA TV
THE REMOTE CONTROL
ASPECT button
PICTURE-IN-PICTUREbutton
HOW TO USE THE REMOTE TO CONTROL YOUR PLASMA TV
THE REMOTE CONTROL
DAY/NIGHT button
AV NET button
CONTROL
HOW TO USE THE REMOTE TO CONTROL YOUR PLASMA TV
THE REMOTE
AV NET LEARNING WIZARD
REMOTE
HOW TO USE THE REMOTE TO CONTROL YOUR PLASMA TV
CONTROL
Photo Input Ant B Ant A Input Input Input Input
HOW TO USE THE REMOTE TO CONTROL YOUR PLASMA TV
THE REMOTE CONTROL
INPUTS button
JUMP
HOW TO USE THE REMOTE TO CONTROL YOUR PLASMA TV
THE REMOTE CONTROL
PHOTO INPUT
ROTATE
HOW TO USE THE REMOTE TO CONTROL YOUR PLASMA TV
THE REMOTE CONTROL
SLIDESHOW
THE REMOTE CONTROL
HOW TO USE THE REMOTE TO CONTROL YOUR PLASMA TV
INFO button
HOW TO USE THE REMOTE TO CONTROL YOUR PLASMA TV
THE REMOTE CONTROL
When an S-VIDEO
CHANNEL CH WHEEL/CHANNEL SELECTOR buttons
HOW TO USE THE REMOTE TO CONTROL YOUR PLASMA TV
THE REMOTE CONTROL
VOLUME VOL WHEEL, MUTE button
POP MODE PICTURE-IN-PICTURE
PICTURE-IN-PICTUREPIP
THE REMOTE CONTROL
PIP button
SPLIT MODE PICTURE-IN-PICTURE
THE REMOTE CONTROL
PICTURE-IN-PICTUREPIP
PIP MODE PICTURE-IN-PICTURE
MAIN FREEZE
THE REMOTE CONTROL
PICTURE-IN-PICTUREPIP
PAUSE button
NOTES
HOW TO USE THE REMOTE
TO CONTROL CABLE BOX FUNCTIONS
THE REMOTE CONTROL
NOTES
HOW TO USE THE REMOTE TO CONTROL
SET-TOP-BOX/SATELLITERECEIVER FUNCTIONS
THE REMOTE CONTROL
PRECODED DVD Buttons
HOW TO USE THE REMOTE TO CONTROL DVD FUNCTIONS
THE REMOTE CONTROL
NOTES
NOTES
TO CONTROL VCR/PVR FUNCTIONS
HOW TO USE THE REMOTE
THE REMOTE CONTROL
PRECODED AUDIO Buttons
THE REMOTE
CONTROL
NOTES
THE REMOTE
INPUT ACCESS
CONTROL
CH+ , CH
REMOTE
THE REMOTE CONTROL
POWER button
VCR BRAND
AUDIO CODES FOR REMOTE CONTROL
PVR/VCR, CABLE, SATELLITE, DVD AND
THE REMOTE CONTROL
SET TOP BOX BRAND
THE REMOTE CONTROL
AUDIO BRAND
RECEIVER BRAND Amplifier CODE
ON-SCREENDISPLAY
OSD On-ScreenDisplay
OSD On-ScreenDisplay
Video
Audio
Aspect
Channel Manager Locks Timers Setup
Swivel Locked
OSD On-ScreenDisplay
Picture Mode
VIDEO
Video
ON-SCREENDISPLAY
Brightness Color Tint Sharpness Color Temperature
VIDEO
ON-SCREENDISPLAY
Contrast
Reset Video Settings
VIDEO
Color Management
Auto Color
VIDEO
ON-SCREENDISPLAY
Color Decoding
ON-SCREENDISPLAY
AUDIO
Perfect Volume
Audio
AUDIO
ON-SCREENDISPLAY
Language Digital Output DRC
Auto Aspect
ASPECT
ON-SCREENDISPLAY
Aspect
Set The Antenna
CHANNEL MANAGER
Chan Manager
ON-SCREENDISPLAY
Channel List
Signal Meter
CHANNEL MANAGER
ON-SCREENDISPLAY
LOCKS
Locks
ON-SCREENDISPLAY
DISPLAY
LOCKS
PG-13
NC-17
ON-SCREENDISPLAY
LOCKS
LOCKS
13 ans +
LOCKS
ON-SCREENDISPLAY
8 ans +
Set The Clock
TIMERS
Timers
ON-SCREENDISPLAY
Timers
TIMERS
Set Sleep Timer
Set Day/Night Timer
TIMERS
Set Event Timer
ON-SCREENDISPLAY
TIMERS
Set Timer Recording
ON-SCREENDISPLAY
Menu Preference
SETUP
Setup
SCREEN-ON
Menu Background
SETUP
Image Power
ON-SCREENDISPLAY
SCREENDISPLAY
SETUP
Set The Inputs
SETUP
Setting
ON-SCREENDISPLAY
Set Closed Caption
DISPLAY
ON-SCREEN
SETUP
CableCARD Info
SETUP
ON-SCREENDISPLAY
Set Monitor Out
Set Stand-ByMode
SCREEN DISPLAY
SETUP
Upgrades
RGB ON SCREEN DISPLAY
USING THE RGB INPUT
USING THE RGB INPUT
RGB ON SCREEN DISPLAY
RGB ON SCREEN DISPLAY
USING THE RGB INPUT
NO SYNC. SIGNAL
POWER SAVING mode will come on after 10 seconds
USING THE RGB INPUT
Aspect Setup Power Swivel Move SEL Sel
RGB ON SCREEN DISPLAY
Video Aspect Setup Power Swivel
USING THE RGB INPUT
RGB ON SCREEN DISPLAY
CONTRAST
USING
INPUT
RGB ON SCREEN DISPLAY
ENHANCER
USING THE RGB INPUT
RESET
RGB ON SCREEN DISPLAY
H POSITION
USING THE RGB INPUT
AUTO ADJUST
RGB ON SCREEN DISPLAY
RGB ON SCREEN DISPLAY
USING THE RGB INPUT
CLOCK PHASE
RESET
POWER SWIVEL
USING
THE RGB INPUT
in Real and Normal signals in Standard Mode
AND YOUR REMOTE CONTROL
CARE OF YOUR HITACHI PLASMA DISPLAY
DO NOT
RECEPTION PROBLEMS
USEFUL INFO
SYMPTOMS
PLUG and PLAY
TRADEMARK ACKNOWLEDGMENT
Notes on Closed Caption
Modifications
USEFUL INFO
AGENCY REGULATORY INFORMATION
Federal Communications Commission Notice
SPECIFICATIONS
Features
Supplied Accessories
Optional Accessories
USEFUL INFO
1-800-448-2244 Hitachi America, LTD
Home Electronics Division
DIAL TOLL FREE
USEFUL INFO
Hitachi Canada, LTD Digital Media Division
INDEX
IMPORTANT – READ CAREFULLY: This License Agreement is a legal agreement between you and Hitachi America, Ltd., Home Electronics Division HAL-HED.By using this Hitachi digital television the DTV and its software the Software, you agree to be bound by the terms of this License Agreement. IF YOU DO NOT AGREE TO BE BOUND BY THIS LICENSE AGREEMENT, DO NOT USE THIS DTV AND ITS SOFTWARE
7.LIMITATION OF LIABILITY. IN NO EVENT SHALL HAL-HEDOR ANY OF ITS PARENT OR AFFILIATE COMPANIES BE LIABLE TO YOU OR ANY THIRD PARTY FOR ANY DIRECT, INDIRECT, INCIDENTAL, SPECIAL, EXEMPLARY, OR CONSEQUENTIAL DAMAGES INCLUDING, BUT NOT LIMITED TO, PROCUREMENT OF SUBSTITUTE GOODS OR SERVICES; LOSS OF USE, DATA, OR PROFITS; LOSS OF GOODWILL, EXPENDITURES MADE OR COMMITTED FOR IN RELIANCE ON THE CONTINUATION OF THIS LICENSE AGREEMENT OR BUSINESS INTERRUPTION HOWEVER CAUSED AND ON ANY THEORY OF LIABILITY, WHETHER IN CONTRACT, STRICT LIABILITY, OR TORT INCLUDING NEGLIGENCE OR OTHERWISE ARISING IN ANY WAY OUT OF THE USE OF THE SOFTWARE, EVEN IF ADVISED OF THE POSSIBILITY OF SUCH DAMAGE
QR60951