Manuals
/
Hitachi
/
Computer Equipment
/
Projector
Hitachi
cp-s318
user manual
Command data chart, CP-S318/328W/TECHNICAl責了 03.5.27 239 PM ページ
Models:
cp-s318
1
48
53
53
Download
53 pages
58.57 Kb
45
46
47
48
49
50
51
52
Specification
Command data chart
Selecting an Input Signal
timer
Regarding the Indicator Lamps
Connecting Your Devices
Closecover the battery
buttons to adjust
H.Phase
Setting Up The Projector
Page 48
Image 48
Page 47
Page 49
Page 48
Image 48
Page 47
Page 49
Contents
CP-S318W/CP-X328W
MANUALE DISTRUZIONI Vol.1 Informazioni di base
BRUKERHÅNDBOK Vol.1 Grunnleggende
ENGLISH DEUTSCH FRANÇAIS ITALIANO ESPAÑOL NEDERLANDS NORSK PORTGÊS
CONTENTS
SETTING UP
CONNECTING
USING THE REMOTE
PROJECTOR FEATURES
Ultra High Brightness
Keystone Distortion Correction
Partial Magnification Function
3 Connect the power cord
Connect your devices to the projector
8 ~
Insert the batteries into the remote
PART NAMES
THE PROJECTOR
THE REMOTE CONTROL
SETTING UP THE PROJECTOR
Adjusting the Projectors Elevator Feet
Press and hold in the elevator 1 buttons
Raise or lower the projector to the
Adjusting the Screen Size and Projection Distance
If 43 aspect ratio
If 169 aspect ratio
CONNECTING YOUR DEVICES
Indicates the corresponding reference page
Ports and Cables
NOTE About Plug-and-Play Capability
CONNECTING YOUR DEVICES continued
Connecting to a Computer
Laptop computer
Desktop computer
Connecting to a DVD Player
Connecting to a VCR
DVD player
If using a component
Connecting to a Display Monitor
Display monitor
RGB OUT RGB IN
USING THE REMOTE CONTROL
Putting batteries into the remote control unit
Operating the remote control
3 Closecover the battery
TURNING ON THE POWER
Precautions
Make sure that the power cord is firmly and
Turn on the projectors power
Selecting an Input Signal
Using the remote control If selecting RGB input Press the RGB button
Using the projectors control panel Press the INPUT button
Use the zoom ring to adjust the
TURNING OFF THE POWER
panel or remote control
control panel or remote control
Check that the POWER indicator stops
ADJUSTING THE VOLUME
Press the VOLUME button
buttons to adjust
the volume
ADJUSTING THE POSITION
1 Press the POSITION button
Use the
the position
USING THE AUTOMATIC ADJUSTMENT FEATURE
Automatic Adjustment for RGB Input
Automatic Adjustment for Video Input
Press the AUTO button
CORRECTING KEYSTONE DISTORTIONS
Press the KEYSTONE button
buttons to select the
direction of distortion to correct
USING THE MAGNIFY FEATURE
FREEZING THE SCREEN
Press the MAGNIFY ON button
press the POSITION button again to confirm your
SIGNAL SEARCHING
SELECTING THE ASPECT RATIO
TEMPORARILY BLANKING THE SCREEN
1 Press the SEARCH button
USING THE MENU FUNCTIONS
2 Select a menu using the
Select an item using the
buttons to adjust the level
You can use the remote control as a simplified mouse or keyboard
OPERATING THE PC SCREEN
PS/2, ADB, Serial Mouse Control
USB Mouse/Keyboard Control
THE LAMP
THE LAMP continued
Replacing the lamp
Turn off the projector, and unplug the power cord
Apply a vacuum cleaner to
to clean the air filter
Turn on the projector, and use the menu to reset the filter
Turn off the projector, and unplug the power cord. Prepare a
Turn on the projector power, and using the menu, reset the
filter timer
THE AIR FILTER continued
Caring for the cabinet and remote control transmitter
OTHER CARE
Caring for the inside of the projector
Caring for the lens
CP-S317/327W/Vol2-E責了 03.5.27 230 PM ページ
MULTIFUNCTIONAL SETTINGS
MAIN Menu
MAIN Menu
PICTURE 1 Menu
PICTURE 2 Menu
PICTURE1 Menu
PICTURE2 Menu
MULTIFUNCTIONAL SETTINGS continued
INPUT Menu
INPUT Menu
SCREEN Menu
SCREEN Menu
OPTION Menu
OPTION Menu
Related Messages
WHAT TO DO WHEN YOU THINK A MACHINE DEFECT HAS OCCURRED
Regarding the Indicator Lamps
Flashing of the green lamp
The green lamp is lighted
Flashing of the orange lamp
WHAT TO DO WHEN YOU THINK A MACHINE DEFECT HAS OCCURRED continued
Phenomena That May Easily Be Mistaken for Machine Defects
SPECIFICATIONS
Dimension Diagram
Specification
WARRANTY AND AFTER-SERVICE
SIGNAL CONNECTOR PIN ASSIGNMENT
TECHNICAL
CP-S318/328W/TECHNICAl責了 03.5.27 239 PM ページ
EXAMPLE OF COMPUTER SIGNAL
Resolution
Signal mode
fH kHz
INITIAL SET SIGNALS
The following signals are used for the initial settings
CONNECTION TO THE MOUSE CONTROL
ADB Mouse
USB Mouse
PS/2 Mouse
Communications setting
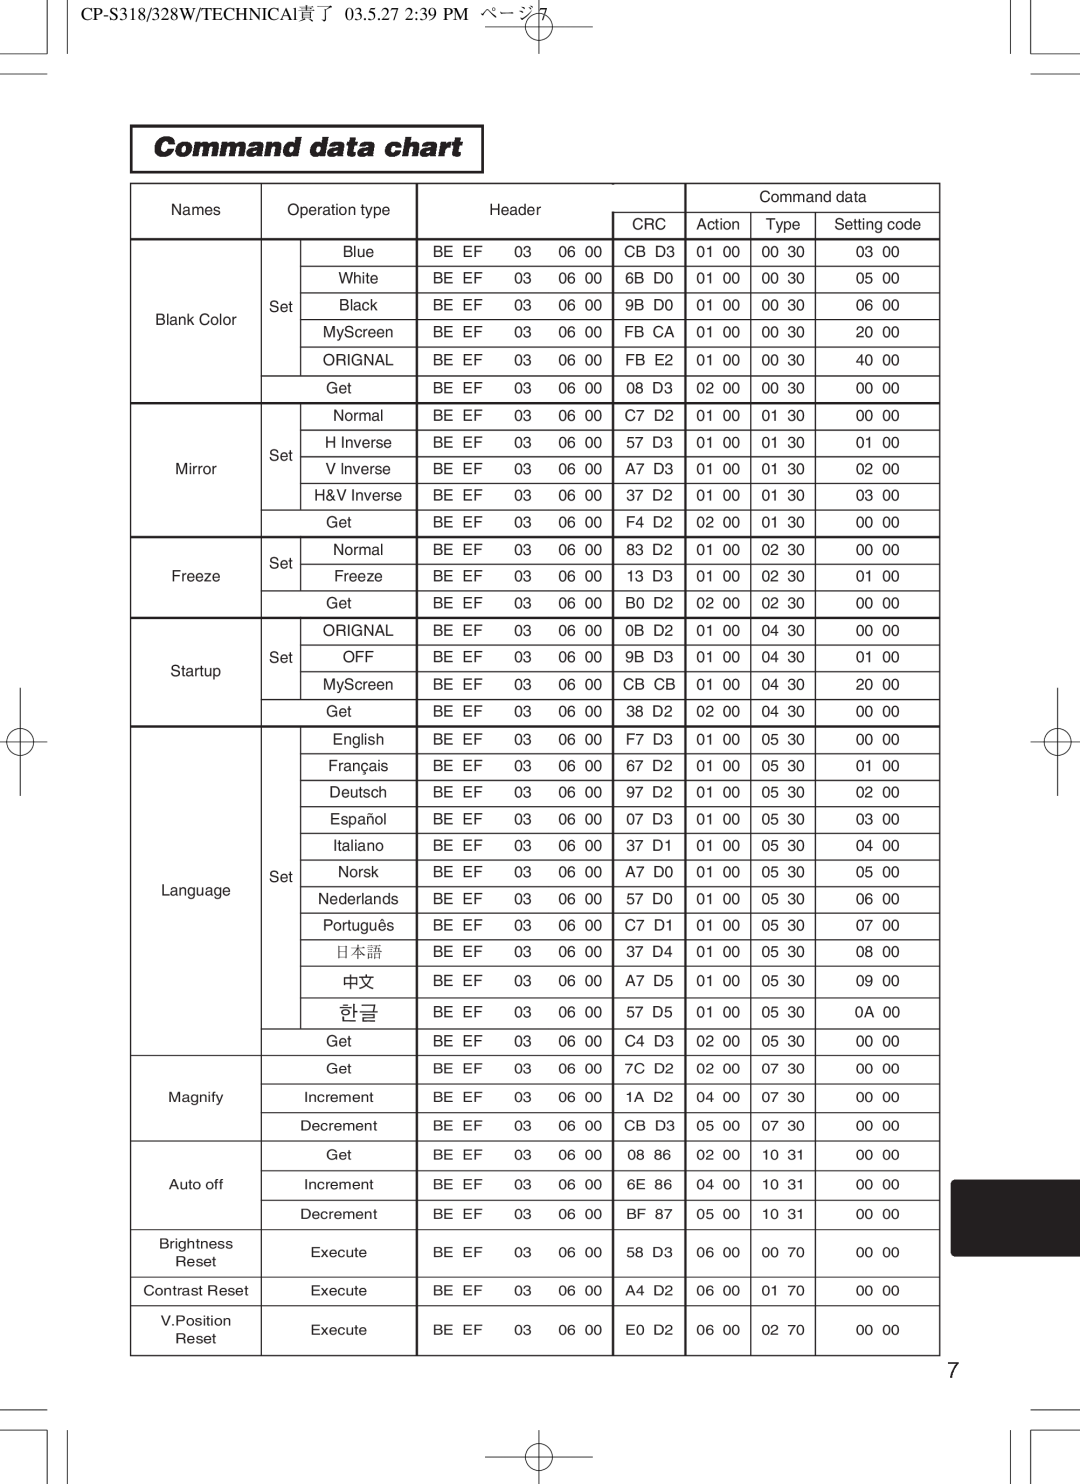
3 Command data
Command data chart
RS-232C COMMUNICATION
Requesting projector status Get command
Changing the projector settings Set command
Using the projector default settings Reset Command
Increasing the projector setting value Increment command
Command data chart
Command data chart continued
Default
H.Phase
Contrast
KeystoneH
Command data chart continued
REGULATORY NOTICES
FCC Statement Warning
For the Customers in CANADA
Pour les utilisateurs au Canada
QR57451
Top
Page
Image
Contents