Multifunctional settings

SCREEN menu (continued)

Item

Description

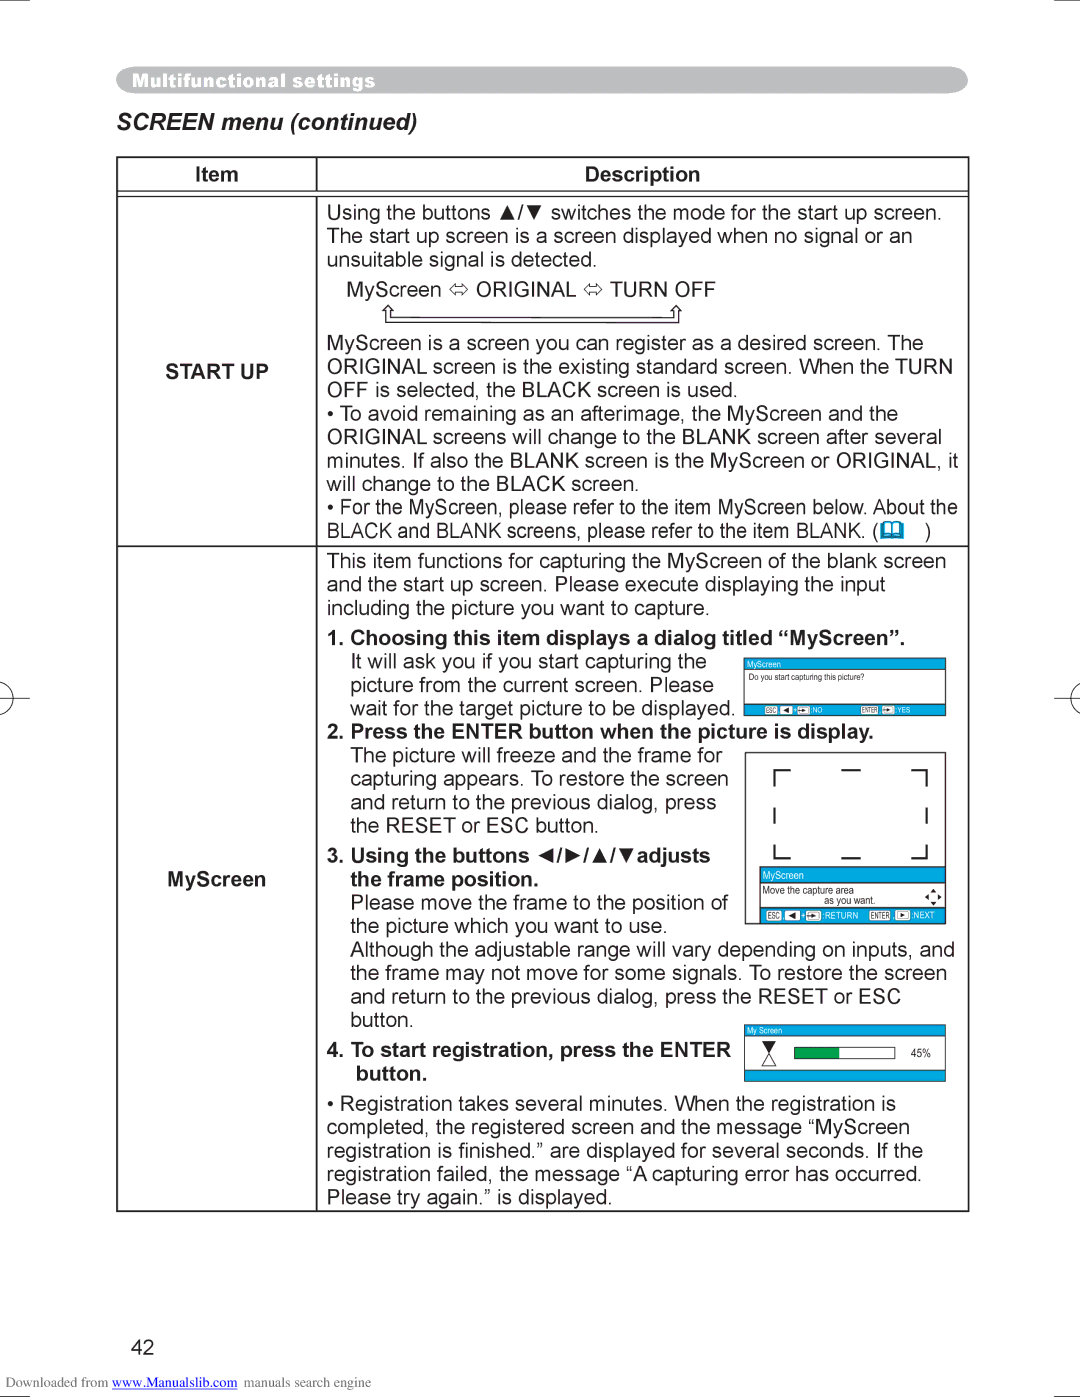
Using the buttons ▲/▼ switches the mode for the start up screen. The start up screen is a screen displayed when no signal or an unsuitable signal is detected.

MyScreen ORIGINAL TURN OFF


MyScreen is a screen you can register as a desired screen. The

START UP

ORIGINAL screen is the existing standard screen. When the TURN


OFF is selected, the BLACK screen is used.


• To avoid remaining as an afterimage, the MyScreen and the


ORIGINAL screens will change to the BLANK screen after several


minutes. If also the BLANK screen is the MyScreen or ORIGINAL, it


will change to the BLACK screen.


• For the MyScreen, please refer to the item MyScreen below. About the


BLACK and BLANK screens, please refer to the item BLANK. (41)


This item functions for capturing the MyScreen of the blank screen


and the start up screen. Please execute displaying the input


including the picture you want to capture.


1. Choosing this item displays a dialog titled “MyScreen”.


It will ask you if you start capturing the


MyScreen


picture from the current screen. Please

Do you start capturing this picture?


wait for the target picture to be displayed.

ESC , +


:NO

ENTER ,


:YES


2. Press the ENTER button when the picture is display.


The picture will freeze and the frame for


capturing appears. To restore the screen


and return to the previous dialog, press


the RESET or ESC button.


3. Using the buttons ◄/►/▲/▼adjusts


MyScreen

the frame position.

MyScreen

Move the capture area


Please move the frame to the position of

as you want.


ESC , + :RETURN ENTER , :NEXT


the picture which you want to use.


Although the adjustable range will vary depending on inputs, and


the frame may not move for some signals. To restore the screen


and return to the previous dialog, press the RESET or ESC


button.

My Screen


4. To start registration, press the ENTER

45%


button.


Registration takes several minutes. When the registration is completed, the registered screen and the message “MyScreen registration is finished.” are displayed for several seconds. If the registration failed, the message “A capturing error has occurred. Please try again.” is displayed.

42

Downloaded from www.Manualslib.com manuals search engine

Page 44
Image 44
Hitachi PJ-LC9 user manual Start UP

PJ-LC9 specifications

The Hitachi PJ-LC9 is a compact and versatile projector, renowned for its cutting-edge features and outstanding performance. Ideal for business presentations, educational settings, and home theater use, it blends functionality with user-friendly design. With its impressive specifications, the PJ-LC9 caters to the demands of professionals and casual users alike.

One of the key features of the PJ-LC9 is its native resolution of 1024 x 768 pixels (XGA), which ensures crisp and clear images. This resolution is particularly beneficial for presentations containing detailed graphs, charts, and high-quality images. The projector’s brightness of 2500 ANSI lumens makes it suitable for use in a variety of lighting conditions, allowing it to shine in both dim and well-lit environments.

The PJ-LC9 employs advanced LCD technology, which enhances color accuracy and contrast, providing vibrant and lifelike visuals. This technology aids in delivering sharp and vivid images, which is crucial for capturing and maintaining the audience's attention during presentations or watching media content.

Another standout characteristic of the PJ-LC9 is its lightweight design, weighing just 2.5 kg, which makes it highly portable. Its compact form factor allows users to effortlessly transport it between locations, making it an excellent choice for traveling professionals and educators who need to present on-the-go.

Connectivity options are another advantage of the Hitachi PJ-LC9. It comes equipped with multiple input ports, including HDMI, VGA, and USB, enabling users to connect various devices such as laptops, desktops, and media players without hassle. The inclusion of RS-232C serial connection also makes it compatible with computer control for automation and control purposes.

Additionally, the projector features a built-in 1W speaker, providing adequate sound output for small spaces, although external speakers may still be preferable for larger venues. The PJ-LC9 also supports a range of aspect ratios, including 4:3 and 16:9, allowing for flexibility depending on the content being presented.

In terms of maintenance, the PJ-LC9 utilizes a long-lasting lamp that can deliver up to 3000 hours of operation in standard mode, extending to around 5000 hours in eco mode. This longevity ensures reduced maintenance costs and downtime for users.

In summary, the Hitachi PJ-LC9 is a reliable, feature-rich projector that excels in performance and versatility. Its combination of high resolution, brightness, portability, and connectivity options make it a popular choice for professionals and educators seeking an efficient and effective projection solution.