When using electrical appliances, basic safety precautions should always be taken including the following:
1.Read all instructions before using this appliance.
2.Use fan only for purposes described in the instruction manual.
3.To protect against electrical shock do not immerse unit, plug or cord in water or spray with liquids and plug the appliance directly into a 120V AC electrical outlet.
4.Close supervision is necessary when any appliance is used by or near children.
5.Unplug from outlet when not in use, when moving fan from one location to another, before putting on or taking off parts and before cleaning.
6.Avoid contact with moving parts.
7.Do not operate in the presence of explosive and/or flammable fumes.
8.To avoid fire hazard, NEVER place the cord under rugs or any parts near an open flame, cooking or other heating appliance.
9.Do not operate any appliance with a damaged cord or plug after the appliance malfunctions, or has been dropped/damaged in any manner.
10.Do not run cord under carpeting. Do not cover cord with throw rugs, runner, or similar coverings. Do not route cord under furniture or appliances. Arrange cord away from traffic area and where it will not be tripped over.
11.The use of attachments not recommended or sold by the appliance manufacturer may cause hazards.
12.Do not let the cord hang over the edge of a table, counter or come in contact with hot surfaces or leave exposed to high traffic areas.
13.Do not use outdoors.
14.To disconnect, grip plug and pull from wall outlet. Never yank on cord.
15.Always use on a dry, level surface.
16.Do not operate fan until fully assembled with all parts properly in place.
17.This product is intended for household use ONLY and not for commercial or industrial applications.
18.WARNING: To reduce the risk of electrical shock and injury to persons, do not use in window.
19.WARNING: To reduce the risk of fire or electric shock, do not use this fan with any solid-state speed control device.
PLEASE READ AND SAVE THESE IMPORTANT SAFETY INSTRUCTIONS
ASSEMBLY INSTRUCTIONS
Your Table Fan comes completely assembled and is ready for immediate use. Carefully unpack your fan, read the instructions completely, plug it in and enjoy.
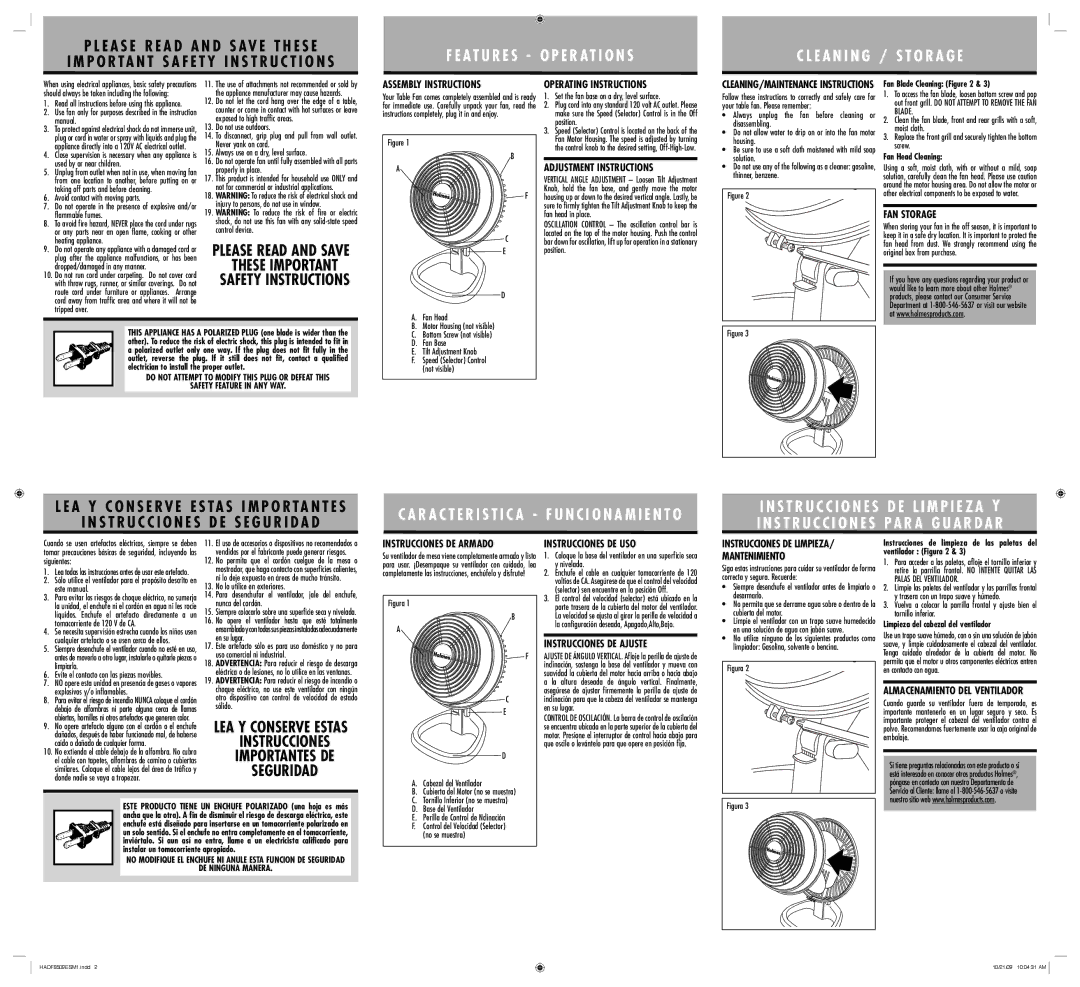
Figure 1
B
A
 F
F
 C
C


 E
E
D
A. | Fan Head |
B. | Motor Housing (not visible) |
OPERATING INSTRUCTIONS
1.Set the fan base on a dry, level surface.
2.Plug cord into any standard 120 volt AC outlet. Please make sure the Speed (Selector) Control is in the Off position.
3.Speed (Selector) Control is located on the back of the Fan Motor Housing. The speed is adjusted by turning the control knob to the desired setting, Off-High-Low.
ADJUSTMENT INSTRUCTIONS
VERTICAL ANGLE ADJUSTMENT – Loosen Tilt Adjustment Knob, hold the fan base, and gently move the motor housing up or down to the desired vertical angle. Lastly, be sure to firmly tighten the Tilt Adjustment Knob to keep the fan head in place.
OSCILLATION CONTROL – The oscillation control bar is located on the top of the motor housing. Push the control bar down for oscillation, lift up for operation in a stationary position.
CLEANING/MAINTENANCE INSTRUCTIONS
Follow these instructions to correctly and safely care for your table fan. Please remember:
•Always unplug the fan before cleaning or disassembling.
•Do not allow water to drip on or into the fan motor housing.
•Be sure to use a soft cloth moistened with mild soap solution.
•Do not use any of the following as a cleaner: gasoline, thinner, benzene.
Figure 2
Fan Blade Cleaning: (Figure 2 & 3)
1.To access the fan blade, loosen bottom screw and pop out front grill. DO NOT ATTEMPT TO REMOVE THE FAN BLADE.
2.Clean the fan blade, front and rear grills with a soft, moist cloth.
3.Replace the front grill and securely tighten the bottom screw.
Fan Head Cleaning:
Using a soft, moist cloth, with or without a mild, soap solution, carefully clean the fan head. Please use caution around the motor housing area. Do not allow the motor or other electrical components to be exposed to water.
FAN STORAGE
When storing your fan in the off season, it is important to keep it in a safe dry location. It is important to protect the fan head from dust. We strongly recommend using the original box from purchase.
If you have any questions regarding your product or would like to learn more about other Holmes® products, please contact our Consumer Service Department at 1-800-546-5637 or visit our website at www.holmesproducts.com.
Cuando se usen artefactos eléctricos, siempre se deben tomar precauciones básicas de seguridad, incluyendo las siguientes:
1.Lea todas las instrucciones antes de usar este artefacto.
2.Sólo utilice el ventilador para el propósito descrito en este manual.
3.Para evitar los riesgos de choque eléctrico, no sumerja la unidad, el enchufe ni el cordón en agua ni les rocíe líquidos. Enchufe el artefacto directamente a un tomacorriente de 120 V de CA.
4.Se necesita supervisión estrecha cuando los niños usen cualquier artefacto o se usen cerca de ellos.
5.Siempre desenchufe el ventilador cuando no esté en uso, antes de moverlo a otro lugar, instalarle o quitarle piezas o limpiarlo.
6.Evite el contacto con las piezas movibles.
7.NO opere esta unidad en presencia de gases o vapores explosivos y/o inflamables.
8.Para evitar el riesgo de incendio NUNCA coloque el cordón debajo de alfombras ni parte alguna cerca de llamas abiertas, hornillas ni otros artefactos que generen calor.
9.No opere artefacto alguno con el cordón o el enchufe dañados, después de haber funcionado mal, de haberse caído o dañado de cualquier forma.
10.No extienda el cable debajo de la alfombra. No cubra el cable con tapetes, alfombras de camino o cubiertas similares. Coloque el cable lejos del área de tráfico y donde nadie se vaya a tropezar.
11.El uso de accesorios o dispositivos no recomendados o vendidos por el fabricante puede generar riesgos.
12.No permita que el cordón cuelgue de la mesa o mostrador, que haga contacto con superficies calientes, ni lo deje expuesto en áreas de mucho tránsito.
13.No lo utilice en exteriores.
14.Para desenchufar el ventilador, jale del enchufe, nunca del cordón.
15.Siempre colocarlo sobre una superficie seca y nivelada.
16.No opere el ventilador hasta que esté totalmente ensambladoycontodassuspiezasinstaladasadecuadamente en su lugar.
17.Este artefacto sólo es para uso doméstico y no para uso comercial ni industrial.
18.ADVERTENCIA: Para reducir el riesgo de descarga eléctrica o de lesiones, no lo utilice en las ventanas.
19.ADVERTENCIA: Para reducir el riesgo de incendio o choque eléctrico, no use este ventilador con ningún otro dispositivo con control de velocidad de estado sólido.
LEA Y CONSERVE ESTAS
INSTRUCCIONES
IMPORTANTES DE
SEGURIDAD
INSTRUCCIONES DE ARMADO
Su ventilador de mesa viene completamente armado y listo para usar. ¡Desempaque su ventilador con cuidado, lea completamente las instrucciones, enchúfelo y disfrute!
Figura 1
B
A
 F
F
 C
C


 E
E
D
A. | Cabezal del Ventilador |
B. | Cubierta del Motor (no se muestra) |
C. | Tornillo Inferior (no se muestra) |
INSTRUCCIONES DE USO
1.Coloque la base del ventilador en una superficie seca y nivelada.
2.Enchufe el cable en cualquier tomacorriente de 120 voltios de CA. Asegúrese de que el control del velocidad (selector) sen encuentre en la posición Off.
3.El control del velocidad (selector) está ubicado en la parte trasera de la cubierta del motor del ventilador. La velocidad se ajusta al girar la perilla de velocidad a la configuración deseada, Apagado,Alto,Bajo.
INSTRUCCIONES DE AJUSTE
AJUSTE DE ÁNGULO VERTICAL. Afloje la perilla de ajuste de inclinación, sostenga la base del ventilador y mueva con suavidad la cubierta del motor hacia arriba o hacia abajo a la altura deseada de ángulo vertical. Finalmente, asegúrese de ajustar firmemente la perilla de ajuste de inclinación para que la cabeza del ventilador se mantenga en su lugar.
CONTROL DE OSCILACIÓN. La barra de control de oscilación se encuentra ubicada en la parte superior de la cubierta del motor. Presione el interruptor de control hacia abajo para que oscile o levántelo para que opere en posición fija.
INSTRUCCIONES DE LIMPIEZA/
MANTENIMIENTO
Siga estas instrucciones para cuidar su ventilador de forma correcta y segura. Recuerde:
•Siempre desenchufe el ventilador antes de limpiarlo o desarmarlo.
•No permita que se derrame agua sobre o dentro de la cubierta del motor.
•Limpie el ventilador con un trapo suave humedecido en una solución de agua con jabón suave.
•No utilice ninguno de los siguientes productos como limpiador: Gasolina, solvente o bencina.
Figura 2
Instrucciones de limpieza de las paletas del ventilador : (Figura 2 & 3)
1.Para acceder a las paletas, afloje el tornillo inferior y retire la parrilla frontal. NO INTENTE QUITAR LAS PALAS DEL VENTILADOR.
2.Limpie las paletas del ventilador y las parrillas frontal y trasera con un trapo suave y húmedo.
3.Vuelva a colocar la parrilla frontal y ajuste bien el tornillo inferior.
Limpieza del cabezal del ventilador
Use un trapo suave húmedo, con o sin una solución de jabón suave, y limpie cuidadosamente el cabezal del ventilador. Tenga cuidado alrededor de la cubierta del motor. No permita que el motor u otros componentes eléctricos entren en contacto con agua.
ALMACENAMIENTO DEL VENTILADOR
Cuando guarde su ventilador fuera de temporada, es importante mantenerlo en un lugar seguro y seco. Es importante proteger el cabezal del ventilador contra el polvo. Recomendamos fuertemente usar la caja original de embalaje.
Si tiene preguntas relacionadas con este producto o si está interesado en conocer otros productos Holmes®, póngase en contacto con nuestro Departamento de Servicio al Cliente: llame al 1-800-546-5637 o visite nuestro sitio web www.holmesproducts.com.