ASSEMBLY
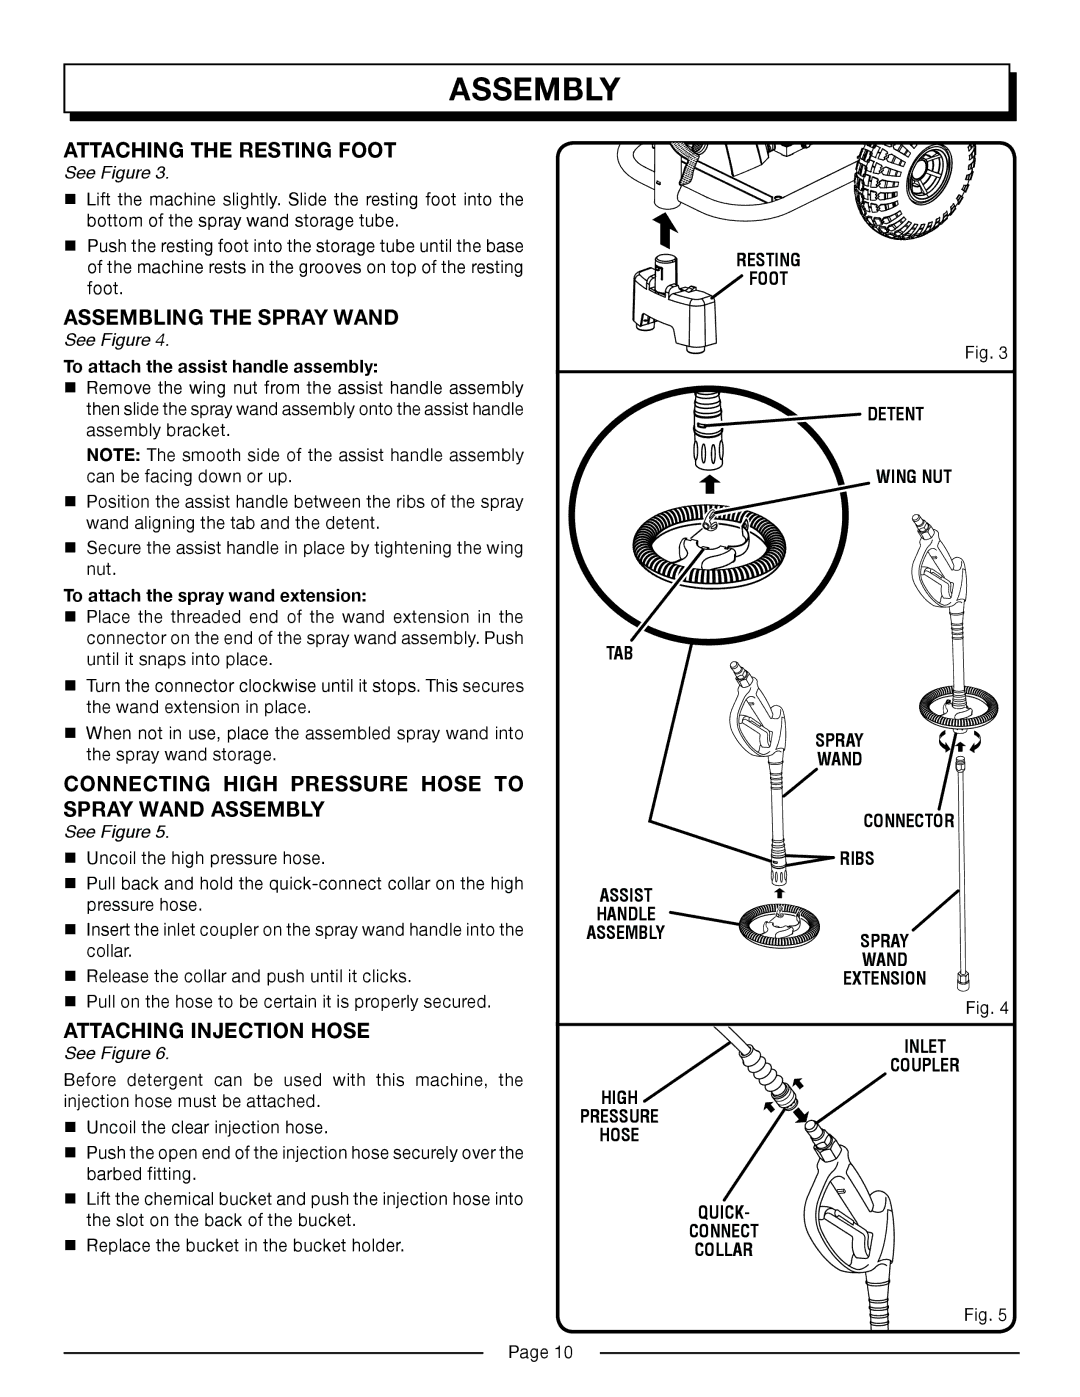
ATTACHING THE RESTING FOOT
See Figure 3.
Lift the machine slightly. Slide the resting foot into the bottom of the spray wand storage tube.
Push the resting foot into the storage tube until the base of the machine rests in the grooves on top of the resting foot.
RESTING ![]() FOOT
FOOT
ASSEMBLING THE SPRAY WAND |
| |
See Figure 4. | Fig. 3 | |
To attach the assist handle assembly: | ||
| ||
Remove the wing nut from the assist handle assembly |
| |
then slide the spray wand assembly onto the assist handle | DETENT | |
assembly bracket. |
| |
NOTE: The smooth side of the assist handle assembly |
| |
can be facing down or up. | WING NUT |
Position the assist handle between the ribs of the spray
wand aligning the tab and the detent.
Secure the assist handle in place by tightening the wing nut.
To attach the spray wand extension: |
|
|
Place the threaded end of the wand extension in the |
|
|
connector on the end of the spray wand assembly. Push | TAB |
|
until it snaps into place. |
| |
Turn the connector clockwise until it stops. This secures |
|
|
the wand extension in place. |
|
|
When not in use, place the assembled spray wand into |
| SPRAY |
the spray wand storage. |
| |
| WAND | |
CONNECTING HIGH PRESSURE HOSE TO |
|
|
SPRAY WAND ASSEMBLY |
| CONNECTOR |
See Figure 5. |
| |
|
| |
Uncoil the high pressure hose. |
| RIBS |
Pull back and hold the | ASSIST |
|
pressure hose. |
| |
HANDLE |
| |
Insert the inlet coupler on the spray wand handle into the |
| |
ASSEMBLY | SPRAY | |
collar. |
| |
| WAND | |
Release the collar and push until it clicks. |
| |
| EXTENSION | |
Pull on the hose to be certain it is properly secured. |
| Fig. 4 |
ATTACHING INJECTION HOSE |
| |
| INLET | |
See Figure 6. |
| |
| COUPLER | |
Before detergent can be used with this machine, the |
| |
HIGH |
| |
injection hose must be attached. |
| |
Uncoil the clear injection hose. | PRESSURE |
|
HOSE |
| |
Push the open end of the injection hose securely over the |
| |
|
| |
barbed fitting. |
|
|
Lift the chemical bucket and push the injection hose into |
| QUICK- |
the slot on the back of the bucket. |
| |
| CONNECT | |
Replace the bucket in the bucket holder. |
| |
| COLLAR | |
|
| Fig. 5 |
Page 10 |
|
|