Honeywell 18150 Series owner manual HowtoInstallandReplacetheFilters…, Troubleshooting

Models: 18150 Series

1 7
Download 7 pages 12 Kb
Page 6
Image 6
HowtoInstallandReplacetheFilters…

INSTALL PRE-FILTER BEFORE INITIAL OPERATION.TroubleshootingManual backgroundManual backgroundHowManual backgroundManual backgroundManual backgroundtoManual backgroundManual backgroundManual backgroundInstallManual backgroundManual backgroundandManual backgroundManual backgroundReplaceManual backgroundManual backgroundManual backgroundtheManual backgroundManual backgroundManual backgroundFiltersManual backgroundManual backgroundManual backgroundManual backgroundManual backgroundManual backgroundManual backgroundManual backgroundManual backgroundManual backgroundManual backgroundManual backgroundManual backgroundManual backgroundManual backgroundManual backgroundManual backgroundManual backgroundManual backgroundManual backgroundManual backgroundManual backgroundManual backgroundManual backgroundManual backgroundManual backgroundManual backgroundManual backgroundManual backgroundManual backgroundManual backgroundManual backgroundManual backgroundManual backgroundManual backgroundManual backgroundManual backgroundManual backgroundManual backgroundManual backgroundManual backgroundManual backgroundManual background

INSTALL PRE-FILTER BEFORE INITIAL OPERATION.

The initial pre-filter is packaged separately to ensure its freshness. BEFORE initial operation, locate the pre-filter in the box, remove it from its packaging and install per instructions below.

1.DISCONNECT FROM POWER SUPPLY BEFORE SERVICING.

2.Replace filter(s) and re-assemble unit per instructions below.

3.Plug in and RESET appropriate filter monitor(s).

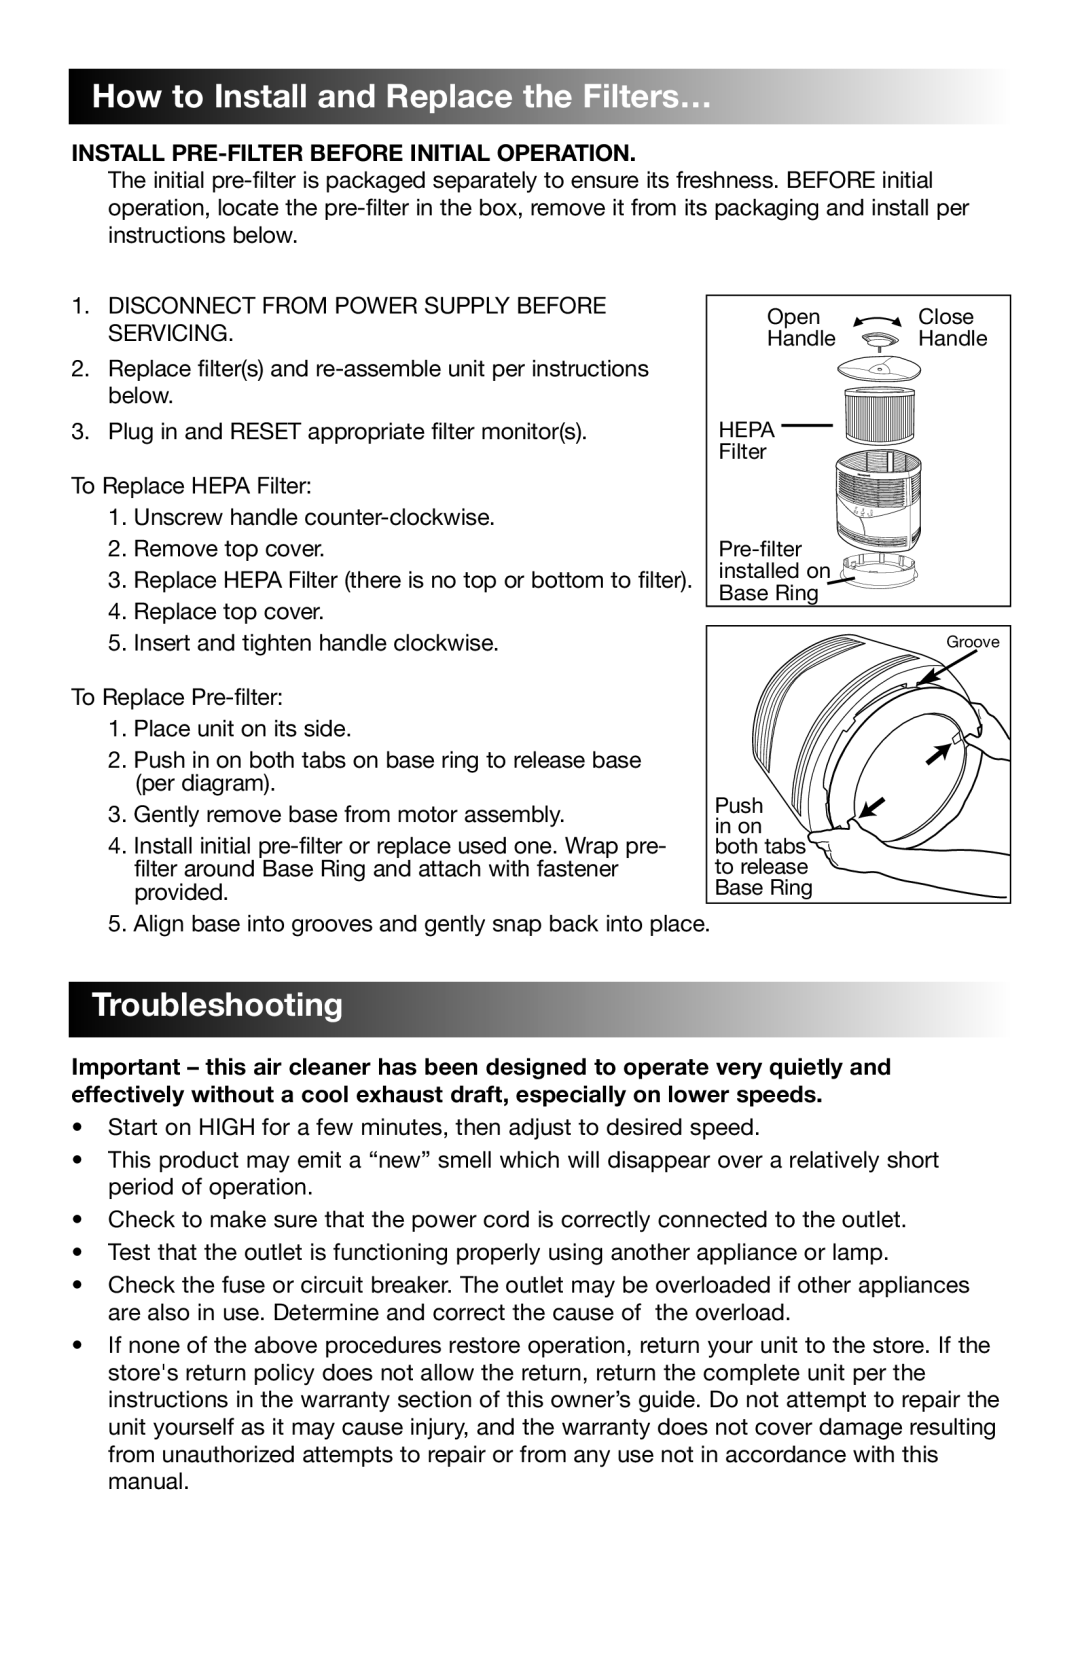
To Replace HEPA Filter:

1.Unscrew handle counter-clockwise.

2.Remove top cover.

3.Replace HEPA Filter (there is no top or bottom to filter).

4.Replace top cover.

Open Manual backgroundManual background Close

Handle Manual background Handle

HEPA

Filter

Pre-filter installed on Base Ring

5. Insert and tighten handle clockwise.

Groove

To Replace Pre-filter:

1.

Place unit on its side.


2.

Push in on both tabs on base ring to release base


(per diagram).

Push

3.

Gently remove base from motor assembly.

in on

4.

Install initial pre-filter or replace used one. Wrap pre-

both tabs


filter around Base Ring and attach with fastener

to release


provided.


Base Ring

5.

Align base into grooves and gently snap back into place.


Manual backgroundManual backgroundManual backgroundManual backgroundTroubleshootingManual backgroundManual backgroundManual backgroundManual backgroundManual backgroundManual backgroundManual backgroundManual backgroundManual backgroundManual backgroundManual backgroundManual backgroundManual backgroundManual backgroundManual backgroundManual backgroundManual backgroundManual backgroundManual backgroundManual backgroundManual backgroundManual backgroundManual backgroundManual backgroundManual backgroundManual backgroundManual backgroundManual backgroundManual backgroundManual backgroundManual backgroundManual backgroundManual backgroundManual backgroundManual backgroundManual backgroundManual backgroundManual backgroundManual backgroundManual backgroundManual backgroundManual backgroundManual backgroundManual backgroundManual backgroundManual backgroundManual backgroundManual backgroundManual backgroundManual backgroundManual backgroundManual background

Important – this air cleaner has been designed to operate very quietly and effectively without a cool exhaust draft, especially on lower speeds.

Start on HIGH for a few minutes, then adjust to desired speed.

This product may emit a “new” smell which will disappear over a relatively short period of operation.

Check to make sure that the power cord is correctly connected to the outlet.

Test that the outlet is functioning properly using another appliance or lamp.

Check the fuse or circuit breaker. The outlet may be overloaded if other appliances are also in use. Determine and correct the cause of the overload.

If none of the above procedures restore operation, return your unit to the store. If the store's return policy does not allow the return, return the complete unit per the instructions in the warranty section of this owner’s guide. Do not attempt to repair the unit yourself as it may cause injury, and the warranty does not cover damage resulting from unauthorized attempts to repair or from any use not in accordance with this manual.

Page 6
Image 6
Honeywell 18150 Series HowtoInstallandReplacetheFilters…, Troubleshooting, Install Pre-Filterbefore Initial Operation

FAQ

How do I install the pre-filter before initial operation?

Disconnect from power supply, replace filters, and plug in and reset appropriate filter monitors.

How do I replace the HEPA filter?

Unscrew handle, remove top cover, replace HEPA filter, and replace top cover.

What should I do if the air cleaner emits a new smell?

The smell will disappear over a relatively short period of operation. If not, refer to troubleshooting steps.