|
| TABLE OF CONTENTS |
|
|
| INTRODUCTION | 3 |
|
| ABOUT HIDEKI ELECTRONICS | 3 |
|
| PRODUCT FEATURES & OVERVIEW | 3 |
|
| BATTERY INSTALLATION | 8 |
| Digiview | WWVB RADIO CONTROLLED TIME | 8 |
| ATOMIC CLOCK | 9 | |
| Atomic Clock with AM/FM Radio | TIME AND CALENDAR WINDOWS | 10 |
| ALARMS SETTINGS | 11 | |
|
| DIGITAL AM/ FM RADIO | 12 |
|
| SNOOZE & BACKLIGHT | 13 |
|
| PRECAUTIONS | 13 |
|
| SPECIFICATIONS | 14 |
|
| FCC STATEMENT | 14 |
|
| DECLARATION OF CONFORMITY | 15 |
|
| STANDARD WARRANTY INFORMATION | 16 |
| (RC402W) |
|
|
| USER MANUAL |
|
|
|
| 2 |
|
|
|
|
|
| DIGIVIEW RC402W MANUAL (ENG) |
|
|
|
|
| |
| SIZE: W65 X H105 (mm) |
|
|
| BY WING TSUI 11/03/09 |
|
|
|
|
|
|
INTRODUCTION
Thank you for selecting the Digiview Atomic Clock Radio. This product combines an Atomic Clock with AM/FM Radio. This device includes precise time keeping and perpetual calendar that you can use from the comfort of your home.
In this package you will find:
•One Atomic Clock Radio
•One AC adapter
•One User Manual
•One Quick Start Guide
Please keep this manual handy as you use your new item. It contains practical
ABOUT HIDEKI ELECTRONICS
Visit our website (www.digiviewtime.com) to learn more about Hideki Electronics precise projection time pieces, environmental products and weather monitoring devices. The website also includes important information about extended warranty programs and other useful facts.
PRODUCT FEATURES
AM/ FM Radio
•AM/ FM radio station tuning
•Radio alarm
Atomic Clock
•Precise time and date set via RF signals from the US Atomic Clock
•Calendar displaying date with month and day in English, Spanish, French, German and Italian
3
•12 or 24 hour time format
•Dual crescendo time alarm with programmable snooze
•LED backlight
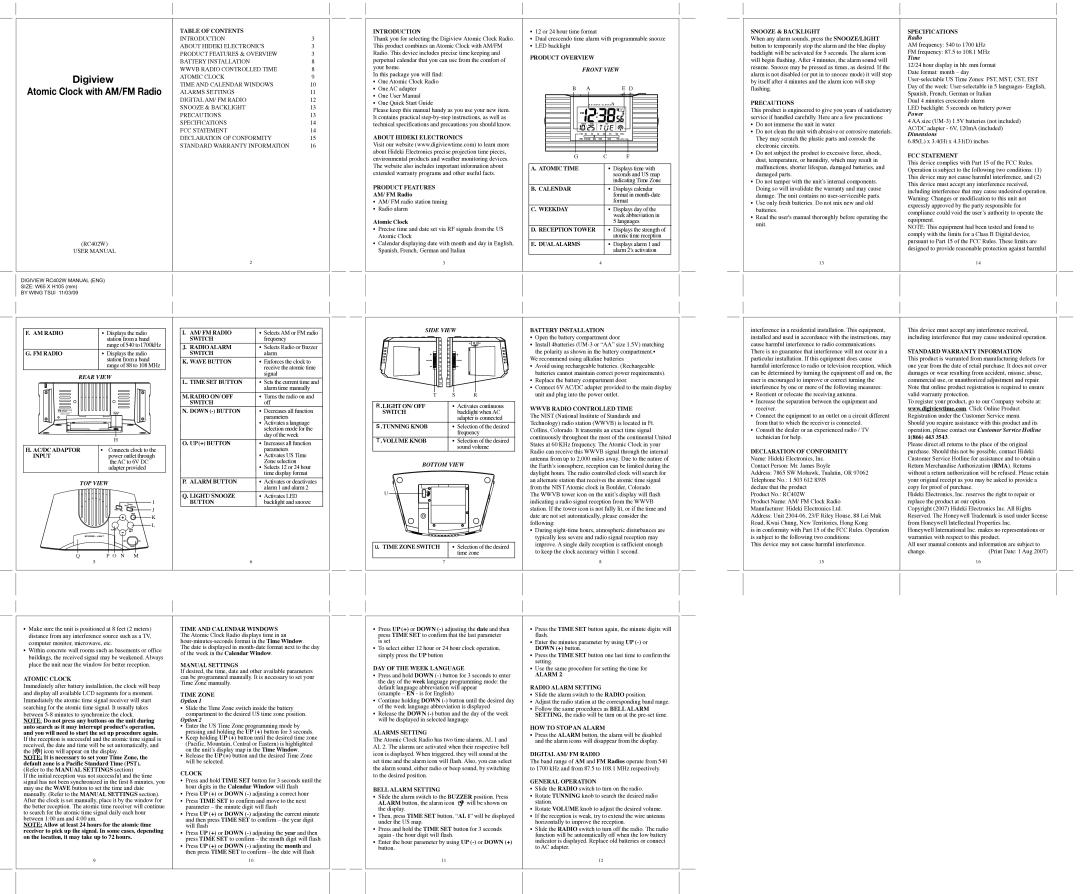
PRODUCT OVERVIEW
FRONT VIEW
B | A |
| E D |
G |
| C | F |
A. ATOMIC TIME |
| • Displays time with |
|
| seconds and US map |
|
| indicating Time Zone |
B. CALENDAR |
| • Displays calendar |
|
| format in |
|
| format |
C. WEEKDAY |
| • Displays day of the |
|
| week abbreviation in |
|
| 5 languages |
D. RECEPTION TOWER |
| • Displays the strength of |
|
| atomic time reception |
E. DUALALARMS |
| • Displays alarm 1 and |
|
| alarm 2’s activation |
| 4 |
|
SNOOZE & BACKLIGHT
When any alarm sounds, press the SNOOZE/LIGHT button to temporarily stop the alarm and the blue display backlight will be activated for 5 seconds. The alarm icon will begin flashing. After 4 minutes, the alarm sound will resume. Snooze may be pressed as times, as desired. If the alarm is not disabled (or put in to snooze mode) it will stop by itself after 4 minutes and the alarm icon will stop flashing.
PRECAUTIONS
This product is engineered to give you years of satisfactory service if handled carefully. Here are a few precautions:
•Do not immerse the unit in water.
•Do not clean the unit with abrasive or corrosive materials. They may scratch the plastic parts and corrode the electronic circuits.
•Do not subject the product to excessive force, shock, dust, temperature, or humidity, which may result in malfunctions, shorter lifespan, damaged batteries, and damaged parts.
•Do not tamper with the unit’s internal components. Doing so will invalidate the warranty and may cause damage. The unit contains no
•Use only fresh batteries. Do not mix new and old batteries.
•Read the user's manual thoroughly before operating the unit.
13
SPECIFICATIONS
Radio
AM frequency: 540 to 1700 kHz
FM frequency: 87.5 to 108.1 MHz
Time
12/24 hour display in hh: mm format
Date format: month – day
Day of the week:
Dual 4 minutes crescendo alarm
LED backlight: 5 seconds on battery power
Power
4 AA size
Dimensions
6.85(L) x 3.4(H) x 4.31(D) inches
FCC STATEMENT
This device complies with Part 15 of the FCC Rules. Operation is subject to the following two conditions: (1) This device may not cause harmful interference, and (2) This device must accept any interference received, including interference that may cause undesired operation. Warning: Changes or modification to this unit not expressly approved by the party responsible for compliance could void the user’s authority to operate the equipment.
NOTE: This equipment had been tested and found to comply with the limits for a Class B Digital device, pursuant to Part 15 of the FCC Rules. These limits are designed to provide reasonable protection against harmful
14
F. AM RADIO |
|
|
|
| • Displays the radio | ||||||||||
|
|
|
|
|
|
|
|
|
| station from a band | |||||
|
|
|
|
|
|
|
|
|
| range of 540 to1700kHz | |||||
G. FM RADIO |
|
|
|
| • Displays the radio | ||||||||||
|
|
|
|
|
|
|
|
|
| station from a band | |||||
|
|
|
|
|
|
|
|
|
| range of 88 to 108 MHz | |||||
|
|
|
|
|
|
|
| REAR VIEW | |||||||
|
|
|
|
|
|
|
|
|
|
|
|
|
|
|
|
|
|
|
|
|
|
|
|
|
|
|
|
|
|
|
|
|
|
|
|
|
|
|
|
|
|
|
|
|
|
|
|
|
|
|
|
|
|
|
|
|
|
|
|
|
|
|
|
|
| H |
H. AC/DC ADAPTOR | • | Connects clock to the |
INPUT |
| power outlet through |
|
| the AC to 6V DC |
|
| adapter provided |
TOP VIEW |
| |
|
| I |
|
| J |
|
| K |
|
| L |
I. AM/ FM RADIO | • Selects AM or FM radio |
SWITCH | frequency |
J. RADIO ALARM | • Selects Radio or Buzzer |
SWITCH | alarm |
K. WAVE BUTTON | • Enforces the clock to |
| receive the atomic time |
| signal |
L. TIME SET BUTTON | • Sets the current time and |
| alarm time manually |
M. RADIO ON/ OFF | • Turns the radio on and |
SWITCH | off |
N. DOWN | • Decreases all function |
| parameters |
| • Activates a language |
| selection mode for the |
| day of the week |
O. UP (+) BUTTON | • Increases all function |
| parameters |
| • Activates US Time |
| Zone selection |
| • Selects 12 or 24 hour |
| time display format |
P. ALARM BUTTON | • Activates or deactivates |
| alarm 1 and alarm 2 |
Q. LIGHT/ SNOOZE | • Activates LED |
BUTTON | backlight and snooze |
SIDE VIEW
|
|
|
|
|
|
|
|
|
|
|
|
|
|
|
|
|
|
|
|
|
|
|
|
|
|
|
|
|
|
|
|
|
|
|
|
|
|
|
|
|
|
|
|
|
|
|
|
|
|
|
|
|
|
|
|
|
|
|
|
|
|
|
|
|
|
|
|
|
|
|
|
|
|
|
|
|
|
|
|
|
|
|
|
|
|
|
|
|
|
|
|
|
|
|
|
|
|
|
|
|
|
|
|
|
|
|
|
|
|
|
|
|
|
|
|
|
|
|
|
|
|
|
|
|
|
|
|
|
|
|
|
|
|
|
|
|
|
|
|
|
|
|
|
|
|
|
|
|
|
|
|
|
|
|
|
|
|
|
|
|
|
|
|
|
|
|
|
|
|
|
|
|
|
|
|
|
|
|
|
|
|
|
|
|
|
|
|
|
|
|
|
|
|
|
|
|
|
|
|
|
|
|
|
|
| T |
|
|
|
| S |
|
|
| R | |||||||||
|
|
|
|
|
|
| ||||||||||||||||||
R.LIGHT ON/ OFF |
|
|
|
| • | Activates continuous | ||||||||||||||||||
SWITCH |
|
|
|
|
| backlight when AC | ||||||||||||||||||
|
|
|
|
|
|
|
|
|
|
|
|
|
| adapter is connected | ||||||||||
S.TUNNING KNOB |
|
|
|
| • Selection of the desired | |||||||||||||||||||
|
|
|
|
|
|
|
|
|
|
|
|
|
| frequency | ||||||||||
T.VOLUME KNOB |
|
|
|
| • Selection of the desired | |||||||||||||||||||
|
|
|
|
|
|
|
|
|
|
|
|
|
| sound volume | ||||||||||
BOTTOM VIEW
U
U. TIME ZONE SWITCH | • Selection of the desired |
BATTERY INSTALLATION
•Open the battery compartment door
•Install 4batteries
the polarity as shown in the battery compartment.• We recommend using alkaline batteries
•Avoid using rechargeable batteries. (Rechargeable batteries cannot maintain correct power requirements).
•Replace the battery compartment door.
•Connect 6V AC/DC adapter provided to the main display unit and plug into the power outlet.
WWVB RADIO CONTROLLED TIME
The NIST (National Institute of Standards and Technology) radio station (WWVB) is located in Ft. Collins, Colorado. It transmits an exact time signal continuously throughout the most of the continental United States at 60 KHz frequency. The Atomic Clock in your Radio can receive this WWVB signal through the internal antenna from up to 2,000 miles away. Due to the nature of the Earth’s ionosphere, reception can be limited during the daylight hours. The radio controlled clock will search for an alternate station that receives the atomic time signal from the NIST Atomic clock in Boulder, Colorado.
The WWVB tower icon on the unit’s display will flash indicating a radio signal reception from the WWVB station. If the tower icon is not fully lit, or if the time and date are not set automatically, please consider the following:
• During |
typically less severe and radio signal reception may |
improve. A single daily reception is sufficient enough |
interference in a residential installation. This equipment, installed and used in accordance with the instructions, may cause harmful interference to radio communications. There is no guarantee that interference will not occur in a particular installation. If this equipment does cause harmful interference to radio or television reception, which can be determined by turning the equipment off and on, the user is encouraged to improve or correct turning the interference by one or more of the following measures:
•Reorient or relocate the receiving antenna.
•Increase the separation between the equipment and receiver.
•Connect the equipment to an outlet on a circuit different from that to which the receiver is connected.
•Consult the dealer or an experienced radio / TV technician for help.
DECLARATION OF CONFORMITY
Name: Hideki Electronics, Inc.
Contact Person: Mr. James Boyle
Address: 7865 SW Mohawk, Tualatin, OR 97062
Telephone No.: 1 503 612 8395 declare that the product Product No.: RC402W
Product Name: AM/ FM Clock Radio
Manufacturer: Hideki Electronics Ltd.
Address: Unit
is in conformity with Part 15 of the FCC Rules. Operation is subject to the following two conditions:
This device may not cause harmful interference.
This device must accept any interference received, including interference that may cause undesired operation.
STANDARD WARRANTY INFORMATION
This product is warranted from manufacturing defects for one year from the date of retail purchase. It does not cover damages or wear resulting from accident, misuse, abuse, commercial use, or unauthorized adjustment and repair. Note that online product registration is required to ensure valid warranty protection.
To register your product, go to our Company website at: www.digiviewtime.com. Click Online Product Registration under the Customer Service menu.
Should you require assistance with this product and its operation, please contact our Customer Service Hotline 1(866) 443 3543.
Please direct all returns to the place of the original purchase. Should this not be possible, contact Hideki Customer Service Hotline for assistance and to obtain a Return Merchandise Authorization (RMA). Returns without a return authorization will be refused. Please retain your original receipt as you may be asked to provide a copy for proof of purchase.
Hideki Electronics, Inc. reserves the right to repair or replace the product at our option.
Copyright (2007) Hideki Electronics Inc. All Rights Reserved. The Honeywell Trademark is used under license from Honeywell Intellectual Properties Inc.
Honeywell International Inc. makes no representations or warranties with respect to this product.
All user manual contents and information are subject to
Q | P O N M |
5 | 6 |
time zone |
7 |
to keep the clock accuracy within 1 second. |
8
15
change. | (Print Date: 1 Aug 2007) |
| 16 |
•Make sure the unit is positioned at 8 feet (2 meters) distance from any interference source such as a TV, computer monitor, microwave, etc.
•Within concrete wall rooms such as basements or office buildings, the received signal may be weakened. Always place the unit near the window for better reception.
ATOMIC CLOCK
Immediately after battery installation, the clock will beep and display all available LCD segments for a moment. Immediately the atomic time signal receiver will start searching for the atomic time signal. It usually takes between
NOTE: Do not press any buttons on the unit during auto search as it may interrupt product’s operation, and you will need to start the set up procedure again.
If the reception is successful and the atomic time signal is received, the date and time will be set automatically, and the [![]() ] icon will appear on the display.
] icon will appear on the display.
NOTE: It is necessary to set your Time Zone, the default zone is a Pacific Standard Time (PST). (Refer to the MANUAL SETTINGS section)
If the initial reception was not successful and the time signal has not been synchronized in the first 8 minutes, you may use the WAVE button to set the time and date manually. (Refer to the MANUAL SETTINGS section). After the clock is set manually, place it by the window for the better reception. The atomic time receiver will continue to search for the atomic time signal daily each hour between 1:00 am and 4:00 am.
NOTE: Allow at least 24 hours for the atomic time receiver to pick up the signal. In some cases, depending on the location, it may take up to 72 hours.
9
TIME AND CALENDAR WINDOWS The Atomic Clock Radio displays time in an
The date is displayed in
MANUAL SETTINGS
If desired, the time, date and other available parameters can be programmed manually. It is necessary to set your Time Zone manually.
TIME ZONE
Option 1
•Slide the Time Zone switch inside the battery compartment to the desired US time zone position.
Option 2
•Enter the US Time Zone programming mode by pressing and holding the UP (+) button for 3 seconds.
•Keep holding UP (+) button until the desired time zone (Pacific, Mountain, Central or Eastern) is highlighted on the unit’s display map in the Time Window.
•Release the UP (+) button and the desired Time Zone will be selected.
CLOCK
•Press and hold TIME SET button for 3 seconds until the hour digits in the Calendar Window will flash
•Press UP (+) or DOWN
•Press TIME SET to confirm and move to the next parameter – the minute digit will flash
•Press UP (+) or DOWN
•Press UP (+) or DOWN
•Press UP (+) or DOWN
10
•Press UP (+) or DOWN
•To select either 12 hour or 24 hour clock operation, simply press the UP button
DAY OF THE WEEK LANGUAGE
•Press and hold DOWN
(example – EN - is for English)
•Continue holding DOWN
•Release the DOWN
ALARMS SETTING
The Atomic Clock Radio has two time alarms, AL 1 and AL 2. The alarms are activated when their respective bell icon is displayed. When triggered, they will sound at the set time and the alarm icon will flash. Also, you can select the alarm sound, either radio or beep sound, by switching to the desired position.
BELL ALARM SETTING
• Slide the alarm switch to the BUZZER position. Press ALARM button, the alarm icon will be shown on the display.
•Then, press TIME SET button, “AL 1” will be displayed under the US map.
•Press and hold the TIME SET button for 3 seconds again - the hour digit will flash.
•Enter the hour parameter by using UP
11
•Press the TIME SET button again, the minute digits will flash.
•Enter the minutes parameter by using UP
•Press the TIME SET button one last time to confirm the setting.
•Use the same procedure for setting the time for ALARM 2.
RADIO ALARM SETTING
•Slide the alarm switch to the RADIO position.
•Adjust the radio station at the corresponding band range.
•Follow the same procedures as BELL ALARM SETTING, the radio will be turn on at the
HOW TO STOP AN ALARM
•Press the ALARM button, the alarm will be disabled and the alarm icons will disappear from the display.
DIGITAL AM/ FM RADIO
The band range of AM and FM Radios operate from 540 to 1700 kHz and from 87.5 to 108.1 MHz respectively.
GENERAL OPERATION
•Slide the RADIO switch to turn on the radio.
•Rotate TUNNING knob to search the desired radio station.
•Rotate VOLUME knob to adjust the desired volume.
•If the reception is weak, try to extend the wire antenna horizontally to improve the reception.
•Slide the RADIO switch to turn off the radio. The radio function will be automatically off when the low battery indicator is displayed. Replace old batteries or connect to AC adapter.
12