INSTALLATION INSTRUCTIONS

5.Remove the screw on the right hand side of the burner and gently slide the burner off the injector.

6.Using a 7mm socket, replace the grill injector as appropriate (see table on previous page).

7.Re-assemble the burner and baffle.

8.Inside the top oven, remove the central screw securing the burner retainer. Slide the retainer to the right slightly and lift away.

9.Lift the burner assembly and place on the floor of the oven to the right of the burner opening.

10.Using a 7mm socket, replace the oven injector as appropriate (see table on previous page).

11.Re-assemble the oven burner and retainer.

12.Replace the main oven injector following the same procedure as for the top oven.

13.From behind the cooker, remove the screws securing the rear panel and swing the left hand side outwards (viewed from the rear) to gain access to the main oven flame supervision device.

14.Replace the flame supervision device bypass screw.

15.Re-assemble the rear panel.

16.Carefully pull off the control knobs and timer buttons.

17.Remove the 2 screws securing the underside of the control panel. Slide the control panel to the left slightly to remove.

18.Remove the 6 screws securing the timer mounting panel. Without completely removing it, manoeuvre the timer mounting panel to gain access to the thermostat bypass screws.

19.Using a narrow flat bladed screwdriver rotate the bypass screws fully clockwise. The main oven thermostat bypass screw is located on the body of the thermostat below the spindle, the top oven thermostat bypass screw is located on the body of the thermostat to the right of the spindle and the hotplate tap bypass screws are located down the centre of the spindle.

20.Re-assemble the control panel parts.

21.Secure the self-adhesive LPG conversion label over the gas details on the data badge.

STABILITY CHAIN

A hole in the gas inlet valve bracket can be used to engage a stability chain.

CONNECTING TO GAS SUPPLY

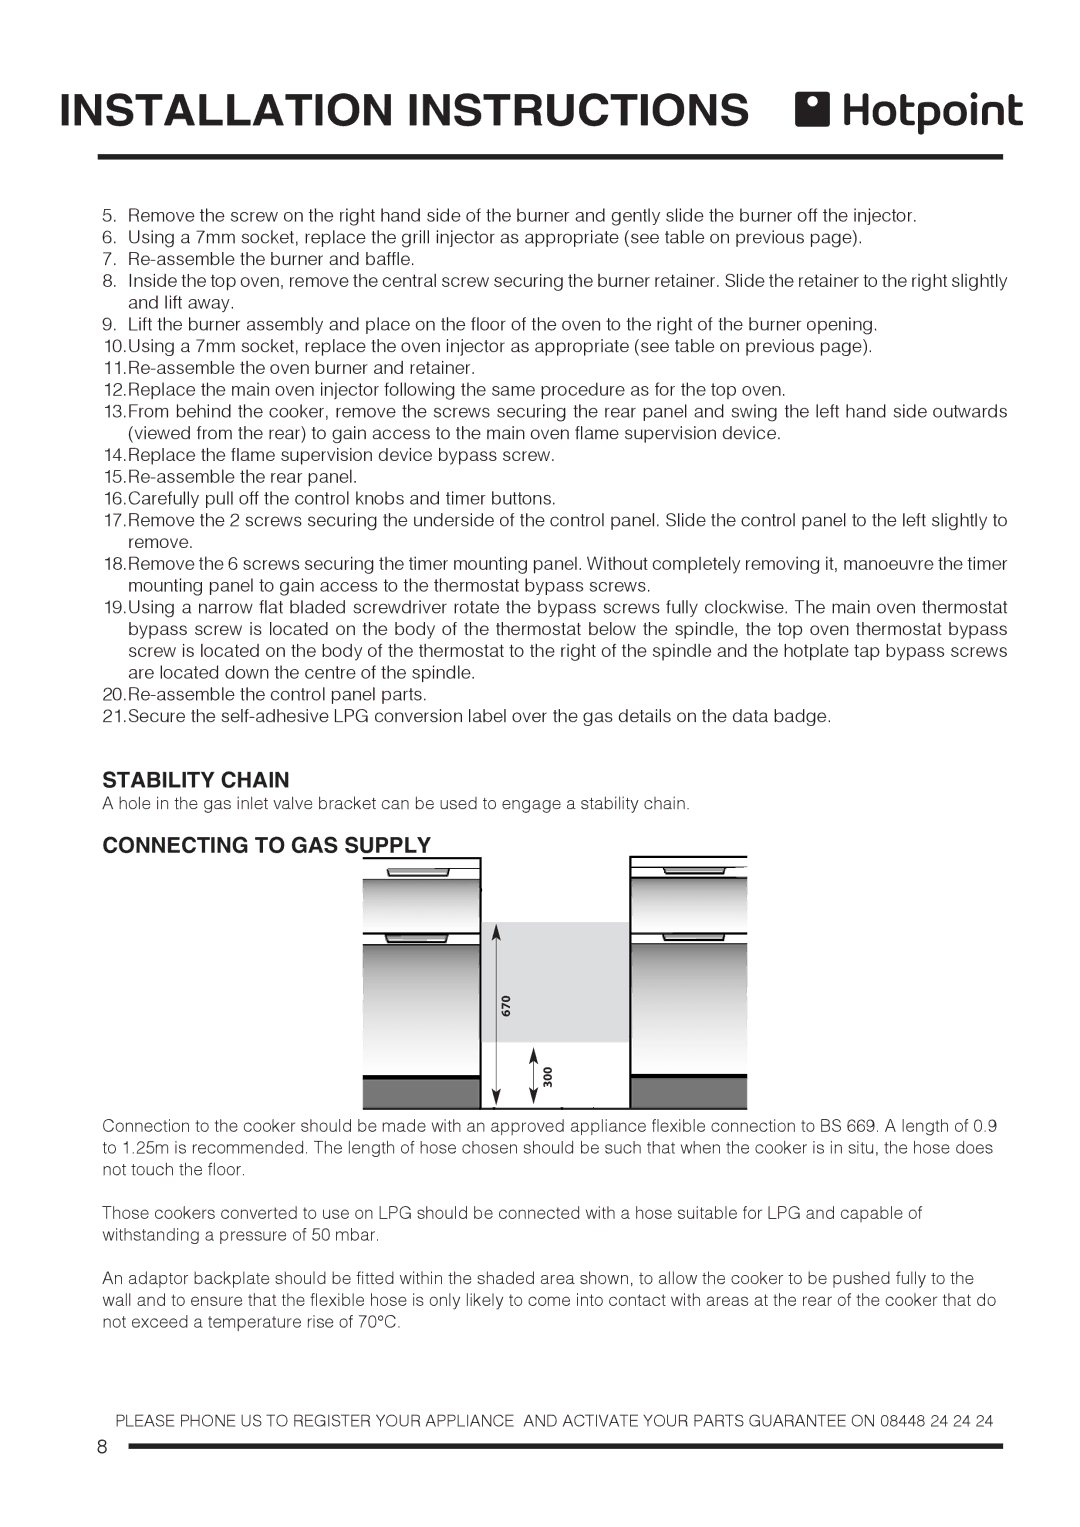
670

300

Connection to the cooker should be made with an approved appliance flexible connection to BS 669. A length of 0.9 to 1.25m is recommended. The length of hose chosen should be such that when the cooker is in situ, the hose does not touch the floor.

Those cookers converted to use on LPG should be connected with a hose suitable for LPG and capable of withstanding a pressure of 50 mbar.

An adaptor backplate should be fitted within the shaded area shown, to allow the cooker to be pushed fully to the wall and to ensure that the flexible hose is only likely to come into contact with areas at the rear of the cooker that do not exceed a temperature rise of 70°C.

PLEASE PHONE US TO REGISTER YOUR APPLIANCE AND ACTIVATE YOUR PARTS GUARANTEE ON 08448 24 24 24

8

Page 8
Image 8
Hotpoint ch60gpcf, ch60gpxf installation instructions Stability Chain, Connecting to GAS Supply

ch60gpcf, ch60gpxf specifications

Hotpoint is a renowned brand in the home appliance industry, known for their high-quality kitchen products that combine efficiency, style, and durability. The Hotpoint models CH60GPXF and CH60GPCF are two versatile dual-fuel cookers that exemplify the brand's commitment to providing a superior cooking experience.

The CH60GPXF is designed for those who appreciate the combination of gas cooking with the precision of electric ovens. One of its standout features is the powerful four-burner gas hob, which allows for quick heating and excellent heat control while cooking. The burners vary in size, ensuring that you can accommodate a variety of pot and pan sizes. The fact that the hob is fitted with enamel supports minimizes cleaning time and keeps your kitchen looking pristine.

The electric ovens in the CH60GPXF offer a range of cooking functions, including conventional cooking and fan-assisted options. The fan oven circulates hot air evenly throughout the cavity, ensuring that food cooks uniformly. Moreover, the built-in grill function is perfect for achieving that crispy finish on meats and vegetables. Another remarkable feature is the easy clean enamel interior, which simplifies the cleaning process after cooking.

Turning to the CH60GPCF model, it shares many of the same core features but introduces additional technologies to enhance your cooking experience. The CH60GPCF also features a four-burner gas hob, but it may include advanced ignition systems for optimal ease of use, ensuring that you can light your burners with minimal effort.

In terms of design, both models exhibit a modern aesthetic with stainless steel finishes that seamlessly integrate into any kitchen decor. The ergonomic control knobs make it easy to set the temperature and cooking modes, while the large, double-glazed oven doors provide an excellent view of your cooking progress without opening the oven and losing heat.

Energy efficiency is another key characteristic of both cookers, helping users save on energy costs while reducing their environmental impact. With a blend of functionality, style, and efficiency, the Hotpoint CH60GPXF and CH60GPCF are ideal choices for culinary enthusiasts looking for reliable cookers that deliver outstanding performance in any kitchen setting. Whether you are preparing a simple family meal or hosting a dinner party, these models provide the versatility and technology needed to make cooking enjoyable and hassle-free.