Electrical Connection
The electrical connection to the mains must be made on the appliance. The power voltage and frequency are as indicated on the rating plate.
!THIS APPLIANCE MUST BE EARTHED. Fitting the power supply cable
Unplug the appliance before all operations, even
when replacing the oven lamp.GB Using the appliance without correct earthing is highly dangerous.
!After connecting the appliance to the flexible cable, tighten all the screws on the terminal board.
APPLIANCE SPECIFICATIONS
Dimensions* | width 43.5 cm |
height 32,4 cm |
L |
N
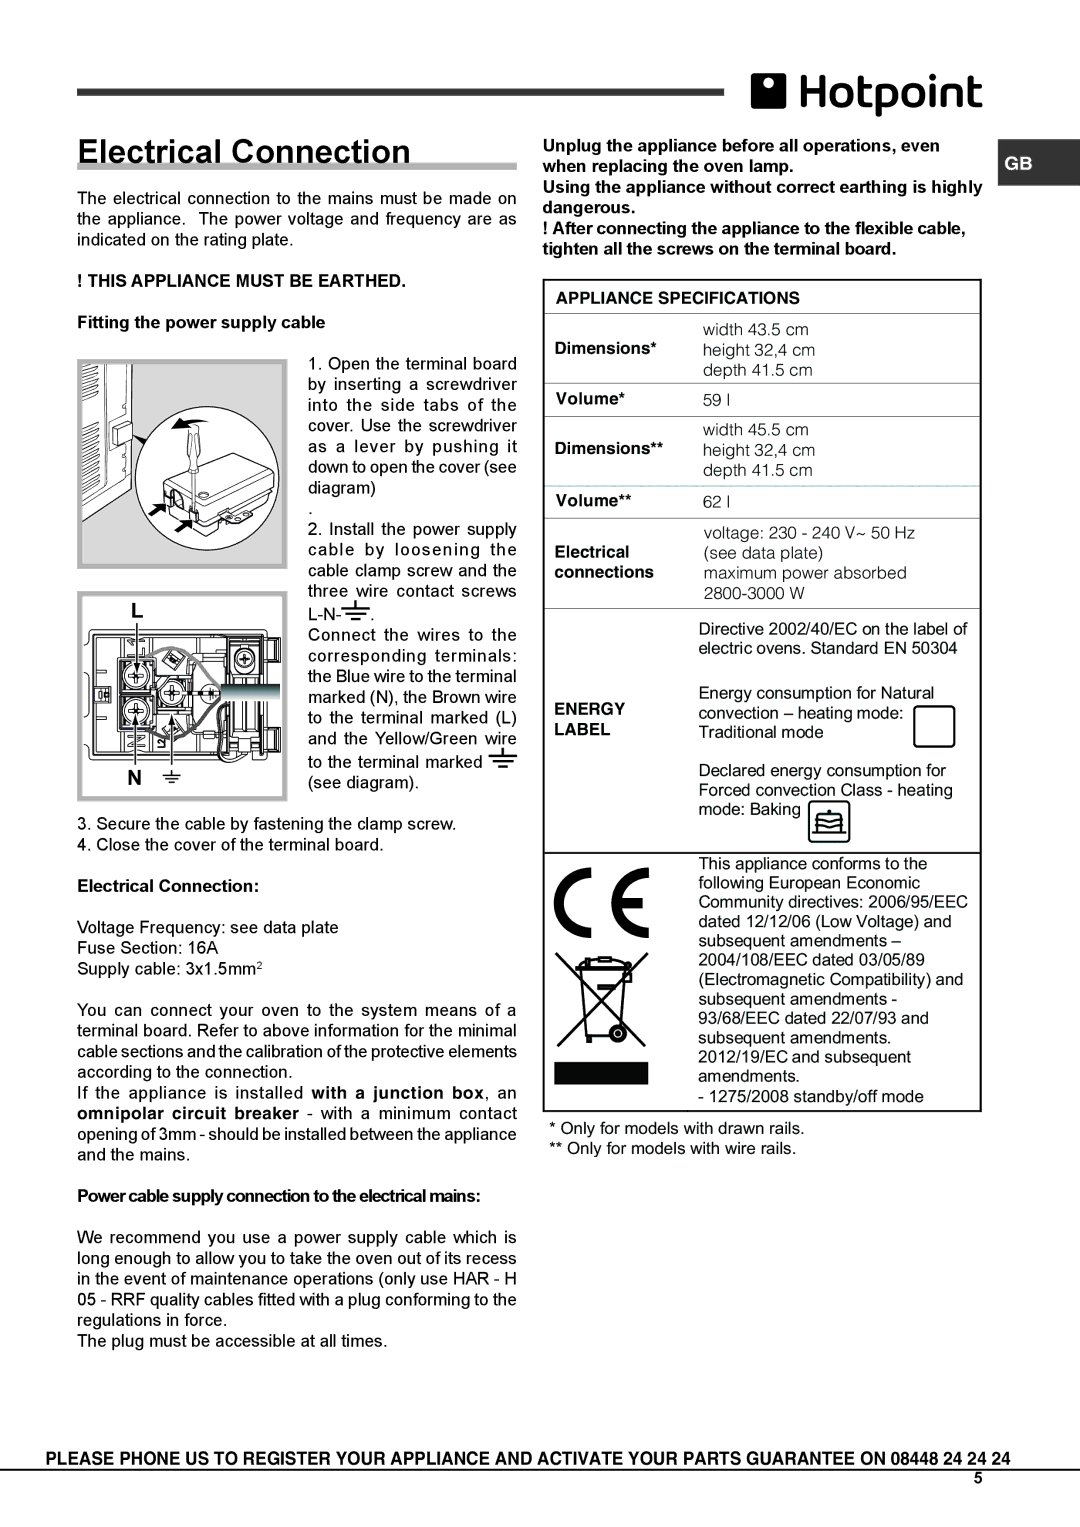
1.Open the terminal board by inserting a screwdriver into the side tabs of the cover. Use the screwdriver as a lever by pushing it down to open the cover (see diagram)
.
2.Install the power supply cable by loosening the cable clamp screw and the three wire contact screws
![]() .
.
Connect the wires to the corresponding terminals: the Blue wire to the terminal marked (N), the Brown wire to the terminal marked (L) and the Yellow/Green wire
to the terminal marked  (see diagram).
| depth 41.5 cm |
|
|
Volume* | 59 l |
|
|
Dimensions** | width 45.5 cm |
height 32,4 cm | |
| depth 41.5 cm |
|
|
Volume** | 62 l |
|
|
Electrical | voltage: 230 - 240 V~ 50 Hz |
(see data plate) | |
connections | maximum power absorbed |
| |
|
|
| Directive 2002/40/EC on the label of |
| electric ovens. Standard EN 50304 |
ENERGY | Energy consumption for Natural |
convection – heating mode: | |
LABEL | Traditional mode |
| Declared energy consumption for |
| Forced convection Class - heating |
| mode: Baking |
3.Secure the cable by fastening the clamp screw.
4.Close the cover of the terminal board.
Electrical Connection:
Voltage Frequency: see data plate
Fuse Section: 16A
Supply cable: 3x1.5mm2
You can connect your oven to the system means of a terminal board. Refer to above information for the minimal cable sections and the calibration of the protective elements according to the connection.
If the appliance is installed with a junction box, an omnipolar circuit breaker - with a minimum contact opening of 3mm - should be installed between the appliance and the mains.
Power cable supply connection to the electrical mains:
We recommend you use a power supply cable which is long enough to allow you to take the oven out of its recess in the event of maintenance operations (only use HAR - H 05 - RRF quality cables fitted with a plug conforming to the regulations in force.
The plug must be accessible at all times.
This appliance conforms to the |
following European Economic |
Community directives: 2006/95/EEC |
dated 12/12/06 (Low Voltage) and |
subsequent amendments – |
2004/108/EEC dated 03/05/89 |
(Electromagnetic Compatibility) and |
subsequent amendments - |
93/68/EEC dated 22/07/93 and |
subsequent amendments. |
2012/19/EC and subsequent |
amendments. |
-1275/2008 standby/off mode
*Only for models with drawn rails.
**Only for models with wire rails.
PLEASE PHONE US TO REGISTER YOUR APPLIANCE AND ACTIVATE YOUR PARTS GUARANTEE ON 08448 24 24 24
5
