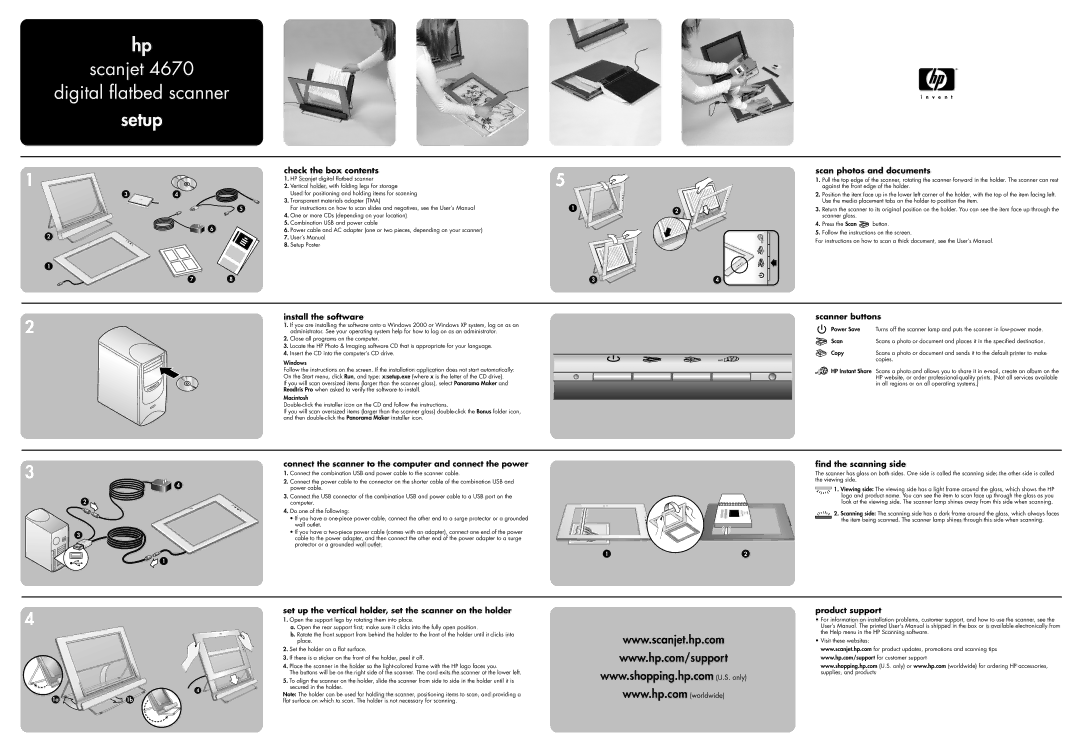
hp
scanjet 4670
digital flatbed scanner
setup
check the box contents
1 |
| 1. | HP Scanjet digital flatbed scanner |
| 2. | Vertical holder, with folding legs for storage | |
3 | 4 |
| Used for positioning and holding items for scanning |
|
| 3. | Transparent materials adapter (TMA) |
|
| 5 | For instructions on how to scan slides and negatives, see the User’s Manual |
|
| 4. | One or more CDs (depending on your location) |
| 6 | 5. | Combination USB and power cable |
2 | 6. Power cable and AC adapter (one or two pieces, depending on your scanner) | ||
| 7. User’s Manual | ||
|
| 8. | Setup Poster |
1
78
5
1 | 2 |
|
3 | 4 |
scan photos and documents
1.Pull the top edge of the scanner, rotating the scanner forward in the holder. The scanner can rest against the front edge of the holder.
2.Position the item face up in the lower left corner of the holder, with the top of the item facing left. Use the media placement tabs on the holder to position the item.
3.Return the scanner to its original position on the holder. You can see the item face up through the scanner glass.
4.Press the Scan ![]() button.
button.
5.Follow the instructions on the screen.
For instructions on how to scan a thick document, see the User’s Manual.
install the software
2 | 1. | If you are installing the software onto a Windows 2000 or Windows XP system, log on as an |
| administrator. See your operating system help for how to log on as an administrator. | |
| 2. | Close all programs on the computer. |
| 3. | Locate the HP Photo & Imaging software CD that is appropriate for your language. |
| 4. | Insert the CD into the computer’s CD drive. |
Windows
Follow the instructions on the screen. If the installation application does not start automatically:
On the Start menu, click Run, and type: x:setup.exe (where x is the letter of the CD drive).
If you will scan oversized items (larger than the scanner glass), select Panorama Maker and
ReadIris Pro when asked to verify the software to install.
Macintosh
If you will scan oversized items (larger than the scanner glass)
scanner buttons
Power Save | Turns off the scanner lamp and puts the scanner in |
Scan | Scans a photo or document and places it in the specified destination. |
Copy | Scans a photo or document and sends it to the default printer to make |
| copies. |
HP Instant Share | Scans a photo and allows you to share it in |
| HP website, or order |
| in all regions or on all operating systems.) |
3 |
| connect the scanner to the computer and connect the power | |
| 1. | Connect the combination USB and power cable to the scanner cable. | |
|
| ||
| 4 | 2. | Connect the power cable to the connector on the shorter cable of the combination USB and |
|
| power cable. | |
|
|
| |
3.Connect the USB connector of the combination USB and power cable to a USB port on the
2 | computer. |
|
| 4. Do one of the following: |
|
| • If you have a |
|
| wall outlet. |
|
3 | • If you have a |
|
cable to the power adapter, and then connect the other end of the power adapter to a surge |
| |
|
| |
| protector or a grounded wall outlet. |
|
| 1 | 2 |
| 1 |
|
find the scanning side
The scanner has glass on both sides. One side is called the scanning side; the other side is called the viewing side.
![]() 1. Viewing side: The viewing side has a light frame around the glass, which shows the HP
1. Viewing side: The viewing side has a light frame around the glass, which shows the HP ![]()
![]() logo and product name. You can see the item to scan face up through the glass as you look at the viewing side. The scanner lamp shines away from this side when scanning.
logo and product name. You can see the item to scan face up through the glass as you look at the viewing side. The scanner lamp shines away from this side when scanning.
2. Scanning side: The scanning side has a dark frame around the glass, which always faces the item being scanned. The scanner lamp shines through this side when scanning.
set up the vertical holder, set the scanner on the holder
4 |
|
| 1. | Open the support legs by rotating them into place. |
|
|
| a. Open the rear support first; make sure it clicks into the fully open position. | |
|
|
|
| b. Rotate the front support from behind the holder to the front of the holder until it clicks into |
|
|
|
| place. |
|
|
| 2. | Set the holder on a flat surface. |
|
|
| 3. | If there is a sticker on the front of the holder, peel it off. |
|
|
| 4. | Place the scanner in the holder so the |
|
|
|
| The buttons will be on the right side of the scanner. The cord exits the scanner at the lower left. |
|
|
| 5. | To align the scanner on the holder, slide the scanner from side to side in the holder until it is |
|
| 4 |
| secured in the holder. |
|
| Note: The holder can be used for holding the scanner, positioning items to scan, and providing a | ||
1a | 1b |
| ||
| flat surface on which to scan. The holder is not necessary for scanning. | |||
www.scanjet.hp.com
www.hp.com/support
www.shopping.hp.com (U.S. only)
www.hp.com (worldwide)
product support
•For information on installation problems, customer support, and how to use the scanner, see the User’s Manual. The printed User's Manual is shipped in the box or is available electronically from the Help menu in the HP Scanning software.
•Visit these websites:
www.scanjet.hp.com for product updates, promotions and scanning tips www.hp.com/support for customer support
www.shopping.hp.com (U.S. only) or www.hp.com (worldwide) for ordering HP accessories, supplies, and products