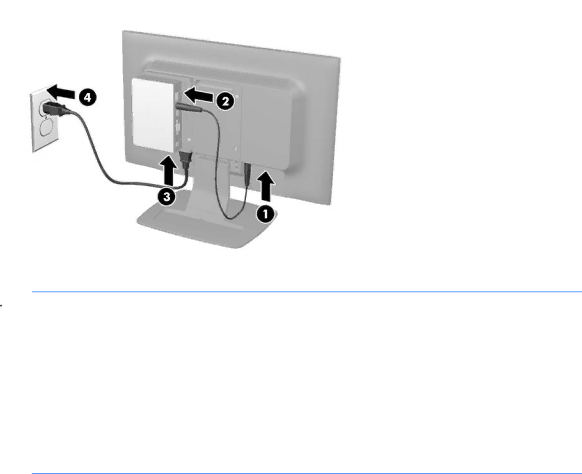
4.Connect the DC power cable to the DC OUT connector on the monitor (1) and into the power connector on the HP t150 or HP t200 Zero Client for MultiSeat (2), and then plug one end of the power cord into the AC power connector on the back of the monitor (3), and the other end into an electrical wall outlet (4).
Figure 2-10 Connecting the DC Power Cable and the Power Cord
![]() WARNING! To reduce the risk of electric shock or damage to the equipment:
WARNING! To reduce the risk of electric shock or damage to the equipment:
Do not disable the power cord grounding plug. The grounding plug is an important safety feature.
Plug the power cord into a grounded (earthed) electrical outlet that is easily accessible at all times.
Disconnect power from the equipment by unplugging the power cord from the electrical outlet.
For your safety, do not place anything on power cords or cables. Arrange them so that no one may accidentally step on or trip over them. Do not pull on a cord or cable. When unplugging from the electrical outlet, grasp the cord by the plug.
To operate the HP t150 or t200 Zero Client for MultiSeat, refer to the documentation provided with the HP MultiSeat Desktop Computer.
Mounting a Thin Client to the Monitor with the HP Quick Release
You can attach a thin client to the LE1852ms monitor using the HP Quick Release included with the monitor.
1.Attach the Quick Release to the back of the monitor using the 4 screws to secure the quick release to the VESA mounting holes on the monitor.
Mounting a Thin Client to the Monitor with the HP Quick Release | 9 |