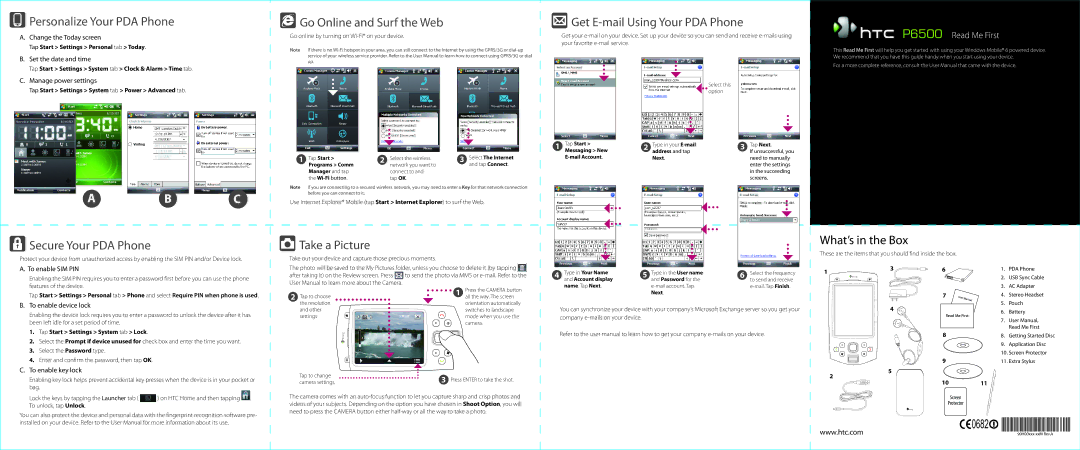
Personalize Your PDA Phone

A.Change the Today screen

Tap Start > Settings > Personal tab > Today.

B.Set the date and time

Tap Start > Settings > System tab > Clock & Alarm > Time tab.

C.Manage power settings

Tap Start > Settings > System tab > Power > Advanced tab.

Go Online and Surf the Web

Go online by turning on Wi-Fi® on your device.

Note If there is no Wi-Fi hotspot in your area, you can still connect to the Internet by using the GPRS/3G or dial-up service of your wireless service provider. Refer to the User Manual to learn how to connect using GPRS/3G or dial up.

Get E-mail Using Your PDA Phone

Get your e-mail on your device. Set up your device so you can send and receive e-mails using your favorite e-mail service.

Select this option

P6500 Read Me First

This Read Me First will help you get started with using your Windows Mobile® 6 powered device. We recommend that you have this guide handy when you start using your device.

For a more complete reference, consult the User Manual that came with the device.

AB C

Secure Your PDA Phone

Protect your device from unauthorized access by enabling the SIM PIN and/or Device lock.

A. To enable SIM PIN

Enabling the SIM PIN requires you to enter a password first before you can use the phone features of the device.

Tap Start > Settings > Personal tab > Phone and select Require PIN when phone is used.

1

Tap Start >

2

Select the wireless

3

Select The Internet


Programs > Comm


network you want to


and tap Connect.


Manager and tap


connect to and


the Wi-Fibutton.


tap OK.


Note If you are connecting to a secured wireless network, you may need to enter a Key for that network connection before you can connect to it.

Use Internet Explorer® Mobile (tap Start > Internet Explorer) to surf the Web.

Take a Picture

Take out your device and capture those precious moments.

The photo will be saved to the My Pictures folder, unless you choose to delete it (by tapping

after taking it) on the Review screen. Press to send the photo via MMS or e-mail. Refer to the User Manual to learn more about the Camera.

2

Tap to choose

1

Press the CAMERA button


all the way. The screen

1

Tap Start >


Messaging > New

E-mail Account.

4

Type in Your Name


and Account display

name. Tap Next.

2 Type in your E-mail address and tap Next.

5

Type in the User name


and Password for the

e-mail account. Tap Next.

3 Tap Next.

If unsuccessful, you need to manually enter the settings in the succeeding screens.

6

Select the frequency


to send and receive

e-mail. Tap Finish.

What’s in the Box

These are the items that you should find inside the box.

11

3 3

6 6


7 7

1.

PDA Phone

2.

USB Sync Cable

3.

AC Adapter

4.

Stereo Headset

B.To enable device lock

Enabling the device lock requires you to enter a password to unlock the device after it has been left idle for a set period of time.

1.Tap Start > Settings > System tab > Lock.

2.Select the Prompt if device unused for check box and enter the time you want.

3.Select the Password type.

4.Enter and confirm the password, then tap OK.

C.To enable key lock

Enabling key lock helps prevent accidental key presses when the device is in your pocket or bag.

Lock the keys by tapping the Launcher tab ( ) on HTC Home and then tapping . To unlock, tap Unlock.

the resolution

orientation automatically

and other

switches to landscape

settings

mode when you use the


camera.

Tap to change

3 Press ENTER to take the shot.

camera settings.

The camera comes with an auto-focus function to let you capture sharp and crisp photos and videos of your subjects. Depending on the option you have chosen in Shoot Option, you will need to press the CAMERA button either half-way or all the way to take a photo.

You can synchronize your device with your company’s Microsoft Exchange server so you get your company e-mails on your device.

Refer to the user manual to learn how to get your company e-mails on your device.


4 4

Read Me First


8


8


9


2

5


5


2

10

11


Screen

Protector

5.

Pouch

6.

Battery

7.

User Manual,


Read Me First

8.

Getting Started Disc

9.

Application Disc

10. Screen Protector

11. Extra Stylus

You can also protect the device and personal data with the fingerprint recognition software pre- installed on your device. Refer to the User Manual for more information about its use.

www.htc.com

90H00xxx-xxM Rev.A

Page 1
Image 1
HTC P6500 user manual Personalize Your PDA Phone, Go Online and Surf the Web, Get E-mail Using Your PDA Phone

P6500 specifications

The HTC P6500, released in the mid-2000s, was a device that marked HTC's significant evolution in the realm of mobile technology. Known for its robust features and user-friendly interface, the P6500 was primarily aimed at business users who sought functionality without compromising on style.

One of the standout features of the HTC P6500 was its integration of Windows Mobile. This operating system not only provided a familiar platform for users transitioning from PCs but also allowed for the seamless synchronization of Outlook, thus ensuring that users could access their emails, contacts, and calendars effortlessly. The device was equipped with a 3.5-inch touchscreen display, which was considered large for its time, allowing for intuitive navigation through its various applications and features.

The HTC P6500 boasted a powerful processor, enhancing its performance and enabling a smooth user experience. With its built-in Wi-Fi connectivity, users could access the internet on-the-go, making it easier for business professionals to stay connected during meetings or while traveling. Additionally, HTC included Bluetooth technology, which allowed for wireless connections to headsets and other devices, further emphasizing the device's business-oriented design.

Memory was another feature where the P6500 excelled, featuring expandable storage options through a microSD slot. This meant that users could increase their device's capacity to store important documents, presentations, and multimedia files, thus catering to the needs of professionals who relied on their mobile devices for productivity.

In terms of multimedia capabilities, the P6500 had a built-in 3-megapixel camera, enabling users to capture images and video during their workday. The device's battery life was also commendable, providing ample usage time for those who needed to be productive throughout the day without frequent charging.

On the aesthetic front, the HTC P6500 showcased a sleek and sturdy design, often praised for its ergonomic build that enhanced the overall user experience. The combination of functionality, performance, and style made the HTC P6500 a notable player in the market during its time.

In summary, the HTC P6500 was a well-rounded device combining advanced technologies with user-centric features. Its emphasis on business functionality, connectivity, and multimedia capabilities set a benchmark for future HTC devices and contributed to the brand's reputation for quality mobile solutions.